Up next in 10

Manifest.build INSANE AI Backend Builder to Instantly Ship Apps For Cursor & Github Copilot in CMD
Aug 7, 2025
Get the full source code of application here:
Show More Show Less View Video Transcript
0:00
Uh hello guys, welcome to this video. So
0:02
in this video, I'll show you a coding
0:05
backend builder for AI code editors. So
0:08
many a times a AI code editors can
0:11
generate the front end very easily. They
0:13
can write the code. But when it comes to
0:15
back end, it's very difficult to
0:16
generate the data for your back end of
0:18
your application. So there is a tool in
0:20
the market which is manifest.build.
0:23
If you go to the browser, simply type
0:25
this address and this will be the tool
0:28
which come right here. It's an
0:29
open-source tool and it basically builds
0:32
out your back end automatically if
0:34
you're building an application using the
0:36
AI code editor such as cursor, GitHub
0:39
copilot, winds surf or inside the
0:42
terminal as well. So this is the command
0:44
it gives you simply execute this command
0:46
npx create manifest at the rate latest
0:50
and automatically from a single yiml
0:53
file you simply write what sort of data
0:56
you want to generate and automatically
0:58
this will build out your back end
1:01
using if you're using cursor this is the
1:03
cursor command if you're using github
1:05
copilot then this is this command so if
1:09
you are using the terminal simply copy
1:11
this command
1:13
And you simply go
1:15
and uh open your terminal if you inside
1:20
and simply paste this command.
1:27
So just go to the terminal make sure
1:30
that you have NodeJS installed and
1:33
simply enter. So as soon as you do this
1:36
you will see it will say need to install
1:38
the following packages. Simply press Y
1:41
and uh now this will install this
1:44
package for you. So once it is installed
1:47
you can actually generate the back end a
1:49
complete back end that fits in a one
1:52
file of code.
1:54
So
1:58
so this is completely open source. This
2:01
is their documentation which is given
2:02
stepby-step instruction is there. If
2:05
you're using cursor IDE, so this is
2:07
actually the project. Simply create
2:10
this.
2:13
So stepby-step instructions are given.
2:16
So this is completely open source. It
2:19
doesn't cost anything. Definitely check
2:21
out this manifest.bu.
2:23
It's basically will build out your back
2:25
end in a
2:28
so in this easy way. What name would you
2:31
like to use for the new workspace? So
2:32
just give it a name here. Let me say
2:35
sample.
2:39
So now it is see it is creating your
2:41
project creating the package.json file.
2:45
So now it created this uh back end for
2:49
you. So you can see that
2:53
if you're using GitHub copilot there's
2:55
this command given.
3:02
So once it is complete you can actually
3:04
run this application as well. It's very
3:07
simple.
3:10
You simply say npm run start. So this
3:13
will start your application. So just
3:15
wait for the dependencies to install.
3:19
So it's very easy whenever you are
3:21
developing any sort of application. It's
3:23
very easy to develop the back end using
3:26
this tool.
3:31
So you can see it is automatically
3:33
adding the environment variables
3:35
building your database
3:37
in a single file. So that will actually
3:41
solve a lot of problem. When it comes to
3:44
back end automatically the backend will
3:47
be created. So you will see manifest
3:48
successfully installed. To start the
3:51
server, you simply go to the folder
3:55
cd sample
3:59
and just say npm run start.
4:08
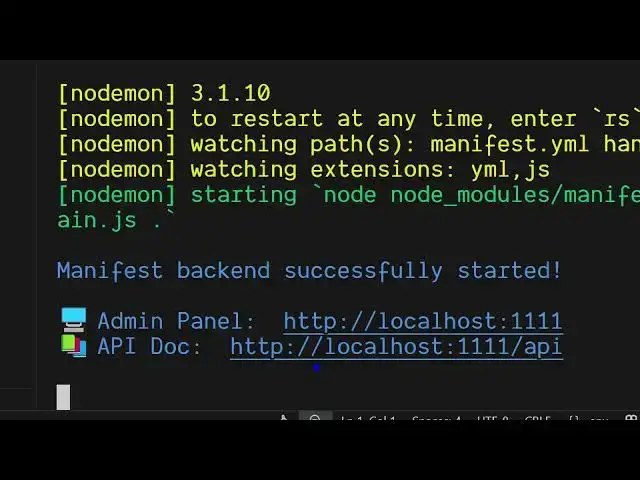
So now you can see automatically your
4:11
back end has successfully started. Uh
4:13
this is actually the admin pal that
4:16
gives you. So if you simply type the
4:18
address localhost.
4:28
So this is your simple application. You
4:31
provide the email and the password. Just
4:34
login right here. And inside the
4:36
collections here you will see you have
4:40
this 50 collections. You can even add a
4:43
new creative owner. Simply type the name
4:46
here. So this gives you the sample
4:48
database sample back end for you. So you
4:51
can see the owner has been created
4:52
successfully. So now inside the owner
4:56
section cat section you can create a new
4:59
cat as well. Click on create new cat. So
5:02
this is the admin section right here.
5:05
You can create a new admin. Just enter
5:07
the email address. So let's suppose I
5:10
say geeky197
5:14
at the redgmail.com
5:16
and password let me say 1 2 3 4 5 6 and
5:20
simply say submit. So now you can see
5:23
the admin has been created successfully.
5:25
So now inside we have two admins.
5:28
So you can see that. So in this easy way
5:32
guys this is the tool here
5:34
manifest.build build and you can use it
5:36
with any AI provider as well, GitHub
5:38
copilot or cursor. So this gives you
5:41
this API as well. So localhost
5:46
/ API. So if you go to the browser
5:49
section, simply type localhost
5:54
1111 / API.
5:58
So this is your API section right here.
6:00
So right here you can be able to create
6:02
a new owner.
6:04
So these are all the requests which are
6:06
supported. Get put patch delete for
6:09
every collection either cat home
6:12
content. So this is a complete backend
6:15
solution guys. If you're developing your
6:17
application if you want to develop the
6:19
back end very quickly then this
6:21
manifest.build is a great solution.
6:23
Definitely check it out and you can even
6:25
integrate with the GitHub copilot or
6:27
cursor as well. So all those commands
6:30
are given right here.
6:33
So if you're building it using a AI
6:36
provider, so for GitHub copilot, this is
6:38
a command here. For cursor, this is a
6:41
command. So definitely check out this
6:43
project and also check out my website
6:46
freemediatools.com
6:48
uh which contains thousands of tools.
#Programming
#Open Source