Up next in 10

Build a Python Django Google OAuth2 Login and Logout System With Sessions in Browser
Jan 9, 2025
Buy the full source code of application here:
https://procodestore.com/index.php/product/build-a-python-django-google-oauth2-login-and-logout-system-with-sessions-in-browser/
Show More Show Less View Video Transcript
0:00
uh hello guys welcome to this video so in this video we will look at how to actually integrate the Google
0:07
authentication Google login and logout system with sessions inside Jango application Jango is actually a
0:15
framework of python which allows you to build a applications it's a very popular framework and we will be showing you how
0:21
to actually integrate the Google authentication o to login and show these profile details of a logged in user you
0:28
will see this is actually showing the username display name email address and also a log out button as well inside
0:35
this uh window and if I click log out here I will be successfully log out right here and I will be redirected back
0:41
to the login page so you can now see there is a login with Google button right here if I close this window it
0:48
will automatically redirect me to the login page it will automatically detect I'm already logged off so you can see
0:54
login with Google button is showing right here so if I just simply click this button what should happen it will
1:01
go to the profile page it will log me in and now you can see if I close this window once again reopen go to Local
1:08
Host 800 Board number it will detect that I'm already logged in and it will
1:13
actually redirect me to the profile page where I can see the display name email address
1:20
and I can even show for a different account as well if I [Music]
1:26
now go to Local Host 800 so you can now see this is actually a
1:32
different account right here I can log out I show for this
1:39
account so you can actually try out for any account right here you should have a Google account for that to try out just
1:47
go to Local Host 800 so now this is actually the button
1:53
so if you are doing it for the very first time it will actually show you this account screen right here as you
1:58
click the login with Google button then it will redirect you to the consent screen where you can actually select
2:03
your Google account right here so as I select the Google account you will need to redirect just allow the permissions
2:10
so this you need to do it for the very first time if your our account is new you just need to Grant the permission as
2:16
you grant the permission right here your display name email address will be fed
2:21
and now it is it will be displayed it right here in the browser so if I close
2:27
this here and once again go to the same page you will
2:32
see it will automatically detect that I'm already logged in so it is automatically redirected me to the
2:37
profile page you will see that so we also have the log out button if I click the log out button I will be log out
2:43
here but once again if I click login with Google I don't need to redirect and select my account it will remember me
2:50
and I can directly log in right here so this is actually the sessions we are also using S sessions in Jango you'll
2:58
see as I close the the browser it will automatically redirect me to the it will automatically detect I'm already logged
3:05
in so it will storing information in the form of sessions in Django application so I will show you so one such package
3:12
is available in Django which is actually called as show social or app Jango this
3:19
is actually the name of the package that we are using for this application so we are using this package
3:27
here pip install social or app Jango so this is actually the
3:33
command for installing this module so this is actually the source code for this project I will show you step by-
3:40
step instruction on how to build this D Jango project and integrate Google login so if you're interested in purchasing
3:46
the source code with full documentation and support you can go to the description of the link in the video you
3:51
will find out the payment link from Pro Cod store.com you can purchase the full source code after you purchase it you
3:56
will be redirected to Google Drive where you can actually get this ZIP file from Google Drive
4:02
after you make the payment so I will show you step by step instruction guys how to build this project and how to
4:07
integrate Google Google login so we will look at it in the next section so now to
4:13
get started guys we are actually here in my current working directory so what I
4:18
will do I will CD into this directory and I will make a new directory right
4:23
here and uh or I can basically build out the Django project so you should have
4:29
Jango installed on your machine so if you don't know about Jango it's actually a framework of python it's very famous
4:36
framework for building web applications this is their official website Jango makes it easier to build better web
4:42
applications more quickly and with less code so it's a high level framework and it basically comprises a built-in
4:49
features which is admin panel everything is built in inside Jango and you should
4:55
first of all install this framework by using this command pip install Jango so
5:02
this is actually the command let me zoom in so pip install Django so just first
5:07
of all install this package if you are not installed it so once you install this there is actually a command line
5:13
command to actually build out ajango project which is Jango admin so Jango
5:18
admin comes with the command for creating project for everything so D Jango admin followed by there is a
5:25
command right here for creating a project high level project this is the start project Command right here and
5:32
followed by your actual project name so let me call this as Google o or to
5:38
project this is actually my project name Jango admin start project followed by
5:44
the name of the project so simply enter it so it will actually create your project so now you just need to CD onto
5:51
the project name which is Google or to project
6:01
so if I should show you the directory structure of a basic D Jango project if you create it using this command it will
6:07
look something like this there will be this manage.py file so we actually call this file to actually start the Jango
6:14
web server on port number 800 and then this is actually the high level project files in it. py is empty
6:21
you don't need to worry about it this is also another file this is actually the
6:27
high level settings file of your Jango project so here we will be making some changes for integrating that uh
6:34
framework that we will do urls.py which actually corresponds to all the URL
6:41
routes that you will do inside your Jango app and that's all so these are some of the files of the project files
6:47
so now to start this server it's very easy you actually call this manage file
6:55
python manage.py run server so this is actually the command python manage py
7:02
run server it will actually start your Local Host 800 so you will see that
7:08
so it actually started the server so we can navigate to this address Local Host
7:15
800 so you will see that it will actually I I think it's already running
7:21
it that's why it is so what we can do again we can run this
7:31
so you can see that this is actually the page that you will see for a newly created Django project so this is their
7:38
welcome page so now if you want to run it on a different port number as well you can
7:44
even provide a different port number as well I think there is this Command right here after that you need to provide the
7:50
port number Port is equal to 801 you can even provide a different
7:56
port number as well if you don't want to run it on 800
8:02
uh I think 8001 directly you need to pass so now it will actually run this on
8:11
8001 so if you want a different port number simply provide it as an argument so now it will actually shift this to
8:19
8001 so you can change your port number as well so now we will look at guys how to actually integrate that package that
8:26
we told you earlier this is actually the command for installing that package which is uh pip install social or app
8:35
Django this is actually the package guys that we need to install for actually uh integrating the Google o to
8:44
login so simply install this package and I have already installed it so now the
8:51
first thing you need to do you need to go to this settings file which is this it is located right here settings.py
8:58
file and and here you need to first of all tell Jango you we need to create a
9:05
in the directory section right here right here just in the template section
9:12
right here by default every Jango app has its own template but we will be
9:17
creating a templates folder right here for telling it you just need to in the
9:23
D's folder right here it's an empty array right here but here we need to Simply import the operating system
9:29
module at the top right here so just import the operating system module and right here
9:34
we need to tell Jango that we need to have a high level templates folder so operating
9:40
system path join and here we need to tell the base directory and it will be located in the
9:48
templates folder so we need to create a templates folder where we will be actually storing all our templates which
9:54
is a login page profile page so we actually tell Jango that they should
9:59
look in the templates folder so we can now create a high level templates folder right
10:05
here so inside the templates folder we will have our login page login. HTML and
10:11
the profile page profile. HTML so these things you need to do just create a templates folder just create login. HTML
10:18
profile. HTML and now in the settings.py we simply tell Django that we already
10:23
created this templates folder so just look right here after this what we need to do we we need to in installed app so
10:31
every Jango project consists of different apps as you all know we can also create our custom apps as well if
10:38
you have a really large project if you can split your functionality into different apps so for this module that
10:44
we installed right here for integrating the Google login there is one app that we need to just in single quotes you
10:52
just need to say social uncore Jango so this is actually the name of that app that we installed
10:59
so social _ Django so simply add this inside this installed apps array and
11:04
also inside middleware array we also need to add one more middleware which is
11:10
a built-in middleware social Django do
11:15
middleware do social o
11:21
exception middleware so this is the thing guys
11:26
basically we have added this middleware social Django
11:32
middleware so this is the name of the middleware so we have added this also so
11:38
after this just go to the bottom of the file and here we need to add some settings for our plugin so we are
11:45
basically adding the settings for O2 Google login plugin that we installed so
11:52
the first setting setting is authentication backends so we just need
11:58
to add this this will be actually an object sorry this will be a parenthesis
12:05
right here and here we need to add two backends social core backends do google.
12:13
gooogle so you just need to copy paste the same code that guys that I'm doing right here so these is actually the
12:20
authentication backends which is required for integrating the Google login and secondly we have the Jango
12:28
cont contri do. backends do model backend
12:35
that's all these are the two authentication backends that we actually have added at the
12:42
top this is required and then after this we need to ask some constants first
12:50
constant here will be social o Google O2
12:55
key so this will be actually the client ID and the client secret that you will
13:02
get from Google Cloud console and then social op Google
13:08
o to secret so these are the two different
13:14
values guys that you will get once you sign up on Google Cloud console and create a diff a project here and get
13:21
your credentials so which is actually this is client ID that you will get and this is client secret I will tell you
13:27
step by step how to get this this information and then we we need to
13:33
provide the redirect URI social or so as I already told you guys u in
13:41
Jango you don't need to build everything from scratch it's a high level framework
13:46
so that's why everything is built it some features are already built in in Jango so that's why it's a high level
13:53
framework and uh it's very easy to integrate Google login so you just need to put these constants
13:59
social or Google or to scope so here you need to provide
14:06
which scope that you are requesting from Google so we need the email of the user so I will simply type array email first
14:13
and then the profile so we do need these two things first is the actual email of
14:19
the user secondly we need the profile which includes the display name email address everything so this is actually
14:26
the scope and then we need our redirect Ur social o
14:33
URL underscore namespace and here you will simply tell
14:40
social and just after you provide this this secret and here we also need to
14:45
have social o so these constant that we are naming
14:51
right here guys this needs to be same you can't change the name of the variable so this needs to be named like
14:57
this Al only you can't change the name of these constants so social o Google O2
15:05
and redirect URI so redirect URI is actually the thing whenever you grant
15:10
access to your Google account so Google will redirect to which URL so this URL
15:15
is constant you don't need to change this value so just note down this value Local Host the port number we will start
15:22
here 8001 I will pick 8001
15:27
SL slash complete SLG Google das2 so
15:33
this same redirect URI we will be providing in Google Cloud console as well so I will simply note down this
15:40
simply copy this as well simply copy this so one last thing you also need to
15:47
do login uncore URL this constant you need to put this value to be/ login
15:54
that's all that's all that we need to do guys now we need to get these client ID client secret from Google Cloud console
16:01
so I will simply go to Google Cloud console and simply get these values from
16:07
the dashboard so go to Cloud console and you should have account here it's
16:13
completely free you don't need to pay any sort of money right here it's
16:19
completely free after you create a project go to apis and services go to credentials and right here you need to
16:25
create a client ID so simply click on this button create credentials and go to
16:31
O client ID and right here you need to just enter this information which is
16:38
application type is web application we are developing web application and then authorized JavaScript Origins this is
16:44
actually the homepage address so we will simply paste HTTP Local Host followed by
16:50
the port number so we are developing it on 801 so this is actually the full address of the
16:56
homepage you don't need a trailing slash so ulate that this will look something
17:01
like this so copy this and in the authorized redirect URI so we'll simply paste the complete redirect URI that we
17:08
are using it// complete or2 so this will remain the same so simply copy this also and
17:15
then click on create so now it will give you your client ID and client secret this will be different for you so don't
17:21
copy my client ID and client secret so simply copy this and go to here paste it
17:27
right here and similarly get the client secret and
17:33
paste it that's all so this is all the setup
17:39
is complete guys for setting up this plugin now go close the settings. py
17:44
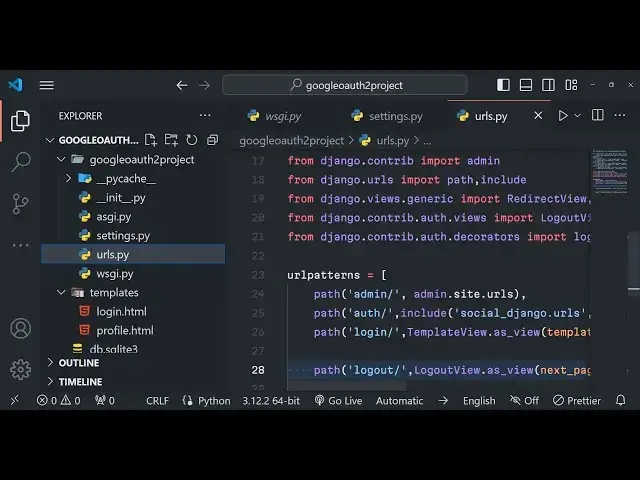
file and now we will go to the file called as urls.py
17:49
so all the things are done guys in a very systematic way in Jango as I
17:54
already told you you don't need to reinvent the wheel everything is built in in Django all the features buil-in
18:00
features so urls.py is the actual file which corresponds to all the routes that
18:05
are used inside your applications such as the homepage whenever someone goes to the homepage whenever someone goes to
18:11
any route so which page will be opening so this file is responsible for that so
18:16
right here in this file what we need to do we need to add some patterns right here so one such P pattern we need to
18:24
write is path we using the path module right here we have imported it you will see already Jango has imported that for
18:30
us so once someone goes to this part or slash we need to include the built-in
18:38
package so this include we need to import it so from just put a comma and
18:44
include this we need to include this package which is social
18:50
Jango do URLs so we are importing this and in the second argument you need to
18:56
provide the name space which is actually called as
19:01
social that's all we have put this so this is required
19:07
for integrating Google login this is actually the package that we have installed so we have included their path
19:13
this is actual all the routes will go which have which containing SL o which
19:20
it will correspond to the social Jango do URLs so secondly when someone goes to
19:27
the uh login page what we need to do right here login slash so we need to
19:32
load a template for loading the template we need to import this from Jango do views. generic we
19:43
need to import the first of all the redirect View and the template view so these two things are built in in Jango
19:50
so whenever you some you want to redirect someone to a different page then this redirect view will come into
19:56
the picture and whenever you need to load a template whenever someone goes to any route this
20:01
will come into the picture so we'll use this template view right here to actually load the login template right
20:07
here so we'll use template View and it actually contains a method which is as View and here we will loading this
20:14
template so we need to give the template name as an argument right here this will
20:20
be login. HTML so it is actually located in the templates folder that you see right here so by default all the
20:26
templates is located in the template folder we have configured this setting early on by going to Der here you will
20:33
see that so everything is systematic in Jango so it will look for this template
20:39
in the templates folder which is login. HTML and in the second argument you also
20:46
need to provide the name parameter so name you can give it
20:52
login put a comma so if you just uh restart your app
20:58
application by default it will get automatically gets restarted so python manage. py run server and we will be
21:06
running it on 8001 so if you go to the if I just uh
21:13
put something in the login page I see here just put H1 right here
21:20
this is the login page
21:25
so if I go to Local Host 8001 if I go to/ login so now you will
21:32
basically see it will actually show me the login page 8001 SL login so now this
21:38
route is opening this template right here this is the login page so in this
21:43
way guys you can actually correspond to any route you can load any template by using this method template view as view
21:50
give it a template name so by default it will look into the templates folder and we load this template in Django so it's
21:57
very easy so now in the same manner we will also be making this route for the
22:03
login page sorry the for the profile page so after you authenticate it we will be showing the profile of the user
22:10
this will be protected route so we will make sure that uh the authenticated
22:16
users must only be viewing the loog profile page so there is a decorator in
22:21
Jango that you can use it's a built-in decorator for this you need to import
22:27
from Jango and
22:33
contrib it is located in O do decorators and this is a built-in decorator which
22:39
is loginor required so by the name itself uh you must be authenticated you
22:45
must be login before you access the page so we will simply pass this decorator right here we will simply write here say
22:52
here which is login required
23:00
so I
23:08
think SL account SL profile okay this is sl/ profile and
23:17
here we need to put this decorator right here in between login required and then if the user is authenticated then only
23:25
load this view as View so we need to give it the profile. HTML
23:33
and then we need to give the name parameter in the second argument which is profile so this line pretty much sums
23:41
UPS all the process guys first of all it is checking whether the user is logged in if the user is logged in then only it
23:48
is showing the profile. HTML so this profile. HTML is located in the
23:53
templates folder you will see that so this is my by this so it's only a on
24:00
line code but it's doing a lot of job at the same time so this is the power of
24:06
Jango you write very less code but that less code means a lot so in the same way
24:13
if I just refresh now go to this route here if I try to access this route SL
24:18
accounts SL profile I can't access it you can you can see I can't access it
24:27
I it will redirect me to the this this fite cannot can't be reached so you
24:32
can't access that route you must be authenticated so it is
24:38
preventing us that's exactly what we want and
24:44
also we also need uh first of all let me just
24:51
make the login page so just go to login. HTML we will
24:57
start building this so for building this uh UI we'll be using Tailwind CSS simply
25:03
paste the ti after the title CDN of Tailwind CSS and right here we will be having a
25:10
simple login page so we'll be giving all these classes Tailwind
25:23
classes so these are all the Tailwind classes that you see right here
25:44
so right here we will simply have a button right
25:52
here which says login so we'll basically say text 2 Xcel font bold
26:01
mb4 so after
26:09
this this is not necessary I am just styling it for the UI to look good but
26:16
for the this tutorial it is not necessary that you use Tailwind CSS it's just for styling purposes so right here
26:23
we will simply have this login with Google button
26:34
and so the HF will be dynamic it will simply have curly brackets and right
26:41
here percentage signs URL and WR in single codes we just need to write
26:48
here social pan this needs to be same but I'm writing here you need to write
26:54
it and again in single codes Google o
27:01
two and then close that percentage sign that's
27:09
all so right here we just need to give some classes these are all Tailwind
27:14
classes so
27:24
simply so if I just uh refresh here if I navigate to Local Host 8001 /
27:36
login so just restart your
27:49
server uh just wait I I think I made a mistake right here in path
28:03
so all the source code is given guys in the description you can directly purchase it so I think right here I made
28:09
a mistake right here me paste the correct one it's a slight uh modification that
28:17
we done it's now you can see as I navigate to it it is showing me the login page there is a button right here
28:24
login with Google so all these styling is done using Tailwind CSS so there was
28:29
slight typo mistake right here in this line so that's why it was not working so now you can see if I go to Local Host 00
28:36
1/ login if I click this button it is saying to me that uh backend not
28:45
found which is
28:51
uh these patterns are not found so right here in the urls.py file
29:00
we need to write all the patterns that we are missing so we need to write those missing
29:17
patterns uh guys there was just a very silly mistake that I done inside this login. HTML file that's why you are
29:24
actually see seeing this issue uh if I navigate to Local Host
29:32
8001 SL login and if you just click this button login with Google you will see
29:38
this issue that backend not found this is coming because I just made a silly mistake right here in login to HTML and
29:45
this back end is simply login O2 not or2 just just make the slight modification
29:51
right here just write this o o or2 this is the mistake that I done so just write
29:58
this o right here so after you do this this error will go away but now a different error will come and I will
30:05
show you the solution to this problem once again if you navigate to Local Host
30:10
8001 and go to the login page / login and click this button now a different
30:16
error will come right here no such table Dango Jango unor session so this package
30:22
that we installed which is this package Jango social at or app this needs to
30:28
actually create this session table because we will be storing the user information in the session that's why
30:34
whenever we close the browser and again reopen it it will automatically detect that whether we are logged in or not so
30:40
for creating those tables we need to run the migrations so right there is a command right here in in Jango you can
30:47
run right here Django admin uh run or we can simply write say
30:55
this is actually the command uh python manage.py migrate this is a
31:01
command so python manage.py we are again calling this file which is manage.py
31:07
this time there is a command which is migrate so if by default it uses the sqi
31:15
database that you see right here sqi database it uses and it will actually create all the tables migration tables
31:21
for the session information inside this database python manage. py migrate if
31:27
you run this command it will actually create all these tables which are necessary required for integrating
31:33
social login so now everything is gone okay now you can actually run the back
31:39
of application and there will be no error which will be there if I navigate to Social uh sorry login
31:47
page click on that and I will be redirected to my consent screen guys
31:52
where it can actually select my Google account and uh Grant the permission
31:59
so as I select my Google account you need to Simply allow these permissions simply click on continue so now it will
32:07
actually redirect me to this page if you see Local Host 8001 slac accounts SL
32:13
profile so now the user is authenticated now it actually redirects me to this page this route that we configured
32:20
inside this url.py file if I show you ur. py file so if the user is
32:26
authenticated then only show this so loginor required this decorator is actually using this uh functionality and
32:34
now when the user is authenticated we are actually showing this profile. HTML if I
32:39
just show this is actually the profile page this is a profile page so here
32:46
we'll be displaying the email display name of the user for the time being simply you will see that so if I now
32:53
close this again reopen it Local Host a
32:59
001 so again it is basically uh navigating to the Lo login page so this
33:05
is a problem guys we need to fix because uh we should automatically detect that the user is already logged in we don't
33:11
need to log in again and again so now to fix this it's very easy go to urls.py
33:17
file once again and here we need to Simply write a route which will be very
33:22
much easy we need to Simply detect that the user is logged in so we don't need
33:27
to redirect them to the login page for doing that there is one line of code
33:32
that you need to write right here so this line is basically path
33:39
again we'll use the path module and here we'll be just s the first argument will
33:45
be empty so this signifies the homepage so here we are simply redirecting if you are going to the
33:51
homepage we are actually redirecting you to the as view pattern name
33:58
you need to provide the pattern name right here pattern name
34:04
profile and here we need to say permanent and uh there is this option
34:12
that we need to configur which is I will explain you the code guys just
34:18
write it permanent is false and then in the second argument you need to give it the name name will be here home so this
34:26
is actually we are config in it to for the homepage so if you actually navigate to the homepage we are redirecting them
34:32
to the profile page because they are already logged in this actually what
34:37
this code is actually doing it is actually redirecting uh the user authenticated
34:45
user to uh profile page based
34:50
upon based upon whether they are logged in or not so if they are logged in we will be redirecting to the profile page
34:58
so if I just now refresh if I go to the homepage local hosts 8001 now you can
35:05
see that it is automatically redirecting me to the homepage if I just I'm just navigating to the Local Host 8001 so you
35:12
can now see it is no longer redirecting me to the login page I can still go to the login page but if I just open the
35:20
homepage you will see that I am redirected back to the profile page so that's exactly what we want guys and
35:29
uh now what we need to do uh after we do this we need to go to
35:36
the profile. HTML and here we need to display the details of the user we need
35:43
the email address and the display name so just after the title past the CDN for Tailwind CSS again we using the Tailwind
35:49
CSS for displaying information so it is not not necessary guys for this tutorial as I already told you I'm just doing it
35:58
so that the UI looks great these are all Tailwind classes so this makes it easy
36:03
for not writing custom CSS and uh in we can simply have
36:13
a H1 tag right here text to excel font
36:19
will be bold Shadow it will also have a
36:26
shadow Max width on medium devices and width will be
36:31
full so inside this uh you will simply say to the user I will
36:38
simply copy this right here I don't want to write custom CSS it's very
36:51
hard so right here uh we will have two information right here to show to the user which is uh the username so in
36:59
double cly brackets we just write user dot username so this is actually the display name the second information we
37:06
will be displaying which will be email which will be user.
37:15
email I simply say welcome welcome message so you'll welcoming it the user
37:23
if I just refresh now guys you will see the user profile welcome come this is
37:28
the display name geeki Gotham 1987 and this is the email address geeki Gotham [email protected]
37:34
so we are actually displaying this and
37:43
uh uh it needs to be wrapped in I forgot to
37:48
do this in the div tag right here so just right here you need to wrap everything
37:57
distri tag
38:02
so so wrap
38:12
everything just format so everything is now shown in a card like structure you
38:18
will see that so it is looking good and uh after you have a simple form which
38:25
will uh actually again we'll write this code it will
38:31
actually go to this URL log out in single codes and just
38:39
this is a syntax and here in method here will be
38:46
post and you must have a csrf token this
38:52
is uh for security purposes
39:01
so here we'll have a simple button of log
39:16
out so if you just say there will be this log out button uh no reverse match
39:23
at accounts profile reverse uh you can act see that this log out that we
39:29
written is not found so now we need to actually make this route in the url. py
39:35
file so every route that you see basically guys we need to uh just configure it in the urls.py file so just
39:42
go to urls.py file and for the log out functionality it's very easy we just
39:48
need to write here just before accounts profile just
39:54
write for the log out as well functionality so whenever someone goes to the logout functionality we just need
40:00
to say we need to import the logout view which is also a built-in view in
40:12
Jango if you see we have a built-in view which for the log out as well so log out
40:22
view redirect view I think we imported that
40:29
indirect view so log log out view is we are using it it actually contains a
40:37
method next page so here we need to just load the login page so we are simply
40:43
telling login go to the login page so whenever someone log out just go to the login page so here we
40:51
need to give it the name parameter so just after this
40:59
the second parameter which is the name
41:06
parameter that's all so if you just refresh now
41:14
uh just need to
41:20
restart I think there is some kind of syntax error which is there in this line I think let me see
41:31
let me fix it oh sorry we forgot to put a comma so just put a comma right here we for got to put it that's all is there
41:41
if you just refresh now if I click log out I will be redirected back to the login page so
41:47
that you can see that guys if I again login with Google I will be showing to the profile page here we can see the
41:53
details if I just close the browser once again open the same page page local hosts
41:59
8001 I will navigate if you just go to the homepage
42:04
you will see it will redirect me to the profile page because it automatically detect that I'm already logged in so
42:10
this you can do for any user guys uh if you're doing it for the very first time you do need to select your
42:18
account if you click login with Google you need to select your account Grant permission once you grant permission you
42:24
will see your details right here this is ajango user authentication guys Google login that we configured step by step
42:30
all the source code is given in the description of the video you can directly purchase it from my website Pro Cod store.com you will actually get a
42:36
zip file so the full source code is given with full documentation and support
42:42
So if I close this browser once again open
42:48
it go to the homepage 001 so it will redirect me to the
42:55
profile page you will see that so this this is because we already the session table is created in it is present in
43:01
this db. sqlite it is actually getting this information that the user is already logged in so that's why it is
43:07
showing the profile page so thank you very much guys for watching this video step by step please hit that like button
43:12
subscribe the channel as well and I will be seeing you guys in the next video Until then thank you very much
#Social Network Apps & Add-Ons
#Educational Software
#Computer Education