Up next in 10


Have questions? Ask in the Chat!
Don't forget to check out Odyssey Custom Vans latest build currently For Sale here: https://www.odysseycustomvans.com/
Whenever you’re ready, there are 2 ways we can help you:
1. If you need a vetted parts list, download our → FREE DIY Van Build Cheatsheet to help you save time and money on Van Parts and Gear: CLICK HERE: https://vanbuilderhq.com/
2. If you want to get Done-For-You Van Build help, book a → FREE Consultation with my Calendly Link: CLICK HERE: https://calendly.com/odysseycustomvans/intro-call
Show More Show Less View Video Transcript
0:09
all right hey guys we're live we are on the iPhone here because that means I got something important to tell you um I've
0:17
got a couple more products that came in we are I'm redoing the power system under the driver's seat because I wasn't happy with the way the cables went in
0:23
and I ordered this product off Amazon so I'll show you what it
0:28
is so I got two things uh I have a terminal fuse block and this one is a dual
0:36
terminal fuse block so we'll look at that inside the van um then we got an additional 75 amp fuse so that's part
0:45
one of this live stream this quick stream over here on this side we've got
0:52
our new wire tap for our
0:57
uh let me set the phone down here
1:03
so this is our new wire tap for the wolf box so this is that very special one
1:09
that's actually instead of two pins uh it's actually three pins so we've already installed this underneath the
1:14
dash the wolf box is working great so when we turn the key on the wolf box comes on when we turn the key off it
1:21
automatically shuts down so it's sensing the accessory wire uh just like we wanted to uh I just
1:28
bought these just in case um again this stuff just cost a couple bucks I think this was eight bucks for two and this
1:35
was maybe five or six or something like that for a whole
1:41
pack um the next thing I bought I'm not going to be using this but I bought this just in case I got a little
1:49
creative uh this thing is by a company called uh New
1:54
Concepts and it has an it's an awesome battery terminal for for a uh the low
2:02
profile design batteries so these right here allow you to add an additional
2:08
battery terminal Mount so that you can do a you know stereo speak uh like a amp
2:15
in the back for Subs you can have these terminals on the side uh and then one of these terminals you can use for the AMP
2:22
one of these terminals you can convert to a uh stud and that allows you to not
2:28
have to cut your original battery wires so let's hop over to the van and
2:36
uh let me show you uh what we're working on over
2:42
here so this is the battery and see how
2:49
there's this pocket so this pocket right here is a lowprofile Mount so that um part that I just showed
2:57
you would go right here nice and flush on the battery terminal you'd clamp it down and then you'd have a extra stud
3:04
that comes out here and that's how you would take this and mount it to your
3:10
battery um that way you don't have to uh for example there's not really a place for me to Mount wires if I wanted to
3:18
mount let's just say some add additional accessory wire to this uh it just it
3:24
just really wouldn't work so um
3:30
yeah so that's how what that kit does all right so where was I not happy in my
3:35
install well the back of the wires here it just it just didn't hold second let me turn the heat
3:41
off that heat messes up with the
3:50
audio there we go hold on I know I'm taking you guys for a road trip
3:57
here all right so what I did was I took these are the two ecoflow wires and they
4:04
were sticking out the back it just I just wasn't happy with it so I redid it
4:09
this is the 60 amp that we talked about in the last live stream so I just want
4:14
to let you know that we're not using this and what we've done is I have CAU over here and if you
4:21
guys can see we now have a dual terminal terminal stud I guess is what
4:29
it's called little wild and then we have two 75
4:34
amp terminal fuses there so they're both 75 amp for our six gauge
4:43
wire um and then this is right on our bus bar of our customer connection
4:51
point and so uh this one goes directly
4:57
to the Ford battery so that's this is the Ford um positive it's pretty obvious
5:05
then this is the negative and then the negative mounts to
5:10
the negative uh stud right here so right
5:16
there and then over here um this is kind of how we got it set up so the P the power coming in so
5:25
this goes to that um Fus panel underneath the
5:30
dash so while we're over here maybe you can see it but
5:37
way see if we can get in there so back up in there is the F where
5:43
that wires are where the wires are coming that is for the fuses so that why
5:49
that's why this all had to come out because it's extremely hard to get into there unless you take all this plastic
5:55
out to get into uh where we needed to tap those wires so right there where the top red
6:02
wire and the bottom red wire come out that is what we used to communicate with
6:09
our wolf box and then the other thing I didn't uh mention yesterday was this so this is
6:17
our wolf box control module for the power coming in and you see this this
6:24
thing is all the way up to here and then we've got this all the way in the pillar
6:30
coming up and then we've got
6:37
uh sneak that wire up there so this is our uh handsfree audio
6:44
for the Dyan but underneath this uh headliner
6:52
we've got all of our cables neatly hidden on the wolf box so we're going to be cleaning that up here and the goal
7:01
that today just this first part of the day is to get the whole front of the van poked back together because we've got
7:07
this all upholstered we don't need to do anything up here um so we want to get the swivel seats in so the whole front
7:14
of the van will be done today and then we can get back to the back of the
7:19
van but um I know I'm like jumping all
7:24
over the place here that was the power that we needed to come on when the van was on and off that's a rear view mirror
7:32
that we mounted it works excellent um the wolf boxes it's an
7:38
awesome unit so when it comes on you can just swipe left you can see the front being recorded you can swipe again you
7:45
can see the rear camera and if you swipe a third time you'll have the front camera on the left and then the rear
7:50
camera on the left live and it's just really really cool
7:57
um so that is what what where all this came
8:04
so uh much more challenging than I had anticipated and uh it's really just how
8:10
uh you know Ford has their stuff placed for example the dynaman I had to take
8:16
apart the whole entire right side of the dash for the sync 3 unit module to be connected to this to access the rear
8:23
camera same with the wolf box um now I say it's complicated but this
8:29
is the right way to do it this way you're not pulling wires and doing some weird uh weird wiring um in a van if you
8:41
just uh think about not cutting the manufacturer wire as much as possible
8:47
and then being creative not to do that so for example even though this was limited here and the wires came out just
8:54
right here I we only have like maybe 12 in of extra it's in a spot to where
8:59
we don't have to worry about it pro install dynan Pro so it's all going to
9:06
work nice and well for a long time which brings me back to the beginning of this where we're talking
9:13
about the ecoflow the ecoflow I was using this customer connection point and these the
9:19
wires were kind of like spiderwebbed out here and it just didn't look good so what I'm doing now is I have
9:25
modified the uh this cap right here so this is the cover and so I've cut this
9:32
Notch out and so what that's going to do is that's going to allow me to come over here and I still have my uh
9:43
positive terminals protected with his cover but the notch allows me to when I
9:49
put this cover on allows me to not chew up my ecoflow wires as they come through
9:55
the battery compartment so right there so now those can mount up here and I know it doesn't
10:02
look like it right now but trying to do this one-handed um and I may go out to that
10:08
permanent marker mark where I did but anyway that's just so this is not being chewed up the battery box these wires
10:16
will come around and then they're going to loop back around and this is the this is the cool part I wanted to show you so
10:22
let me get my camera set down here give me one
10:28
second
10:43
here we go go down a little bit
10:53
more okay so right there hopefully that won't move
11:00
okay perfect all right so that's actually a very good vantage point for
11:08
the for this system hold on second I'm trying to get
11:14
this thing to not fall over got this new DJI osmo and uh
11:21
according to live stream you guys really like the iPhone as opposed to the whole uh very nice live stream live
11:29
stream live stream rig um okay so here is the box you can
11:35
see obviously this doesn't cut the wires off but now here's the fancy part so
11:41
what I did is I neatly cut out this V and I just did that with a multi-tool
11:48
but now I can take my two positive wires so the white one is my alternator
11:55
2 or alternator 1 input for the ecoflow and this one is my alternator 2
12:02
input and so what I'm going to do is I'm going to take those I'm going to pop them up into
12:09
here and so now my ground and or my negative and positive are
12:16
separated and then since this is coming through what I can do is now I can put
12:23
this on my two terminal studs and we're okay from Ford as far as
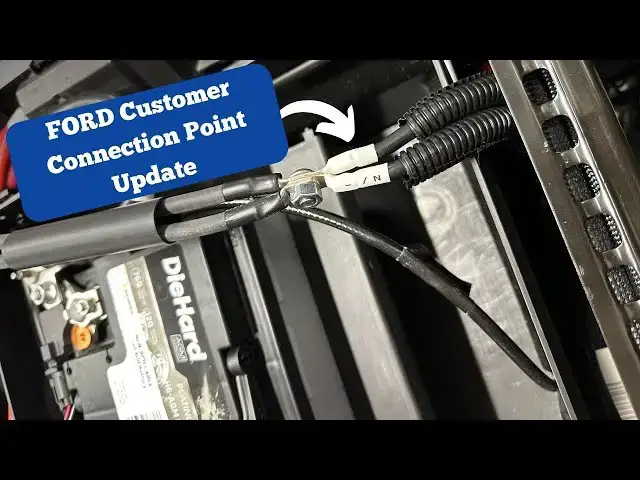
12:32
using this tab over here because they have that fused for their customer connection point at 175 amps and we've
12:41
got uh 50 amps that we're going to be um
12:47
fused 90 is going to be usable so we're only going to be using
12:52
90 all right so I'm just going to go ahead and fully install this while you guys are
12:59
watching this live but when you're doing a terminal fuse and I have an example over
13:06
here this is a single so you want nothing on here except the stud then you
13:12
want to put your terminal fuse on and then that makes contact with this bottom ring and then when you're finished then
13:19
you'll actually take your washer uh your lead and put it on then you put your washer lock washer kind of go from
13:27
there so we're just going to put our two washers on
13:38
here we got two two lock washers and I've already
13:45
torqued that down so that's good to go and we'll take these
13:57
two now I'm completely making this next part up but uh one thing just in in mind that I
14:05
think is good about this scenario is that we have our incoming charge from
14:12
our alternators and then from this is where the battery connects so if I would have
14:19
done it like uh I had done before
14:24
um this thing would be grabbing the whole entire 90 amps plus it would be
14:30
dealing with the amperage that needs to be used to charge the battery so I think
14:35
this is a better setup because this is staying independent to just charging the battery and then this or we're getting
14:43
that juice from the alternator and we're kind of not technically bypassing the
14:49
battery because the battery is going to assist uh in
14:54
somewhat in in some way to provide current but I just think the flow of
15:00
electricity is is bad is better this way so put a comment if you're a pro
15:09
electrician and you'd like to comment on my little idea there but I think it's
15:16
uh I think it's uh legit
15:21
um okay so next what we're going to do is
15:26
we are going to come over here and we're just going to tighten these
15:35
down just want to make sure that our wires are nice and straight and they're
15:40
not kind of veering off coming on top of each
15:55
other okay so that's good good now we can put
16:00
our cap on here now we have increased the height pretty dramatically but when
16:07
I dry tested this it looked like we were able to still put this cover on
16:14
so let's uh let's see if that's still
16:25
true all right so now the plan here is
16:33
to um and I'm actually going to put a little bit of wire loom around
16:44
that um we just we just don't want want things chafing in there nobody
16:51
likes chafing so I'm just going to put a little bit of
16:57
uh wire Lumin around those wires and so I've knocked down all the
17:02
sharp Parts but you know can't hurt to do
17:16
this either even though we're filming from the phone um if you guys have a question you can just definitely put it
17:22
in the chat so I'd love to love to hear that let's see if anybody's in the chat nope
17:44
okay got a wire loom on one side let's get it on the other
17:57
side
18:05
and I want the opening to be on the bottom because if anything is going to rub it's going to be on the
18:13
top okay so now the tricky part to get
18:21
everything to fit comfortably in
18:27
here
19:07
okay now that uh terminal is pushing up just a
19:12
little bit but we're snapped in here um earlier I had thought
19:19
that this had Clips on the inside it just didn't it was just the way that it clipped
19:25
in but now that we have that um that's where I want it that looks
19:31
good happy with that now we can take our
19:37
wires and we can figure out what this is going to look like with the battery box um installed back in
19:45
here so let me move the camera back just a little bit we should be able
19:54
to get a good get a good angle of this
19:59
yeah this phone's actually working out very
20:04
well so one second let me get this
20:27
down
20:51
all right that'll do for right now so let's get this
20:57
battery
22:01
so if you do uh decide to use this setup that I'm using you're going to need to put this piece of plastic on the side
22:08
you need to put that on there first
22:13
um yeah this plastic over here you need to put that on first so you can actually
22:18
protect the wires going [Music] into uh the side
22:26
here
22:48
need to cut we're actually going to need to cut this uh piece of plastic right here so this
22:55
will actually pop into
23:01
place so let me do that real
23:19
quick move the camera so for the iPhone I don't know
23:26
how to actually turn down the volume but we are going
23:32
to oh hey John welcome to the live stream all right I move the camera over
23:38
here because this is going to be crazy loud there's a picture of my
23:56
coffee [Music]
24:03
[Applause]
24:08
[Music]
24:26
oh
24:36
all right so what I did is there is that plastic tab right there so this needs to be
24:41
flush and so now this goes on I've also modified this plastic again and I cut
24:49
this uh plastic ring off and
24:55
uh yeah John I think people like like daytime hours too so I've been trying to do these streams a little bit earlier it
25:01
seems to work out pretty good um so I have so this modification
25:10
that I made uh what I do is actually need
25:16
to I'm going to be we need to put a little bit of
25:21
uh thread lock on
25:26
there
25:34
and then we're going to put the nut okay um because this thing if I
25:43
didn't do what I just showed you right here this thing rattles like crazy
25:49
and we build nice Vans here we don't need
25:54
rattling no rattles
25:59
okay so let's just
26:04
get and working onehanded is almost
26:17
impossible okay you don't want to do it too much but now with that modification this thing is solid it does not it
26:24
doesn't move and uh yeah that's the that is the
26:30
whole the whole point there
26:35
um actually I'm going to go back I'm going to do the B I'm going to modify the bottom one too just to have this
26:40
pulled in and then this cap this is a decorative cap so this decorative cap
26:47
actually goes over this and that'll clean everything up in the wires will go out the back okay
26:54
let's get back to what we were working on here so we now have our two negative
27:01
wires and so what we're going to do with them is we're going to um we're going to take the original
27:11
cable where did they where did they
27:18
go okay this is our original cable that we spliced and crimped
27:24
yesterday and then all we're going to do is extend these like we did yesterday we're going
27:29
to do it independently we're going to heat shrink and then we're going to connect it to the battery so we should
27:36
only need maybe like a foot and a half run um and then we'll put some wire loom
27:42
on this just so that we don't have any chafing
27:49
but the whole point of this live stream was so that you guys can
27:55
see um by being able to to put our our ecoflow
28:06
cables let's see here if I can get doing this one-handed so give me one
28:20
second
28:26
see
28:42
so the point of this
28:52
was I wanted this uh the floor is going to cover the wire but it's not going to cover
28:58
it all the way so for example the floor is going to cover the
29:04
wire here so what I want this to look because
29:10
everybody's going to see this area right here that's why it's upholstered really nice this is all this is why we cleaned
29:16
this all up yesterday um so if you have anybody in the
29:22
van this is where they're going to be you know hanging out see your van for
29:27
the first time and so what I want is I want this right
29:38
here so even though this is taking a bunch of extra time I want it
29:44
to there we go look at that so
29:50
now see where's that cap there so now for example when I put this
29:56
cap on
30:04
I'll probably heat these wires up a little bit they're a little stiff cuz they're not really warmed
30:13
up but now we'll do
30:19
that we put our decorative cover on and you can see this is
30:26
uh the floor will come up to here and this will just be a very nice clean all you'll see is that braided cable and
30:33
that's it you won't see this red yellow heat shrink tape type of thing that we
30:39
had going on earlier um which I just I I just didn't like the way it
30:45
looked and uh yeah that's pretty much what I wanted to show in this live stream is just how you can do a little
30:52
bit extra effort make some modifications and really clean up
30:57
uh something that you know you're going to be walking in the van and you're going to possibly see this area uh now
31:04
it's also true somebody may never ever notice this and but for me I just want
31:10
it to look the best that it can look um and when we combine that with
31:17
our cover right
31:26
here
31:32
you get a really better idea of how that's going to look and uh
31:39
yeah so that is about it guys I'm going to uh go ahead and put the battery back
31:47
in I'll remake these Terminals and then later this
31:52
afternoon let's see what our goal is for later this this
31:58
afternoon definitely get the whole entire interior put back
32:03
together and then this afternoon we're going to hop on um we have we have very little left to
32:12
do up on the roof so what we need to do is the max
32:18
fan is just going to pop in there it's ready to go four screws um and that's pretty much it uh I
32:26
did did mention that I was going to do the lap cyant so we'll do the lap
32:34
cyant um we can put the fan on and then we
32:40
need to drill two holes in the back right there for the solar so all the
32:46
solar is ready it just needs to be plugged in together zip tied and ran
32:52
down the back um we have to wait to put in the no
32:57
itic AC right there because uh we need to build a
33:08
interior um how do I explain
33:13
this so for the uh for the rooftop AC
33:19
you in this type of uh the pneumatic cooling situation you actually have to create a
33:25
box around the uh like a chamber so that the air can go in and then the air can
33:33
come out um so there's going to be like a little there's a baffle piece that you put in the middle and then that'll allow
33:40
you to uh let's see I don't have the screen here let's go into the let's
33:46
go on the van I'll show you so what we'll have to do is we'll
33:52
put our support member here and our support member here that's that's that aluminum piece that we talked about in
33:59
the previous live stream and then we're going to have to take our poly ISO or
34:04
XPS sorry foam and then we'll make this little box and it's just like a little AC box
34:12
and so the air can go in one side and there's a diverter and then the cold air can come out the other side so you have
34:17
the intake diverter and then the exhaust which is in this case the conditioned
34:25
air um also if you guys missed out on yesterday's live stream we installed our
34:32
ecoflow AC input so that's what it looks like on the back so we don't really care what
34:39
the sealant looks like we just want to make sure that it's sealed up really well what we do care about is what it
34:45
looks like on the outside of the van so this is our shore power so it is a 30
34:51
amp Shore power plug um and but one thing you want to do
34:57
if you have this type of setup is you want to get a 15 amp
35:03
converter SL surge protector and that's going to allow you to plug into this but
35:09
then plug it straight into your household power um you're only going to get 15 amps of charging
35:15
but uh it's just more convenient Because unless you're going to do a dedicated 30 amp you know like almost
35:23
like a dryer connection at your house um this is what you're going to want to get
35:30
because friends and family are going to have this readily available if you go travel and hang out with them um you
35:38
know gas station or you know some emergency location you could actually
35:44
use this to to to top off but yeah check out that live stream
35:49
we go through the whole entire install talk about all the products um that we have on there and uh
35:56
yeah we go over that whole thing all right guys hope you enjoyed this uh quick live stream um taking care of some
36:03
electrical checking off the list and moving on with this uh Ford Transit van conversion if you guys are not
36:09
subscribed get subscribed to the channel give us a thumbs up click that notification Bell because I go live
36:15
randomly throughout the day and I don't want you guys to miss out on a video or a chance to ask a question live um when
36:23
we do this on the phone we got the live chat down here as well as on the computer if we're not live uh put a
36:28
question or a comment in one of the videos and I'd love to answer it on a future video um awesome John glad you
36:36
got to watch this one for a bit and uh yeah guys we will see you on the next live stream
#Campers & RVs
#Hybrid & Alternative Vehicles
#Electronic Components
#Power Supplies