Up next in 10


Have questions? Ask in the Chat!
Don't forget to check out Odyssey Custom Vans latest build currently For Sale here: https://www.odysseycustomvans.com/
Whenever you’re ready, there are 2 ways we can help you:
1. If you need a vetted parts list, download our → FREE DIY Van Build Cheatsheet to help you save time and money on Van Parts and Gear: CLICK HERE: https://vanbuilderhq.com/
2. If you want to get Done-For-You Van Build help, book a → FREE Consultation with my Calendly Link: CLICK HERE: https://calendly.com/odysseycustomvans/intro-call
Show More Show Less View Video Transcript
0:01
[Music]
0:58
w
1:05
hey everyone welcome back to the live stream tonight we're talking about designing your van to fit your appliances and gear so whenever you're
1:12
working on or you're getting ready to buy a van do a DIY build or you're even
1:17
looking to uh not do a DIY and buy something that's already done you want
1:23
to know how that is going to affect how your stuff fits in your van also the
1:28
stuff that you want to have put in your van such as you know like the microwave uh the refrigerator um even a cooler
1:36
that's on maybe like a drawer heavy duty drawer slide in the back of your van there's a lot of stuff you want in your van some gear you want to bring with you
1:42
on those camping trips uh and driving across the US so in this video we're going to start uh right off by looking
1:50
at a drawing that I put together so let me get my to my computer
1:58
here yeah we're going to kick it off this is a drawing that I've put together I was working on it today and I had the
2:04
idea of doing a live stream for you guys so I could walk through uh the ideas why they were fresh in my head so this is
2:10
how I do a proposal uh for a van build so if you were coming to me and we were talking about all the stuff that we want
2:16
to put in your van by doing a simple sketch you know nothing fancy in the computer because we
2:22
may change it quite uh frequently but a sketch just to see if what you want is
2:29
possible uh with the allotted space that is a cargo van so you have limited amount of
2:37
space and to be able to fit all that stuff in there you have to have a pretty
2:42
tight plan going forward now when you get in the initial stages of sketching
2:48
it up it can be pretty loose but what I've done here is uh the requirements
2:53
that we've put together for the proposal that is an isotherm uh 130
3:00
fridge and we have like a trolino toilet composting toilet we have some Ikea
3:06
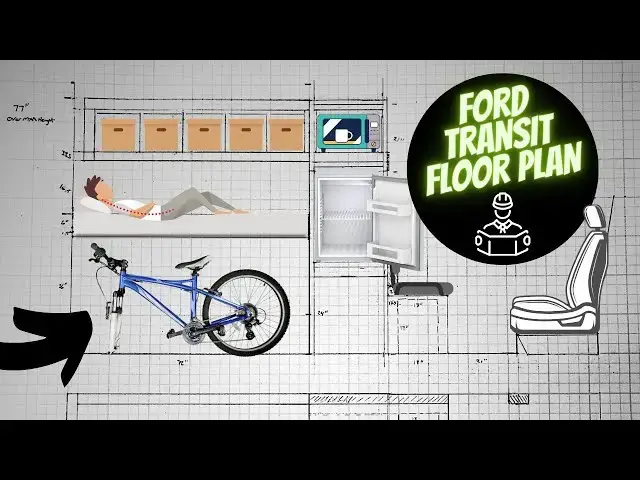
overhead storage we have a particular microwave uh particular bed height
3:13
because of the ability to uh not the ability but the desire to have a bicycle
3:20
or mountain bike storage underneath the Ved the bed so when you have all of this
3:26
stuff happening you got to lock it in to see if it's even possible that those
3:31
things will actually fit together so it's kind of like a puzzle kind of like playing with Legos a
3:36
little bit of both um so I'm going to start off by showing you my approach to
3:42
this and we're do we're going to do a couple of screens here
3:48
uh I'm going mainly talk to you about this on the drawing pad over here so I'm
3:54
going to be able to draw on this and show you how I sketched it out and then
3:59
I've got a camera over here on my desk and I'm going to hop over there really quick we're not going to use this as an
4:06
example CU I don't think the uh the image is clear enough but I
4:12
wanted to show you that this right here is just a uh piece
4:19
of grid paper you can get it from like Michaels or something like that um so
4:24
it's grided paper and this is a 17 in by 22 in
4:30
uh with a 4x4 grid that's how big this is and that's how how the grid is now
4:36
what I do is I take the uh 4x4 grid and I will make the 4x4 grid represent a
4:43
foot so 12 Ines so if we go two blocks we got six
4:50
in we got four blocks we got 12 in you know one block is 3 by3 3 by3 inches and
4:57
you can see that by doing that we can do a uh kind of like an engineering view
5:04
of a side view of our van so this is the driver's seat we have a little jump seat
5:11
here we've got a little stack with a microwave the isotherm refrigerator some
5:17
storage area right here we have our bed height at 36 in for the mountain bike
5:24
situation uh we've got a mattress 6 in thick mattress and and the support member
5:30
being uh an inch and a half currently I'll to explain why these are so precise
5:36
here in just a second um there's also a request to have some overhead storage on the driver's side and then
5:44
what we do is we translate this and we come down and this is kind of back in the day
5:51
how you would do engineering drawings it's still done today they're mostly done on a computer but as you can see
5:58
all we do is we just come down down and now we have a overhead view so this is
6:03
the overhead of the van so in the front here we've got the two seats we got a driver and a
6:10
passenger seat now this is just a rough you know approximation of this seat
6:15
location um once it gets past this dotted line everything is to scale so
6:21
this one is to scale and this one is to scale these little bump outs are those
6:27
pillars right behind where like the seat belts are mounted up on the van and then what we've done is we've
6:34
come back and we've stop where this dotted line is because I like to work from the back of
6:40
the van to the front um there's really I've never had a situation where you know kind of starting the front going to
6:46
the back works because the back doors you want to have everything right up to those back doors such as the bed for
6:53
example and then have your uh your data point or your beginning point start from
7:00
the back and go this way so in this van proposal we have the
7:06
bed going uh north to south so no need for doing bump outs or anything like
7:13
that the bed is going this direction so they're either going to sleep with their
7:18
heads up here you know maybe feet down here that sort of thing um but for this
7:24
particular reason uh was uh to have this
7:30
layout and bed position so that's what we're doing now over here we have some
7:36
overhead storage and we have that coming off the wall um about 15 in and this is so that
7:44
we can accommodate these Ikea uh storage boxes now this is not
7:51
the end result of this whole entire project I'm probably going to change this up there'll be different suggestions uh during this whole process
7:58
but you need to start with something so over here we do we do want a shelf but
8:05
you know what are we going to do with this shelf I mean what products are we going to put here is it going to be Ikea is there going to be boxes from Target
8:12
so this can change but what you need to do when you're starting to plan your van layout is just start with something get
8:19
something that's fixed and uh so my recommendation is the
8:26
bed start with the bed now your your something could change
8:32
let's say maybe you had a partition wall here for some reason you had a crew van completely get it it might change the
8:39
layout but for this uh video today we're just going to start with the bed so we
8:45
know we want uh queen siiz bed um we
8:50
know we want a minimum of you know 72 to 74 in long for the length of the bed to
8:57
accommodate sleeping north to south which is your head over here and your feet right
9:03
here um so the bed's there but now how high do we want the bed we know how far
9:09
forward and back we can go we're going all the way back and then we got 72 in here we're doing uh since we have this
9:17
next we need to position the bed at its height so typically depending on what
9:23
bikes you have but you know an an a good average is 36 in our good starting point
9:30
for a to accommodate mountain bikes is 36
9:35
in from the floor to the bottom of the bed once you have this fixed that's your
9:43
bed platform now everything here adds to
9:49
itself and uh we're going to go and draw once I get into these numbers we're going to start which I guess I'm doing
9:55
right now I'm going to change and go to the computer let me see if there's anything else uh before I leave the desk here so
10:03
start with a piece of graph paper find out the dimensions of your products for example your your fridge um this one uh
10:11
they like to have it actually elevated so it's easier to open and close provides storage down here a spot for a
10:17
microwave up here so we have a microwave Dimension we've got refrigerator Dimension storage we have a composting
10:24
toilet Dimension here um we're putting it inside here this
10:30
jump seat so that you can open it whenever you need to go close it it's nice and concealed and then what we've
10:36
done is we go across to the kitchen Galley we've got a Reva
10:42
sink some work area right here and then when I get on the computer I'm going to
10:47
explain to you how the dimension of a fridge the door opening distance
10:56
minimum and the uh the width right here
11:03
of the kitchen Galley or the the length and the width I'm sorry the depth and the
11:10
length um how all this stuff plays in together so let's hop on the computer
11:16
and we're going to zoom into all these measurements and I'm going to show you why it's critical to find out what you
11:21
want or what you think is going to go in the van along with your gear to help you with your van
11:27
layout
11:35
all right so before we keep going if you guys have any questions we've got the
11:40
chat open and uh I'm ready to take any guys any questions um it'd be great if
11:47
it was on the topic of stuff you wanted to fit in your van and maybe getting some uh questions to me on how you would
11:53
like to do that if you have any questions um but if you have other questions that are other not related
11:58
relateded to live stream tonight completely cool put those in the chat and uh I'll be happy to ask answer them
12:04
for you all right so we're on the computer here and we're going to hop on over to
12:12
the drawing pad and we're going to check out get
12:18
some coffee here all right we're going to look at
12:25
our where I started over there on the table
12:30
and let me move the
12:39
camera all right so what we have here is let's start in what color we want to
12:47
start with so I'm going to do this pink color
12:52
and this is going to show us stuff that we can't move so stuff that's
12:57
fixed so the First Dimension that we have fixed is uh we have
13:04
our isotherm refrigerator we have
13:11
our microwave the size of the microwave we have the footprint for the
13:19
trolino composting toilet uh we're going to do a dotted
13:27
line here just to represent that the bed height is
13:35
fixed so it's something that we we can't change because one of the requirements
13:41
is that we can fit uh a set of bikes underneath the
13:51
garage when we get to the uh kitchen Galley over here we'll talk about this a
13:57
fixed uh item is the rava
14:06
sink get that a little bit more precise the
14:13
revati the trino like we have in the other drawing and then the isotherm and in
14:21
this case on this drawing we are concerned about the depth so how far in the cabinet is the
14:32
refrigerator all right so now that we have each one of these items identified
14:37
and stuff that we want in the van and but we got to figure out where it's going to go so since our bed is pretty
14:47
much checked off we've decided on a 6 in mat 6 in
14:57
mattress so again all of our numbers are starting to come together we have 36 in for the bikes we got 6 in for the
15:07
mattress then we're going to have an inch and a half for this uh subframe of
15:13
the bed what we need to hold the bed
15:18
and uh but we need to give that a dimension so we know what it is the reason that uh I'm putting all this in
15:26
in here is because the next thing you're want to ask yourself
15:31
is with all the cool stuff I'm putting in my van can I still uh sit up in
15:38
bed so right now we have 33.5 in um I only need 33 in I think to be
15:45
able to sit in the bed without my head touching the top and I'm 6 feet
15:50
tall everyone's different but essentially you want to make sure that you're able
15:56
to uh sit in the bed so like if this is you you're hanging out in the bed you
16:03
want to make sure you can sit in there comfortably and then before you know it
16:10
what you've done is you've defined where everything goes so you've
16:16
got this right here for the the bike you've got this section for your bed and
16:24
then you have this section for just being comfortable being able to sit sit
16:29
up in bed so that takes care of our
16:36
height now let's talk about our our width of these items so the first thing
16:41
we're going to look at is this right here so this one is your sleeping
16:48
length so if you want to sprawl out you want to go head to toe and not be
16:54
cramped this number is what's important to you so this one in this case is 72 in
17:00
and that is based off of a bunch of different
17:05
factors so Factor one is we have a fixed uh we have a fridge width that is fixed
17:13
so that fridge width includes a number of things it includes the support members on the left
17:20
and right the paneling and the fridge itself so once all that is put together
17:28
you're going to have a value right here
17:35
um and I think that's like 20.9 for example for the uh the
17:41
isotherm so let's just call it 21 and then you got inch and a half on each side for support So
17:50
24 so you got 24 in right here for your width so now we've got 72 we've got 24
17:59
the next thing we're going to do is we need to check out our jump
18:09
seat so I'm going to go and pull something off the internet really
18:23
quick see if I can find it
18:37
and this is where you want to start to kind of play around with ergonomics and in here do you see I've
18:44
circled it we got 18 in so if I go to my computer I want to
18:51
type in standard seat height and all of a sudden you'll get a bunch of images uh and suggestions on
18:58
you know what is the ideal seat height um there's going to be all kinds of
19:04
stuff from like dining room table couch chair office chair all that type of stuff so what we want to do is we want
19:12
to merge these kind of Two Worlds together we want to merge like ergonomics versus uh with the products
19:19
that we want in our van so for example um let me just find this trolino
19:27
again not sponsored it's uh just happens to be something that I think is what we may
19:35
have to go with in this uh proposal just because of the dimensions use case that
19:41
sort of thing um but let's go ahead let's hop
19:46
over here here's the trino very simple composting toilet I've
19:53
I never actually used this or or tried this but as far as I can see it's uh
19:58
very simple the the the dimensions are pretty um I'm excited about them because
20:05
they're a very clean Square design which lends itself uh and this
20:12
happens to be the Evo L uh 5.2 gallon
20:20
capacity anyway that's not what this is what we want the width depth height uh
20:25
don't really care about weight so we take these numbers and then we take our ergonomic
20:34
numbers so for example let's look at this
20:42
chair so this is a chair off of Walmart um we don't care that it's from Walmart
20:47
we want to look at these numbers so let's start to see a theme we got 18 and a 12 Ines 18 and2 we've got 17 and 38
20:54
for the depth we've got a 238 23 in for the back back uh height off the ground
21:00
is 18 12 in so kind of start making notes and checking this off and then what you want to do is Hop on over to
21:07
your drawing and start plugging and chugging these numbers so right here we want to
21:15
um let me do this in green so right here we want
21:21
our the trolino is let's see
21:27
here
21:32
trino my camera working it
21:39
doing uh 16.9 so trino is
21:45
16.9 this Walmart seat is 18
21:52
A5 all right so let's go back to our drawing and right here
22:00
so look right here we need to make we have a third consideration that is the sofa
22:08
cushion uh thickness so we've got 172 is what I
22:13
came up with for the height which will fit the trilo in there you know nice half inch piece uh three half inch piece
22:20
of plywood will cover it so we might you know make this a little bit bigger but
22:26
you kind of get my point so 172 is right here and then we want uh 3 in for the
22:34
cushion for this jump seat which will be hinged and now that gives us a final
22:41
seat height of 20.5 in and I know I'm kind of getting into
22:47
the Weeds on this but uh it makes a difference if you ever sat down on something where somebody did not give
22:53
the calculations you're at some a friend's house and they made like a custom bench or or something and it just doesn't feel
22:59
comfortable to sit on cuz it's too high or too low that's why these numbers matter so what I did is what is I typed
23:07
in what is the max standard seat height and for example a dining chair is 18 to
23:14
23 in so we've got some room so as long as it's not over 23 in it's probably not
23:19
going to feel weird to sit down on so when we come back over here and we
23:26
look at our uh seat height if we need a little bit more clearance for the trino we could change
23:33
that 17.5 to 18 and then bring our seat height with the cushion up to 21 in and
23:39
then that is going to give us a standard seat height so what about the uh this
23:46
direction well we look at our trino which is 13 in
23:52
wide we add 3 in for our you know plywood making the
23:57
box and stuff like that so we have 16 and then let's just give us a little bit more room to move around 18 in and let's
24:05
look and see if that will fit with our uh our chair so we'll go back over
24:13
here to the right here so 18 in so check it out this chair that you would buy is
24:18
18 and2 in I'm sorry 17 and 38 so call it 18 so
24:25
we know that we're probably going to be comfortable just like a chair that we bought from the store so that is the theory
24:33
behind uh having this having these measurements to design something so it's
24:39
comfortable so once you do that you'll know exactly how thick you can make your
24:44
seat cushions so that when your friend family come over and they're hanging out
24:49
in your van it feels like a seat and it doesn't feel like you made something to hide a toilet it feels like a
24:56
comfortable seat that just happens to have a hidden toilet inside so that's the ergonomics
25:07
there and now we can move even forward more uh closer in the van and let's we
25:13
need to measure turned around so this is the driver's seat of a Ford
25:18
Transit and it is to scale so this box down here where you see this little
25:24
angle uh this whole thing is drawn to scale
25:30
so this Dimension here get back to Blue so we have this
25:39
Dimension pin's messing up we got this Dimension here and this
25:48
is where we can't fix what this is going to be measured but we can see if it's if
25:54
we need to change anything behind it and so we found that this is uh 21
26:00
in and it's that's pretty good it's almost 2 feet
26:06
so you can do one final check so even though you can't do anything about it here I'm going to show
26:12
I'm going show you one more thing that I I've done on another van which happens to be in my personal
26:18
van this is where this is what I was doing when I was laying uh doing the layout for
26:25
it and you go standard
26:31
uh restaurant Booth size and then we're going to go to we
26:38
got our images and now we can click on this and
26:45
check it out so if you go to a restaurant diner something that has
26:50
booths in it maybe even Waffle House you can see
26:56
that this is uh 24 to 36
27:13
in give me one second here cut that off
27:23
okay so you say it's 24 to 36 in so 24 would be the min
27:28
minimum and that's okay it's okay if it's a minimum because we're in a van so
27:35
sometimes you have to make compromises which is all right but we're at 21 in it's not that bad that is pretty good
27:42
for the fact that we got the uh let me come down here so we got the bed length
27:48
that we wanted we've got the minimum distance to put our fridge in we've got a comfortable seat that's appropriately
27:56
sized we do do have two inches here that we can uh remove
28:02
but that would give us 23 so we'd be even closer to having you a
28:08
normal uh table experience or dinet
28:14
experience so that's the theory behind that now let's hop up here to the top
28:20
left before we move to the next photo so up here on the top left we have
28:27
uh we've got these Ikea boxes we just do these in
28:33
Orange so you can play around you can maybe get a get some graph paper you know cut out little pieces almost like
28:40
Legos like puzzle pieces and you know make things to scale and then just start
28:45
to kind of play around to see where things are going to fit in the van so if we're looking at this we've
28:52
got 1 2 3 four five Ikea boxes again this doesn't have to be Ikea it can be
28:57
anything the reason that I'm talking about this is we need to start with a dimension to get things going you can
29:04
always go back and resize because what's most important and let's see here right
29:12
I'm going to change the orange because I'm going to use that for the most important so let's just make
29:20
this let's make this purple all right so we got our Ikea
29:26
boxes Ikea boxes are 13 in by 13
29:31
in by 15 in
29:39
deep so we've got that now let's talk about important Dimensions so we have a
29:45
door we have a door back here on the back of the van and that door is going to have us you know stop putting boxes
29:53
in here we're g to run out of room so try to find out where that is find out how many boxes you want up here as much
30:01
as you can put at that whatever design you have and then find out where you're stopping point is because you're going
30:07
to need some work wiggle room back here to be able to shut the door and not have it you know get in the
30:15
way yeah now take that and now we want to
30:21
start uh making the van you know look like we built it on purpose so what
30:27
we're going to do is we're going to take these lines right
30:36
here and we want to uh or this is just my opinion so we
30:41
want to have these lines come out into our other side where
30:47
our kitchen gley is and it makes things feel nice and uniform um you know this
30:53
kitchen G is not going way out here it's not cut off and short over here uh we
30:59
have these nice clean lines with the seats so when we come in the van we come
31:04
over here you know everything is nice and it just looks
31:11
professional okay so this is our refrigerator and our jump
31:18
seat over here for this particular proposal and so that's fixed that's
31:24
exactly where we want it can't move it we'll pull this line down here that's our bed that's exactly where we want it
31:30
we can't move it we come over here and this is just a visual uh to show us
31:36
where our our 15inch depth of our Ikea
31:41
boxes are coming out just so you know that you know if there if the person is sleeping over
31:47
here another person's over here that they're aware that you know that's up
31:54
there which might be fine because on the back on this uh drawing
31:59
back here we've we have 16.5 in of room
32:05
to sleep underneath this if you had to I mean if you had to really get under
32:12
it 16 and half inches is is very comfortable you just have to be
32:18
cognizant when you wake up that this is here but there's always a give and
32:24
take um if you don't want something like this like a hard shelf um I like the
32:31
hard shelves because you can structurally you can make them structural to where they can hold a lot
32:37
of weight so you can put some heavy items up here whereas you know soft bags you know they may may droop or do that
32:45
sort of thing um so let's come back over here and since this is now fixed we're
32:54
kind of completing the layout uh we'll look at our driver's seat you
33:01
know can't do anything about that that's fixed we've got our passenger seat fixed so we'll come over to our kitchen
33:07
Galley and we'll see where do we want this kitchen Galley and there's two numbers that are very
33:15
important one is you know what what is your minimum
33:21
entrance width that you will be okay with if you can really push this to
33:27
limits I think it's a very uh it's it's a great way to really
33:34
get more room inside the van um most of these are either minimum
33:41
of 24 and greater you know maybe 24 30
33:46
in and that really cuts into the space that uh you wouldn't have right here so
33:53
your your sink would be very small you'd have a very small area trying to keep this nice and
34:00
open so in my opinion if you can keep this small in a perfect world I wouldn't go
34:08
less than 20 in in this particular example I got really specific
34:15
and we're taking the dimensions we're we're taking this as
34:22
our our kind of end point CU we I want this I want this
34:27
Line This visual line to come through the van because it's going to make this
34:33
area look nice and uniform and open if this came in here it's going to be way
34:40
too tight the opposite is if we ended the kitchen Galley here the van is going
34:46
to be nice and open but we're sacrificing space that
34:51
uh it's not necessary so we're going to make sure that this stays
34:59
uh we can do
35:04
a so this is a four Transit 148 High roof uh not extended so I guess that was
35:12
probably the most important thing to say I need to put that at the beginning of the video um and that's so that's what we're
35:18
working with Transit High
35:25
roof and this is not
35:33
extended it's not extended so if you're working with that
35:39
you're going to have 72 in for your bed you're going to have a maximum of 41
35:48
in for your kitchen Galley and then 20 inches for your
35:53
entrance if the kitchen Galley is on this side
35:59
now we got one more thing to talk about and I'll be open for
36:05
questions so what we want to talk about here is this is going to give us a
36:11
401 in kitchen Galley which will give us 20 inches to
36:17
come in and we're going to do a revati sink so that's a that's a dimension that we
36:23
know from the manufacturer so we know that this is 15 in wide 20 in
36:32
long and before we decide how big our kitchen Gall can be or how wide it can
36:39
be we have one critical measurement that is extremely important so I'm going to use orange for that and that is the door
36:46
for the refrigerator we have to make sure that the refrigerator can
36:52
open now the refrigerator is in here and it has a
36:59
minimum if this thing is pushed all the way back to the van there's a position where this has to
37:05
be and then this will be as far back as you can push it this way so we found out what that
37:12
is which is 24 in the face so this face right here is 24 in
37:20
away from the wall of the van that's as far back as you can go for
37:25
with the isotherm Cru 130 and a for Transit because there's this supporting member right here that you can't get
37:32
past so we got 24 we've measured our door opening it's
37:39
19.5 in so whatever's left right here that is
37:47
how that's the maximum depth of your kitchen
37:52
Galley and so you can kind of see how all these measurements start to to stack on one another to see if you're actually
37:59
able to put in what you want in your
38:04
van so this question mark we found that out that it needs to be um we're going
38:10
to do 21 in and this will allow us to have a half
38:16
inch uh Gap here and then we have a half
38:21
inch I say Gap we got half inch in front of the sink and a/ inch behind behind
38:26
the sink and that's as that's as shallow as we can go where it doesn't look
38:36
weird so now that we've done that um that's pretty much it so that is the way
38:44
you can look at let me get back to my face
38:52
here there we go so that's a way that you can take uh a piece of grid paper you can
39:00
lay out all your dimensions of your van and you can try to figure out how you're going to take all the stuff that you
39:05
want all the appliances you want your gear appliances um clothes all that and fit
39:11
it in the spaces that uh you think you are going to be able to fit because it
39:18
the uh it's actually easier the more products you pick out so if you know what your microwave is your fridge your
39:25
sink um you know your your portable toilet um if
39:31
you know those things the more hard Dimensions that you have your bed size uh you want to sleep north and west or E
39:38
east and west or north and south when you get those measurements you can put them
39:43
into the drawing like like I did over here and you can really find out uh
39:50
what's going to work for you or what's going to fit and what's not going to fit
39:57
so yeah let me know if you guys uh that are watching if you guys have any questions um yeah I just wanted to walk
40:04
through this why it was fresh my mind it can get kind of overwhelming when you start to uh work on your van
40:11
because uh once you start making commitments and you're cutting pieces of wood you're doing stuff to your material
40:18
that you can't undo uh you might get ahead of youread of yourself so driver's seat and then
40:23
you go back and you forget that
40:29
uh you forget how it's actually going to end up looking and that's one thing I
40:34
forgot to tell you on here so let's use this orange pen if you notice right here
40:40
uh I've got a even 3 in border around these boxes so this
40:47
right here around the boxes is 3 in and this is where the Aesthetics come
40:53
into play so this is this is sizing it up to let us know how this is going to look when
41:00
we're actually finishing this part now those 3 in here on top and bottom
41:06
they're going to take away from this sleeping height so just be
41:11
aware about making stuff look good it changes it might change stuff in another area but to make it look good we we
41:18
stretch it across where the microwave is and we're pretty much doing what they
41:24
call picture framing so we're picture framing this whole you know Kitchen Gallery setup and
41:32
we're doing that so that everything looks very professional and that we actually had a plan Planned approach to
41:40
this
41:52
layout see if there's anything else I wanted to talk about on this
41:59
yeah that is pretty much it so I'm going to talk about a couple more things here
42:05
uh as we're ending the live stream first thing I want to show you guys over here on the computer is the
42:11
DIY van build cheat sheet if you're not familiar with the DIY van build cheat sheet it's a curated Excel sheet that I
42:16
put together over the last three years of all my Amazon purchases stuff that I use in the shop tools um all kinds of
42:24
things so here's a look at it we've got storage equipment electrical a lot of uh
42:30
Renegy blue SE systems uh some victron components uh some touch switches with
42:36
stepless dimming uh which is really cool we've got Fasteners this is a lot
42:44
of stuff that I use when I do use 020 in the van um HVAC you know Max fan uh SAR
42:51
brackets heaters um you know re a shelf as some cool things where these are pull
42:58
out uh kitchen organizers we got Roofing solar panels uh the most important thing
43:04
on here uh I believe is the tools so every single tool on this list I use in
43:10
the shop to build Vans every day and we actually have a uh a blog
43:16
post that's uh coming soon talking about these tools and why they're
43:22
important um but for now you can download this list it's completely free you just come here put your name in
43:29
email address it goes straight to your inbox and it'll definitely help you out
43:34
with looking at products you know there's stuff that it's stuff that I've bought and I've looked at it it's stuff
43:41
that I've used so I think it'll really help you out just go to uh VOR hq.com put your name
43:50
and email address click download it'll come straight to your inbox you can also click the link in the description below
43:55
to uh get get to this page as
44:01
well and then last but not least let's talk about my van Building Company
44:07
Odyssey custom vans so the van behind me is the one that I'm wrapping up on and
44:13
uh we actually took it to adventur Van Expo in chattanoga Tennessee to show it off we did a quick walk around video if
44:20
you guys want to watch that on our YouTube channel van Builder HQ we walk through the outside inside
44:26
showed you guys uh the interior system from Adventure wagon a lot of Flatline
44:31
vanco components are in this build uh a lot of bamboo uh powdercoated aluminum
44:38
uh robust power system as well as uh 420 watts of solar Up on the Roof got the
44:45
dtic RTX 2000 AC unit as well with as a w basto airtop
44:51
40 uh gasoline heater so it's actually directly connected to the auxiliary port
44:57
of the Ford transits gasoline tank itself down here in the bottom we've got all the details the uh you know the
45:04
vehicle base the offgrid power system that we developed for it the interior system the kitchen Galley couple of
45:11
safety items but if you guys are interested in this van take a look at all the photos so this is the photos
45:18
from the meantime until I finished making the complete walkthrough video of this build but you can kind of comb
45:25
through these check it out if you guys are interested in purchasing this van you can contact me at Odyssey sales
45:32
Odyssey customs.com that is also uh my contact phone number the easiest way to
45:38
connect with me is click on this button right here it says click here to schedule a call it's going to bring you
45:44
up to a calendar link and you can go select the day that you're available you can even select the time that works best
45:50
for you it's going to pop up on my calendar it's the easiest way and best way to get in touch with me if you are
45:57
looking to get a personal van build done this is the best way uh there's some instructions over here on the left stuff
46:04
to get ready for before they call but if you are interested in the van that I just showed you use that link schedule a
46:10
call with me and I'll be happy to tell you more about the van all right guys well that is going to
46:17
do it for our live stream tonight I hope this video helps you out with planning how to get the stuff that you want in
46:22
your van all your gear your appliances uh kind of an approach to help you uh do
46:28
your layout of your van so you can kind of really get the van that you want um and the stuff that you want in it if you
46:35
have any questions uh related to that you can always put those in the comments in the comment section below I'll be
46:41
happy to read those make sure you guys are subscribed to the channel give us a thumbs up if you liked it and then share
46:46
this video to anyone who needs help with uh organizing their van doing a van
46:51
layout or van floor pan van floor plan uh I think it'll really help him out and
46:57
uh until next time we'll see you guys on the next live
47:03
[Music]
47:16
stream
#Autos & Vehicles
#Trucks, Vans & SUVs
#Home Appliances
#Home Improvement