Up next in 10

Installing JDK and JRE for Hadoop
Show More Show Less View Video Transcript
0:00
in this video we are going to discuss
0:02
installing JDK and JRE for Hadoop we
0:05
shall mention all the steps one by one
0:07
for your understanding and also this
0:10
video will be assisted with one
0:12
practical demonstration for your easy
0:15
working so let us start with this
0:18
installation process so to download JDK
0:22
please follow the link so here the link
0:25
is given accept the License Agreement
0:27
option and then go for the Linux 64-bit
0:33
version and ending with dot dot G Jade
0:37
so this particular file is to be
0:39
selected so you can see after going to
0:41
this particular link this page will come
0:43
up we shall go for the accept license
0:45
agreement then you shall select this
0:47
respective version because it is Linux
0:49
x64 and tar dot G Jade should be the
0:53
extension of the file how to download
0:56
GRE on Linux so in the previous one we
0:59
download it only the JDK but we are now
1:02
supposed to download that JRE so now we
1:04
are going for this respective link this
1:06
page will come up accept license
1:09
agreement is to be selected so accept
1:12
the License Agreement and go to the
1:14
Linux x64 g.o.d download ending with the
1:17
filename ending with the extension ta r
1:21
dot G Jade so we have selected this one
1:24
because it is Linux x64 version open up
1:28
the terminal by pressing ctrl alt T in
1:32
the open - just press ctrl alt and T the
1:35
terminal will get open
1:36
create a Java folder at slash user slash
1:39
local using root permission so it will
1:43
ask for the password for the ubuntu root
1:46
system and now the command will be sudo
1:49
mkdir - P slash user slash local slash
1:53
Java so this folder is to be created now
1:58
copy and paste the downloaded JDK and
2:01
JRE dot dot G jet from the download
2:05
location that is a download folder to
2:08
the newly created Java directory so the
2:11
default folder will be download but also
2:13
you can download it in some other folder
2:15
so from that very particular folder to
2:18
the newly created Java directory this
2:20
files are to be transferred there so now
2:23
copy and paste the downloaded JDK and
2:26
JRE both the two files with the
2:27
extension dot dot G Jade into the
2:30
current directory so how to do that one
2:32
so if you if you go to the download
2:35
folder so CD download and then sudo CP
2:38
minus sir this is a respective file name
2:40
and this is a respective destination
2:42
folder and similarly we are going to do
2:44
the same for the JDK also now go to the
2:47
Java folder and enter that JDK and JRE
2:51
files so for that you are supposed to go
2:53
to that folder so cds slash user slash
2:56
local slash Java then sudo tar X V Z F
3:01
that is our GD K star dot dot dot digit
3:05
and similarly we are doing the same for
3:07
the GRE file also just this comments are
3:10
to be executed one by one now go to the
3:15
slash it is a slash profile and edit the
3:18
profile using the lines mentioned below
3:21
so how to open that file which will be
3:24
going for sudo that is a G edit that is
3:27
the editor and then slash it is C slash
3:30
profile is the file name slash it is C
3:33
is the path so now write this lines into
3:35
the profile document so these are the
3:38
lines are to be written in the profile
3:40
document say at the last you are putting
3:42
all these lines mention maintaining the
3:45
lowercase and uppercase letters so you
3:47
can pause the video and you can write
3:48
all these lines onto the slash EDC slash
3:52
profile file now write these lines onto
3:56
the terminal one by one so these are the
3:59
lines are to be retained onto the
4:01
terminal that is you are coming out from
4:03
this G edit software after saving it
4:06
obviously and then you are going to
4:08
write this lines onto the terminal
4:10
prompt now write this lines onto the
4:15
terminal one by one so these are the
4:17
separates more lines are there they are
4:19
to be typed in this order and
4:21
maintaining this syntax if you are using
4:24
the same Java version the
4:26
given lines will work fine for the
4:28
different versions in need to edit the
4:30
version details in the lines so here you
4:33
can find here we are using this Jo e 1.8
4:37
dot 0 underscore 1 7 1 so this version
4:41
was comfortable in my system but if you
4:43
are using some new or other Java
4:46
versions or gianni versions the versions
4:48
are to be are to be updated accordingly
4:50
and just you just go to this user local
4:54
Java folder you will be getting that
4:55
respective folders are there and
4:57
accordingly that commands are to be
5:00
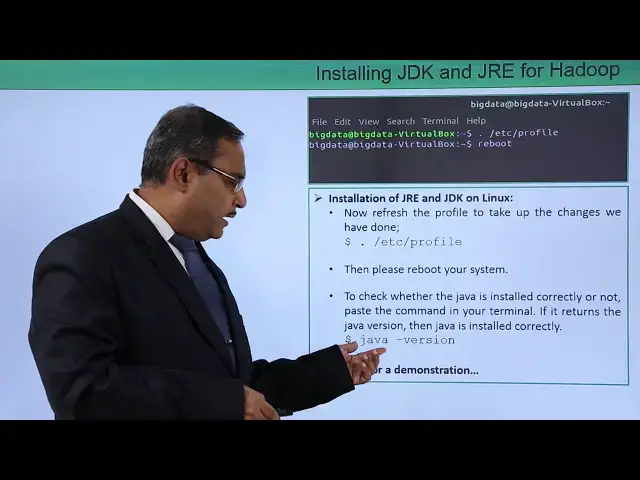
changed here now refresh the profile to
5:04
take up the changes whatever we have
5:07
done so now let us run the profile file
5:10
so that the changes whatever you did in
5:12
the profile file should get reflected
5:14
onto the system so to do that one we are
5:17
going for dot slash etc' slash profile
5:20
then please reboot your system so reboot
5:23
option will be there just go for the
5:25
rebooting of your system to check
5:27
whether the Java is installed correctly
5:29
or not on your system paste the command
5:32
in your terminal and if it returns the
5:35
Java version then Java is installed
5:37
correctly so now you can type this
5:40
command so there is a Java - version now
5:44
if we see that outputs are coming that
5:46
means that your Java has got loaded
5:47
successfully on your system so you see
5:49
we are going for this reboot and then
5:51
after coming up on opening one terminal
5:54
we can go for this we can go for this
5:56
writing this Java - version if the Java
6:00
version is coming correctly that means
6:02
your Java has got loaded successfully so
6:05
now let us go for one practical
6:06
demonstration to give you the idea that
6:08
how the things are taking place and will
6:10
be following all the steps as we have
6:12
mentioned here one by one for your
6:15
better understanding so here is the
6:17
demonstration for you in this video we
6:19
are going to install JDK and JRE so at
6:23
first we are going to copy the part of
6:26
the JDK and also add having the path for
6:29
the JRE link you can find that we are
6:31
having the path for JDK we are having
6:32
the path for GRE so these two parts we
6:35
are going to copy and we are going to
6:37
paste onto the browser for the
6:39
downloading and then we shall create one
6:42
directory under user local so the direct
6:45
animal be Java then we shall do the rest
6:48
operation so let me go for the copy of
6:50
this JDK download link going for this
6:55
space then go accept license and
7:02
selecting the Linna 64 so these are file
7:05
you are going to download save and okay
7:08
so now it is getting downloaded onto my
7:11
download folder copying the other link
7:13
for G re opening another tab paste and
7:20
go similarly again we are going for
7:24
accept license agreement then for this
7:28
Linux 64 where x64 we are selecting this
7:31
version and save okay so two files are
7:36
in are getting downloaded on to my
7:39
download folder so two files have got
7:46
downloaded we are opening one terminal
7:51
here so these are terminal when for the
7:56
next step so you are going to create one
7:58
folder Java under user slash local now
8:07
shall
8:08
come to the Downloads folder then you
8:11
shall copy this GRE file there is a GRE
8:16
start r dot digit and also the JDK start
8:20
dot dot dot gz8 so these two files were
8:22
going to copy onto the Java folder and
8:24
then we shall extract these two files so
8:27
we're coming down to this user local
8:29
Java folder now so now we are going for
8:32
this pseudo dot X visit F so we are
8:38
going for the extraction of the GRE zip
8:42
file and also doing the same also doing
8:45
the same for this so here you can find
8:48
that we are going for this pseudo tar x
8:51
VZ f j TK star dot dot dot g jet so in
8:55
this way you are extracting the jdk file
8:59
and similarly we are extracting that GID
9:01
file so they will get extracted and they
9:03
will create their own folders so they
9:06
will create their own folders and the
9:07
respective files will be there so in two
9:15
separate folders they have got extracted
9:17
now I shall go for this pseudo G edit /
9:22
e TC slash profile file so shall come at
9:26
the end we shall create a space and here
9:29
you are going to copy here we are going
9:33
to copy these are the paths we are going
9:36
to copy here you see this is data path
9:37
so export Java home then the path for
9:41
this Java and then export JT home and
9:44
then part they are to be updated and
9:46
then export path so these are the five
9:49
lines were doing the copy here and now
9:52
we shall go for the paste onto that /et
9:56
see slash profile file
10:05
so before going for the paste at first
10:07
were going to go into this user local
10:10
and the respective Java folder so if you
10:16
go for this LS you can find that here we
10:18
are having two G files there is a JDK
10:21
file that is a dot dot dot G jet and JE
10:24
file that is dot dot dot digit and after
10:27
getting extracted we have got two
10:29
folders that is a JDK 1.8 dot 0
10:32
underscore 181 and GRE 1.8 dot 0
10:38
underscore 181
10:39
so these two are the folders so this
10:42
folder paths are to be mentioned here in
10:45
our the respective home paths for this
10:49
whatever you are going to update on to
10:50
the ETS folder it is a profile file so
10:53
that's why this particular names are
10:55
required so I'm just checking them and
10:58
now we shall go for yes so these are the
11:04
names are there I'm just going for the
11:06
highlighting so going for the copy again
11:15
so now going for the paste so let me
11:19
make this one one it one because we had
11:22
that one one it one here you can check
11:25
that it's so this is my one eight one so
11:28
one seven one has to be replaced by one
11:31
eight one so I've done the required
11:32
objects I've done the required updates
11:35
here so this is very vital when for the
11:39
save closing that terminal going for the
11:43
save and close and then we shall go for
11:48
some alternative setup to updates the
11:52
alternative to set up the Java so before
11:57
that let me execute the profile so here
12:02
also I need to do some changes here so
12:06
we're supposed to execute all the six
12:09
comments there is a pseudo update
12:12
- alternative so all the six commands
12:15
are to be executed but before going to
12:16
do so let me make this one one seven one
12:19
is going to get replaced by 181 as I
12:22
told you the respective a folder name so
12:25
I'm making the changes here then I shall
12:29
go for a copy and then I shall go for
12:32
this terminal I shall go for the paste
12:35
now I shall go for the second line
12:37
I shall copy in the second line pasting
12:41
it on to this terminal similarly I shall
12:44
be doing the same for the rest lines
12:51
now I shall check whether the Java has
12:54
got installed properly or not let me
12:59
check the version of the Java and it
13:02
shows that it has got loaded properly so
13:04
in this way how to load this Java
13:08
installed this Java onto our system that
13:11
has been demonstrated properly thanks
13:13
for watching this video
#Programming
#Programming
#Java (Programming Language)
#Other
#Computer Education