Up next in 10


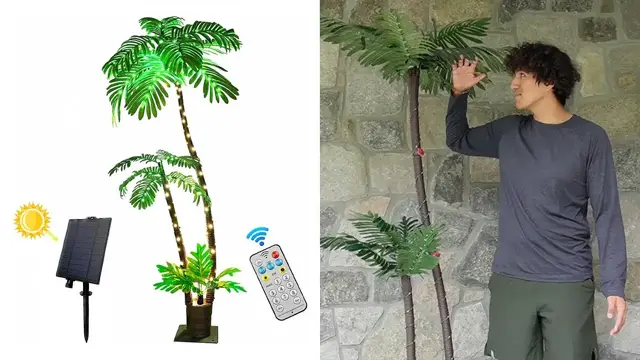
In this video, I review the Solar Lighted Artificial Palm Tree.
Check it out here: https://amzn.to/3tzqU9h
DISCLAIMER: This video and description contains affiliate links, which means that if you click on one of the product links, I’ll receive a small commission. This helps support the channel and allows us to continue to make videos like this. Thank you for the support!
Show More Show Less View Video Transcript
0:00
So today I'm going to be taking a look at this artificial palm tree that I was sent for the purpose of this video
0:04
I'm going to go ahead and just see what's in the box and actually go ahead and build it. So first thing I see over here is going to be these parts nicely wrapped up with this bubble wrap
0:16
This appears to actually just be the leaves themselves. So this is what they go ahead and look like
0:22
And this is all just going to go ahead and be plastic material. And these do appear to be movable
0:28
so yeah yeah i can go ahead and actually go ahead and adjust these as well to open them up a lot more
0:35
and there's several that come with it so there's going to be one two
0:39
and then also three so this little one over here too and then at the bottom there's going to be a lot more stuff so this is going to be the uh the bark
0:55
the branch at that point and there's going to be four of these stubs which is going to make it
0:59
real real tall just as tall as me and then right here this is what the base is going to look like
1:05
and this is going to be a soft cushion and at the bottom it does have this metal plate just to make
1:11
it a little bit more sturdier and also holes to go ahead and screw it into place if you want to
1:16
and right here this is going to be the actual well for starters on this side it going to be the solar panel And on the other side there going to be some buttons followed by lights
1:28
So right here I have the on off button mode. And then right here there's going to be two things
1:35
It says for lighting and then this little hand here that I'll figure out what exactly that is
1:40
And right here this is going to be a plastic part. So let me see what it looks like. This appears to be, yeah, just to go ahead and blow it up
1:55
And then I have a bag filled of stuff. So here I see there's going to be some metal rods. This is
2:03
probably going to go ahead and be to actually put down on the floor just to prevent it from
2:07
falling over or flying away. Right here, here's going to be the USB-C cable
2:12
here's a plastic bit kind of an arm that goes and rotates and then here's going to be some more
2:21
wiring this is going to be i guess for the lights and then there's a few more things here
2:30
so this kind of velcro strap this to go ahead and put on the floor
2:36
the instructions on how to go ahead and do this And it just one piece of paper on both sides And then this is what the remote control
2:47
is gonna go ahead and look like. And then finally at the bottom
2:51
there's gonna be this metal plate. And yeah, this is the heavy part
2:55
So this is, I guess what the base is gonna be screwed onto
2:58
So yeah, the first thing to do, of course, is gonna be to unscrew all of these over here
3:03
And I can place this right on top over here And then screw these back into place
3:07
Alright, now that that's a nice and tight, I can actually start putting in the branches over here
3:12
So right here, they're going to go ahead and be labeled. So this one's going to be for A, which is going to be right over here
3:18
And it even says which ones to put first. So this is A1, so this one will go first
3:22
I can go ahead and, yeah, I'll leave that little cardboard thing there. All I have to do is just stick it in right over there
3:31
Push it, and then I can go ahead and tighten it up. There, now it's nice and tight. This won't be coming off anytime soon. And then here's A2
3:43
I can do the same thing here. And finally A3. There, the A part is complete and I can go ahead
3:50
and do the same thing but for the B part. And now I can go ahead and grab the branches and then put
3:54
them on top. So this one will go on the A section and this one will go for the B section
4:01
And there Now the only problem is that these leaves are kind of droopy so I just have to go ahead and just move them so they look a little bit more realistic and more like a palm tree
4:12
So just like this it looks a lot nicer and then right here wrapping I can go ahead and just wrap
4:20
the LEDs around it here as well and do the same thing for up top over here
4:25
so i went ahead and attached this part over here and then this put this post here
4:31
attach this here and then kind of just stuck it in here and the next thing to do would be to
4:37
attach these bits to the lights right over here all right so this is what the finished palm tree
4:43
end up looking like and it's literally just as tall as me it's actually taller than me over here
4:47
and i'll actually go ahead and light this up i'm going to come down here and then right over here
4:52
at the bottom there's going to be this button to go ahead and turn it on. I can go ahead
4:57
and press it and then I can just press the different modes and it'll go ahead and just
5:00
start to light up everywhere over here but I can also go through cycle through different
5:04
modes and it just shows either flickering or it'll kind of constantly be on. And if
5:13
I want to go ahead and just put this on the grass then I would go ahead and need to use
5:18
these little metal rods here. But yeah, that's a quick overview of the palm tree
#Computers & Electronics
#Home & Garden
#Home Improvement