Up next in 10


In this video, I set up the K&F Concept Tripod for overhead shots.
Check it out here:
USA: https://amzn.to/3Y8mG65
UK: https://amzn.to/462Jxl8
CA: https://amzn.to/3Wj7FwO
DISCLAIMER: This video and description contains affiliate links, which means that if you click on one of the product links, I’ll receive a small commission. This helps support the channel and allows us to continue to make videos like this. Thank you for the support!
Show More Show Less View Video Transcript
0:00
So these are some of my main tripods I use
0:01
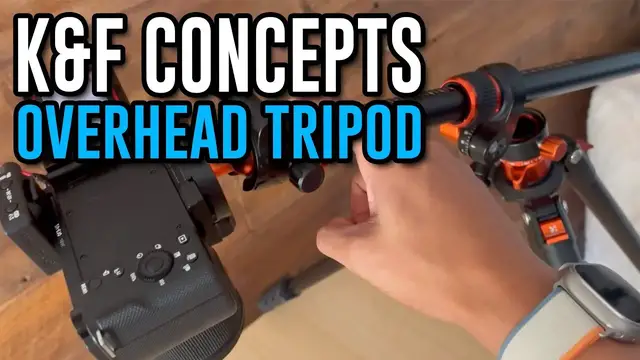
Unfortunately, it's really hard to get an overhead shot with it, which is why I got this KNF Concept tripod
0:07
So I want to do a quick unboxing and test this out to see how well it works. So this opens up real easy and right here is the tripod itself
0:14
It comes in this nice carrying case and we got the logo right here, KNF Concept
0:19
The thing about this baggie is it feels more high quality than regular bags. It feels thicker
0:24
It's got some good cushion on the side. And more importantly, here's the tripod itself
0:29
So right off the bat, this feels like a high quality tripod. And one thing that's different than the tripod I'm currently using is going to be the legs
0:36
So these legs aren't going to be attached to the pole. I can move them separately
0:40
And to actually put them in place, I just have to spin them all the way down. Just like that
0:48
And if you hear the click, it's going to be this mechanism right over here. So I can actually individually move these legs independently of each other
0:56
And to do that I just have to push this clip in place and then I can move it where I want. And then as I move it, it locks into position so now this can't go upwards so it's going to be stuck there
1:06
And I can even move this to this position over here if I want it basically almost flat So this lets me get a bunch of different angles So here a closer look at it And as far as this mechanism it slides really
1:18
smoothly in place and let me tighten it. And there now I can't move this up or down, but I still can
1:23
rotate it clockwise or counterclockwise. And to avoid that, turn the knob, tighten it. And there
1:30
now I can't move it at all. So now time for the coolest part, which is the reason I got this tripod and it's the overhead shot. And to get to that, just loosen this bit up. Then I can pull it
1:38
right out just like so. And now I can't move it. The way to move it is to loosen this up
1:44
And as you saw, it loosens and I can get that shot just like that. So this is going to be real
1:51
useful, especially when I'm doing some videos right over here on the table. I don't have to
1:55
worry about propping the tripod in weird angles just to get this. And I can also rotate this like
2:01
And now if the camera is too heavy over here something to help would be adding a counterweight at the bottom because it does have this hook
2:07
Otherwise if I just put the camera it might tilt over like this
2:11
Another thing to do would just be to not extend the arm all the way so I can actually move it back inside
2:17
Just like this and now it feels a lot more secure and I probably won need the counterweight and taking a closer look at the head We gonna have a leveler and to be able to rotate this just loosen this over here And then I can rotate it to however I desire
2:30
And when attaching my camera to this mount, you just have to unthread this
2:35
And this comes right off. And then here I can just thread it by hand like so
2:40
So let me attach this camera to over here so I can show you what it looks like. So the first thing I'll do is to take off the other mounting plate from my other tripod
2:47
And then I can attach this one right here. And the cool thing about this is there's going to be some rubber on here, so it's going to stay nice in place with friction rather than it being plastic on plastic and potentially scratching it
2:56
Just like that, and I can also move it depending on what position I want to place it in, so I'll have it right around centered
3:01
And then I can mount this right here, and then tighten it
3:10
And there, and as you see, it's actually falling, and that's because I do need some extra weight
3:14
or I can extend the legs and put this on the floor and I think I'll go with that option
3:18
So first let me just unscrew this and raise it up a little bit more so it feels a little bit more secure
3:25
And then I also do have to flip this so this is facing downwards. So here the final setup and some adjustments I made would be to re this more upwards spread the legs out even more wider apart and for the back leg place it all the way down there and again for extra security i do want to put some sort of counterweight over
3:45
here and if i don't have anything just placing something at the back leg because that'll also
3:51
secure it maybe you know something like this to prevent it from moving forward and then here
3:55
Let's see how sturdy this is. So if I if I tap this yeah this feels yeah this feels pretty secure
4:03
so it doesn't feel like it's going yeah it doesn't feel like it's going to go ahead and fall down
4:08
But more importantly let's see how the footage looks so I can add this black background over
4:12
here and if I want to make a vertical style content it'll be a lot easier like this and
4:16
if this is still too low I can still raise this upwards even more so I can actually re-angle this
4:22
and here so you can kind of see what it looks like. I'm going to angle this even more up and
4:29
this is as high as it goes. There. And let me recenter this and that's what it looks like
4:38
So overall I'm pretty happy and this is a much needed upgrade and this is going to make shooting
4:42
content, specifically vertical video, overhead shots, much easier. But yeah that's a quick look
4:47
at the KNF tripod
#Computers & Electronics
#Camera & Photo Equipment