Up next in 10


In this video, we talk about what’s wrong with a wood station buck and why it may not be the best choice for serious metal shaping work. We go over some of the common deficiencies, where it can fall short in real shop use, and why other options may give you better accuracy, durability, and results.
Show More Show Less View Video Transcript
0:02
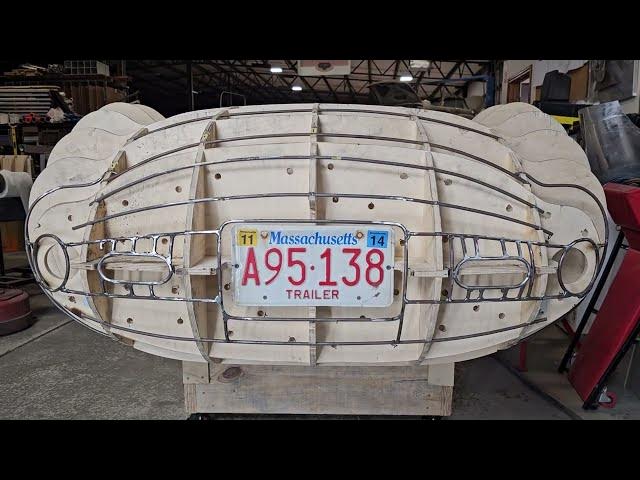
All right, it's Ray from Pro Shaper
0:03
Workshop and you're looking at a wood
0:06
station buck. It's got about an 8 and
0:08
1/2 inch spacing on the stations.
0:11
It's Baltic birch, 1/2 inch thick Baltic
0:14
birch, which is the best material you
0:16
could use if you're going to make a
0:17
station buck.
0:18
And the beauty of a station buck is it
0:21
comes from a file. You have to assume
0:23
that the file is accurate information.
0:26
And the file might have come from a scan
0:29
of a real car. It might have came from
0:32
just analysis of pictures
0:34
that some someone CAD knowledge has
0:37
developed into the shape. It might be
0:39
off a half an inch. It might be an inch
0:41
off. Who knows? You never know.
0:43
Uh even the original cars would be off
0:45
left or right. Uh they were made in
0:47
haste.
0:48
So, this car is going to be symmetrical
0:50
because the file is all symmetrical.
0:54
But, uh one of my main criticisms of
0:57
wood station bucks is they do not
0:59
provide the information you need in
1:02
order to get all the details. So,
1:05
you can make the skins and then draw on
1:07
the skins uh where the various little
1:10
features are like this one has the
1:12
license plate opening and then there's a
1:14
couple of vents to either side of the
1:16
light license plate opening and then
1:18
there's the tail lights
1:20
uh further out.
1:21
And um all those details, yes, you can
1:24
do them from the skins, but it's so much
1:28
easier if you have them well defined.
1:30
So, when the panels are made, they can
1:32
be trimmed and then they're going to
1:34
need flanges in in in board on like
1:36
those tail light
1:38
openings, the round openings, and also
1:41
on the plate and and the vents.
1:43
And you can cut out the inside and use a
1:47
torch, heat the aluminum up, and then
1:49
just hammer form right around that wire.
1:51
Uh and the wire doesn't doesn't care if
1:54
you heat it up or whatever. If it was
1:56
wood, it's going to start burning. So,
1:58
uh typically when these cars were made
2:01
new, they were either made with a wire
2:03
form or uh some uh coach builders used a
2:06
complete
2:08
full surface hardwood both the on the
2:11
front and the back where all the detail,
2:13
that's the hardest part of shaping any
2:15
car because there's so much detail
2:17
there.
2:18
Uh and they would hammer form and you
2:21
can't really clamp with a full surface,
2:23
but you can hammer form. A lot of times
2:25
they would have a full surface
2:27
uh buck
2:29
uh hardwood uh buck.
2:31
And also they would have maybe a wire
2:34
form next to it they would uh weld
2:36
together on the wire form. Now, this
2:38
this is a a combo. I've enhanced a wood
2:42
station buck.
2:43
And the wood station buck is totally
2:45
different than a hard hardwood full
2:48
surface buck. You know, people say it's
2:50
got a wood buck, but you really have to
2:51
define what does wood buck mean.
2:55
And I've been a heavy critic of these uh
2:57
wood station bucks for years and years
2:59
and years. I actually made my first one
3:01
in 1985
3:03
and it was for a packet fender and I
3:05
swore after I got that thing done that I
3:07
would never ever make a wood station
3:10
buck again.
3:11
So, I didn't make this one. This one
3:13
just came to the shop and we got to do a
3:15
lot of panel work on it.
3:17
And uh
3:19
and now we've got this whole back
3:20
defined really well and it makes it
3:22
really easy.
3:24
Sort of. So, the other problem is with a
3:28
wire form, you have full access to the
3:30
back side. You just got to crane your
3:31
neck around and you can see how the
3:33
panels are fitting. And typically what I
3:35
do is I hold them on with little hand
3:37
squeeze clamps, which I put rubber on
3:39
the jaws and and it really holds the
3:41
panels really nice. You really need to
3:44
clamp the panel to find out how it's
3:47
fitting.
3:48
So, uh with the wood station buck, it's
3:51
absolutely almost impossible to do that
3:53
and uh
3:55
it it's it's pretty nebulous as far as
3:57
how you're fitting.
3:59
So, I knew uh the technology of bore
4:03
scopes has come up quite a bit. So, I
4:05
went on Amazon. I found a nice little
4:07
bore scope for $45.
4:11
And then we drilled all these little 1/2
4:13
inch holes now and and the lead going in
4:15
is about a quarter of an inch off the
4:17
bore scope. We'll be able to put that
4:19
bore scope in there and it has a LED
4:21
light or it has a um
4:23
like a LED light on the end of it. It's
4:25
got a fiber optic light on the end of
4:28
it. And you will be able to see how it's
4:31
uh
4:32
sitting on the wires in the wood here.
4:34
So, it's going to make the job a lot
4:36
easier.
4:37
So,
4:38
uh tomorrow we've got some of the panels
4:41
roughed in and the first panel that was
4:43
roughed in was roughed in by one of my
4:45
students
4:46
and because we couldn't see and we only
4:49
had a few wires to begin with, uh
4:52
that it got it got overdeveloped and
4:54
that's a typical situation. When you're
4:56
building a panel,
4:58
uh it doesn't matter what tools you're
5:00
using, you you've got to make sure that
5:03
you don't go too much, but uh in a
5:06
situation of making a panel, you're
5:07
either underdeveloped,
5:09
perfectly developed, or overdeveloped.
5:13
And in some part of the panel might be
5:14
overdeveloped, some part of the panel
5:16
might be underdeveloped, and some part
5:18
of the panel might be perfectly
5:19
developed. So, there's quite a skill set
5:22
to get it all to the to the Goldilocks
5:25
point where it's it's not too
5:27
underdeveloped or too overdeveloped,
5:29
just right. So,
5:32
it's an interesting process and we'll be
5:34
doing a couple bunch bunch of little
5:36
videos of this and maybe a couple
5:38
tomorrow.
5:39
We're going to laser weld these panels
5:41
together. We got one that's pretty
5:43
close.
5:44
We it was overdeveloped and I had a heat
5:46
shrink it down.
5:48
And that's the beautiful beautiful thing
5:50
about doing sheet metal shaping is it
5:52
doesn't it almost doesn't matter how bad
5:55
you make a mistake, it's repairable.
5:58
But, uh if you get it out of control,
6:00
it's usually you're not really paying
6:02
attention and uh I I had my student on
6:05
it and uh in a matter of minutes, you
6:08
can go from oh boy, this is looking
6:10
really good to uh-oh. So, uh we had to
6:13
shrink it down probably about a half an
6:15
inch, which is pretty easy to do. It's
6:17
just time consuming.
6:18
And it doesn't hurt the panel at all.
6:21
And uh tomorrow we'll maybe get a couple
6:24
of the panels fit and hopefully we'll
6:26
start welding them together and then we
6:27
put these details in. It's going to be a
6:29
pretty cool project. Thanks for
6:31
watching. It's Ray from Pro Shaper
6:32
Workshop.