Up next in 10


English Wheel Plans:
https://www.proshaper.com/tool-designs/
Our Amazon Storefront:
https://www.amazon.com/shop/proshaper
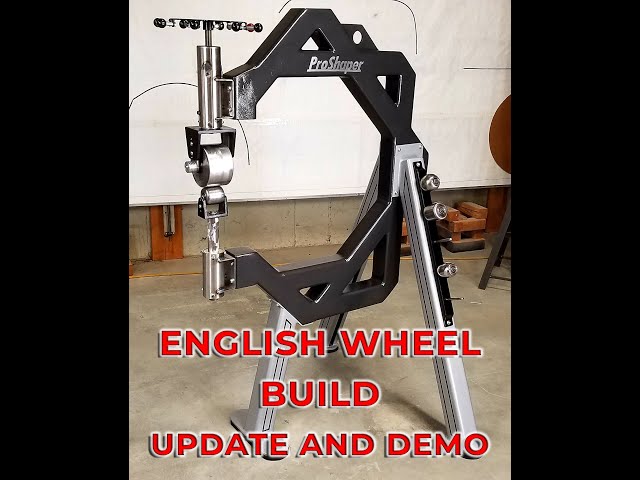
The English Wheel is complete minus a few touch ups here and there. Wray explains all of the features and the demonstrates the functionality of it by wheeling a piece of sheet metal. The plans for the frame can be purchased on our website and we will also have the adjuster / wheel plans available there soon. Thank you for all your continued support!
Email: [email protected]
Website: https://www.proshaper.com
Facebook: https://www.facebook.com/ProShaper/
Instagram: https://www.instagram.com/proshaper/
Twitter: https://twitter.com/ProshaperM
Linkedin: https://www.linkedin.com/company/proshaper/
Show More Show Less View Video Transcript
0:08
hi it's ray from proshape a workshop and
0:11
tonight I wanted to talk about the
0:13
YouTube build English wheel as you can
0:24
see we're almost done with is a few
0:26
little tweaks we want to paint these
0:28
here the bottom and the top of the
0:30
juster and the bottom holder here and we
0:34
feel a few tweaks here and there still
0:36
but I'll just show you some of the
0:38
features that we have on the wheel
0:40
we have rubber underneath it gets glued
0:43
on and it's got a really nice tripod
0:46
system the thing is super stable someone
0:51
mentioned I had it on Facebook and
0:53
someone mentioned I should probably put
0:54
a boggling across there doesn't need it
0:58
those legs are bulletproof we have the
1:01
adjuster of the anvils right here with a
1:04
nice rack and we have a new adjuster I
1:10
designed in a new bottom holder these
1:13
bolt on and some of the people have been
1:15
making comments on Facebook I put a
1:17
couple pitches up this week on Facebook
1:20
on my facebook page or anybody on
1:21
YouTube wants to follow me on Facebook
1:24
it's under a chalene or row shape or
1:28
sheet metal either one and my racial een
1:31
when I post a lot of really good stuff
1:33
there if you're interested so you have
1:36
to become a friend I have already you
1:38
have to follow me I've already got 5,000
1:41
friends and that's the limit I guess on
1:43
Facebook so we painted it up with
1:47
rust-oleum hammered finish all of the
1:51
the wells Frank my volunteer put the
1:55
frame all together he did all the
1:57
welding and most of it was MIG weld and
2:00
Miggs spatter all over the place but it
2:02
was quite a bit of cleanup from the
2:05
wells and then I wanted it to be really
2:08
pretty so I had Frank
2:12
put bondo in all of these and we clean
2:16
the fill it's all up nice they're all
2:17
been sanded beautifully and everything
2:19
so it's gotten really nice appearance
2:21
now even on the legs we filled it all
2:23
with bondo down on the bottom when we
2:25
put the soles on there and these are
2:32
going to be painted with wrinkle paint I
2:34
just didn't get a chance to yet to get
2:36
that done and this is the mechanism that
2:42
I designed for this wheel the top wheel
2:45
and anvil it's a pretty much standard of
2:47
what I do on my other other english
2:50
wheels that we sell and what I'm gonna
2:53
do now is I've got this as a plan that
2:59
you can buy it's a full-scale plan that
3:02
includes the plan for the frame and the
3:05
legs and that's been pretty successful
3:09
and it's another way of help in my
3:10
youtube channel and these difficult
3:12
times if you're interested in building a
3:13
really nice machine like this so my the
3:18
plans are on sale at my website pro
3:21
shaper calm and now what we're going to
3:24
do is this is the prototype machine and
3:28
we might like I said tweak it here and
3:30
there but not nothing major everything
3:32
is really really good it exceeded my
3:34
expectations but we might do some
3:37
enhancements as we evolve it and Frank
3:41
is going to start doing wheel number one
3:45
the production wheel number one we're
3:47
going to make a couple for the shop but
3:49
wheel number one we're gonna video every
3:52
bit of it showing how to do all the
3:54
joints and doing how the different ways
3:56
of doing the joints the cutting the the
3:59
metal for the joints and also the
4:01
welding methods and then what a lot of
4:04
people are interested in is how do you
4:06
make all this well I'm going to have
4:09
plans available they also will be
4:12
full-scale they will be on on my pro
4:16
shaper with pro shepard.com website and
4:19
all the innards and all that will all be
4:23
there
4:23
and that means that you can make this
4:26
all yourself or if you don't have a
4:29
lathe and the equipment maybe you have a
4:31
friend on the street or machine shop
4:34
that you've dealt with they can do it
4:35
for you or you can also buy all this
4:39
stuff from pro shaper calm another
4:43
option is if you have a local company
4:49
that's making the anvils or something
4:51
you can buy all that stuff from them and
4:54
it will all adapt what I have the reason
4:56
why it will adapt is I designed this
4:59
with an interface so it has these four
5:02
bolt three eighths bolts interfaces
5:04
right here so it's it's pretty flexible
5:07
as far as how you want to put on
5:09
different types of tooling and some of
5:12
the people on the forearms have said hey
5:15
would that be kind of cool if you made
5:18
it like a multi-purpose machine and I
5:20
said yeah I'm generally not a big fan of
5:22
multi-purpose machines but some people
5:24
are very tight on their space in their
5:27
two-car garages or one car garage or in
5:29
their basement or whatever and it's very
5:32
easy for me to come up with a dovetail
5:35
that's tapered and that would allow you
5:38
to kind of plug this stuff in so you
5:41
could plug this and tighten a couple set
5:43
screws and it would hold it and that one
5:46
would drop in a couple set screws and
5:48
that would be the English wheel mode but
5:51
it also could potentially be turned into
5:53
a planning hammer or a luring press or
5:57
all kinds of different or bead roll or
5:59
tipping wheel all kinds of different
6:01
things so that's yet to come
6:04
that's on the agenda somebody else said
6:07
that they'd like to have it so that it
6:09
could swing against the wall and be
6:12
hinged right against the wall so this
6:15
has a nice flat plane here and flat
6:17
plane here that easily could be adapted
6:19
for a wriggly really heavy-duty hinge
6:23
system so that you could swing swing it
6:26
right out into the room or against the
6:29
wall so some of the other features that
6:34
the machine has is these and
6:37
these yolks here these are adjustable so
6:41
that you got set screws here and here
6:43
that allows you to tip the angle to
6:48
correct any geometry problems or
6:50
anything like that or if you want to
6:51
pinch one like this sometimes you want
6:54
to pinch the wheel and you can do that
6:57
by just loosening the screws and turning
7:00
these adjustments here you also have a
7:02
one point connect connection point here
7:05
for the yokes so that if you turn that
7:08
loosen that you can turn this and that
7:11
allows you to turn it 90 degrees or 45
7:14
degrees which comes in really handy not
7:17
all the time but maybe 5% at a time it's
7:20
a really nice feature to have that's the
7:24
same deal over here you got one
7:26
half-inch 20 thread with a 3/4 a head on
7:31
it
7:32
bolt that you just loosen up and you can
7:35
turn that yoke any way you want and this
7:39
system here is it has an inch and a half
7:42
piece of cold-rolled Brown stock through
7:46
here and this has got a sleeve on it
7:49
right now that's carrying the load but
7:51
you can alter the size of that sleeve if
7:53
you wanted to and that would allow you
7:56
to raise and lower that if you wanted to
7:58
put a little bit bigger wheels or
8:00
different yokes and all that so there's
8:02
all kinds of adaptability to this to
8:05
this machine if you wanted to have a
8:07
bunch of different specialty anvils you
8:10
can make another holder on the other
8:12
side you got plenty of room for growth
8:14
foot handles and we got a nice lifting
8:17
point it's really well balanced it comes
8:20
up really nice and square there and and
8:23
then I have this is what I do here on my
8:25
top wheel adjuster I always put one
8:28
different colored ball so you can find
8:30
out where you're at
8:31
as far as how much tension you have on
8:34
it now this will be what I call the
8:38
deluxe mechanism kit and again it'll be
8:43
sold as plans might also sell it as
8:46
components that you finish and also as
8:50
finished piece
8:51
that's yet to come it might be another
8:53
two weeks before I get all of that stuff
8:55
done and some people really
9:00
budget-conscious
9:01
and they might want even at less
9:05
expensive set of mechanisms so I will do
9:09
also a bottom adjuster set up is
9:15
oftentimes a little less expensive to
9:17
make so this can be easily adapted to a
9:20
bottom adjuster some people just favor
9:22
in many ways you can kick in with your
9:24
feet I don't particularly care for them
9:26
but a lot of people do so I will make a
9:29
mechanism that will be a bottom adjuster
9:31
and that'll be another option and that
9:33
will be a lesser priced one but that's
9:36
going to be at least a couple weeks or
9:38
so before I get all that done and we
9:41
painted it the black rust-oleum Hammad
9:44
finish then this is a silver when we put
9:47
these little stripes on and it's looks
9:50
really attractive like I said this is
9:51
going to be the wrinkle finish I think
9:54
that will set it off really nice and we
9:57
got this with the plan kit you get with
10:00
the deluxe plans you get the full-scale
10:03
plans which allow you to make little
10:06
templates and to be able to cut all the
10:08
pieces very easy and you leave the
10:10
full-scale plan untouched and you can
10:13
measure everything so when you get ready
10:16
to well that if you want to know what
10:18
that distance is from here to here
10:19
whether you're in metric or if in inches
10:22
you'll be able to measure the plan and
10:25
make sure that yours is measuring up the
10:28
same and as you weld it the plans also
10:31
include the angle cuts for the wheels
10:34
and area for the legs and there and then
10:40
also the pro shaper aluminum nameplate
10:46
here which I put on with the two-sided
10:50
industrial Automotive tape so that's a
10:54
funny story because when I put it on I I
10:58
said oh I'm gonna try it here in the
11:00
center of the machine and I just barely
11:03
touched it
11:04
this and I step back my says you know it
11:07
might be better if I put it over here
11:09
and I went to take it off and there was
11:10
no way it was impossible it was on this
11:13
so the other side I put it in the center
11:15
right in here that's going to have to
11:18
stay there so we've got an asymmetric
11:20
look on this wheel so I'm really happy
11:24
with the machine let me show you where
11:26
we can do with it there's some steel you
11:30
know put the steel into it any adjuster
11:35
on and we'll be using this on some of
11:41
our projects too as you can see that's
11:59
really stable the machine's not jumping
12:01
around or anything with the rubber feet
12:04
on it or rubber shoes on it and that
12:07
three-point pickup or leg system it's
12:13
really stable so there's the the nice
12:19
compound you can pop in there in minutes
12:23
let's try hitting up a little bit let me
12:41
get my gloves on so if anybody has any
12:46
questions about the wheel two on the
12:48
forums if you probably noticed I answer
12:51
all the questions on the forum on
12:52
YouTube where you can make comments or
12:56
ask questions
12:59
[Applause]
13:25
[Music]
13:29
so you can knock those lumps out pretty
13:33
quick don't hesitate to ask any
13:40
questions and thank you very much for
13:43
the support you have been given me it's
13:45
been really helpful in this this time
13:47
we're in now and I hope we can make this
13:51
into something that works really well
13:53
not only the English wheels but like
13:56
I've mentioned I think in the earlier
13:57
video I plan to make you know a bunch of
14:01
different machines there will be of this
14:02
high quality build construction and
14:06
design and it's pretty inexpensive
14:09
everybody's always looking for an
14:11
inexpensive tool but they want it to
14:15
function well as you can see that
14:16
functions really nicely I priced out the
14:20
tubing brand new from my supplier and
14:23
brand new with the legs and everything
14:27
is probably about 250 to 275 250 to 275
14:33
dollars I don't have the price yet for
14:37
projected for this and like I said
14:39
that'll be in a basic and a deluxe
14:42
version and also it'll be bought
14:45
potentially in plans where you do it
14:47
yourself or the kit or assembled so
14:51
there'll be an array of different price
14:53
points so make it affordable for
14:55
everybody's pocketbook so from charlton
14:59
massachusetts and racial liens
15:01
browshaper workshop i want to thank you
15:03
for watching good night
15:08
[Music]