Up next in 10

Bios & UEFI Booting from a USB Drive
Apr 21, 2026
Mastering BIOS and UEFI USB Booting: https://pendrivelinux.com/bios-usb-booting-tips-and-tricks/
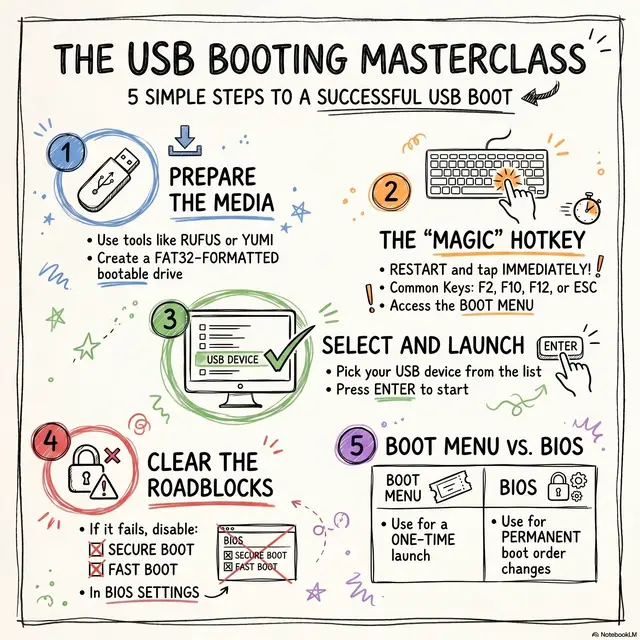
A comprehensive walkthrough for launching an operating system or utility from a removable flash drive. It highlights the critical distinctions between legacy BIOS and modern UEFI firmware, noting that settings like Secure Boot or Fast Boot often need adjustment for success.
A simple workflow involving creating bootable media, accessing a startup menu via hotkeys, and selecting the correct device. To ensure compatibility, we recommend using specific formatting tools FAT32 boot partitions.
Troubleshooting advice is also included to help users resolve issues such as unrecognized devices or systems that bypass the USB to load the default desktop. A practical resource for installing software or performing system recoveries using external hardware.
#bios #uefi #boot
Show More Show Less View Video Transcript
0:00
All right, let's jump right in. You know
0:02
that simple little USB port on your
0:04
computer? Well, it's hiding a superpower
0:06
that honestly most people never even
0:08
touch. Today, we're going to unlock it.
0:10
I'm going to show you how to take full
0:12
control of your PC by booting it
0:13
straight from a USB drive. No, really,
0:16
just think about that for a second. What
0:18
if that tiny flash drive you've got
0:19
rattling around in a drawer could do way
0:21
more than just hold your documents? What
0:23
if it was the key to installing a whole
0:24
new operating system, fixing a computer
0:26
that won't even start, or test driving
0:28
something like Linux without any
0:29
commitment? Well, the answer is it
0:31
absolutely can. Yeah, with this one
0:34
skill, you can do so much. You can
0:37
install a brand new clean copy of
0:39
Windows or finally dip your toes into
0:41
the world of Linux. You could run some
0:43
serious recovery software to rescue a
0:45
computer that's on its last legs. Or,
0:48
and this is really cool, you can boot
0:50
into what's called a live Linux
0:51
environment to try it out without
0:52
messing with your main hard drive at
0:54
all. It's basically the ultimate PC
0:56
Swiss Army knife, all on one little
0:59
stick. Okay, so before we get into the
1:01
how, we kind of need to understand the
1:03
wear. The main control panel that tells
1:05
your computer how to start up is called
1:07
its firmware. Now, I know that sounds
1:09
super technical, but don't worry, it
1:11
really just comes down to two types
1:12
you're ever going to see. The old school
1:14
BIOS and the modern UEFI. Let's break
1:16
them down real quick. The easiest way to
1:19
think about it is like this. BIOS is an
1:21
old black and white TV with rabbit ears.
1:24
And UFI is a modern 4K smart TV. BIOS is
1:28
that old textbased system you'd find on
1:30
PCs from way back when. UFI, on the
1:33
other hand, is the new standard on
1:35
pretty much any computer from the last
1:36
decade. It starts up way faster. It
1:39
often has a nice graphical interface
1:40
where you can actually use your mouse.
1:42
And it has this one really important
1:44
security feature called secure boot. And
1:46
that brings us to secure boot. So what
1:49
is it? Well, its whole job is to protect
1:51
you. It makes sure that only trusted,
1:53
officially signed software can run when
1:55
your computer first turns on. Now, this
1:57
is great for security, but it can
1:59
sometimes get in our way because it
2:01
might see our perfectly safe bootable
2:03
USB drive as something unauthorized. So
2:06
just keep this in the back of your mind
2:07
if you ever run into a problem.
2:08
Disabling secure boot is usually your
2:10
first move. All right, with those ground
2:12
rules out of the way, let's get to the
2:14
main event. Your mission, should you
2:17
choose to accept it, is to boot your
2:19
computer from a USB drive. And I promise
2:21
you, it is way, way easier than it
2:24
sounds. It really just boils down to
2:26
five super simple steps. First things
2:28
first, plug your bootable USB drive into
2:30
a port. Simple. Step two, restart your
2:33
computer. Now, here's the most important
2:35
part. The second it starts turning back
2:37
on, you have to start tapping the magic
2:39
key. It's usually F12, escape, F2, or
2:42
the delete key. This gets you into the
2:44
boot menu. From there, you just use your
2:46
arrow keys to find your USB drive in the
2:48
list, hit enter, and that's it. You're
2:50
in. But what happens if it doesn't work?
2:53
What if you do all that and your PC just
2:55
boots into Windows like absolutely
2:57
nothing happened? Okay, first, don't
2:59
worry. This is super super common and
3:01
the fixes are almost always really
3:03
simple. Let's walk through the stuff
3:04
that goes wrong the most. So yeah, this
3:07
is the number one thing people run into.
3:09
You restart, you hit the key, you even
3:11
select the USB for the menu, and then
3:13
you're just looking at your normal
3:15
Windows login screen again. It feels
3:17
like the computer is just completely
3:18
ignoring you. But trust me, it's not.
3:20
There's almost always a good reason for
3:22
it. Okay, so the first roadblock you
3:25
might hit is that your USB drive doesn't
3:27
even show up in the menu. The fix? Let's
3:30
start simple. Unplug it, plug it back
3:32
in, and try again. If that doesn't do
3:34
it, try a different USB port. You know,
3:36
on a desktop computer, the ports on the
3:38
back are usually more reliable. And if
3:40
all else fails, just double check that
3:42
the USB drive was actually created
3:43
correctly and is, you know, bootable.
3:46
All right, next scenario. The USB drive
3:48
is there in the menu. You select it, but
3:51
then the PC just skips right past it and
3:53
loads Windows. The number one culprit
3:55
here is a setting called fast boot or
3:57
fast startup. Its job is to make Windows
3:59
load faster, but it does that by kind of
4:01
cheating the shutdown process, and that
4:03
can cause it to skip checking for a
4:05
bootable USB. The fix is to go into your
4:08
UEFI settings and just turn that feature
4:10
off. Oh, and here's a pro tip. Always
4:12
try to use that onetime boot menu key
4:15
like F12. It's so much easier and safer
4:17
than going deep into the settings to
4:19
permanently change the boot order. And
4:21
now for the final boss of boot errors,
4:23
the no bootable device message. This is
4:26
when you select the USB and the computer
4:28
basically throws its hands up and says,
4:30
"Yeah, I see this thing, but I have no
4:32
idea what to do with it. This is almost
4:34
always a security or formatting
4:36
problem." And like we talked about, your
4:38
first step is to go disable secure boot.
4:40
If that doesn't work, it could be a
4:42
formatting mismatch. The simplest fix
4:43
and the one that works most of the time
4:45
is to just recreate your bootable USB
4:47
drive, but this time make absolutely
4:50
sure you format it as FAT 32. It's just
4:53
the most compatible format for modern
4:54
systems. Phew. Okay, we have covered a
4:58
lot of ground, right? We've gone from
5:00
the why to the how to the what do I do
5:02
when it all goes wrong. So, let's wrap
5:04
this all up with a quick debrief of the
5:06
most important things to remember so you
5:08
can get this right every single time.
5:10
So, if you only remember a few things,
5:12
make it these. First, always try to use
5:14
that one-time boot menu key. It's
5:16
temporary, it's easy, and it'll save you
5:18
headaches later. Second, for the best
5:20
results, format your USB drive as FAT32.
5:23
Third, if something isn't working, your
5:25
first suspects should always be secure
5:27
boot and fast boot. Go find them in the
5:29
settings and turn them off. And finally,
5:31
if you're on a desktop, remember those
5:32
USB ports on the back connected right to
5:34
the motherboard? They're your best
5:36
friends for this job. And you know what?
5:37
That quote really says it all. This
5:39
isn't just some weird technical trick
5:41
for nerds. It is genuinely one of the
5:44
most versatile and powerful skills you
5:46
can have for managing, repairing, and
5:49
just exploring what's possible with your
#Computers & Electronics