Up next in 10

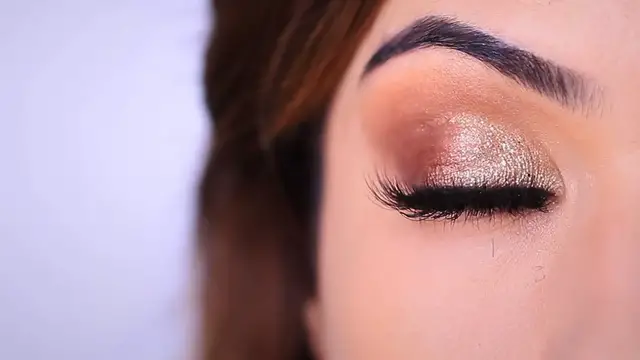
Eye Makeup Tips and Tricks for HOODED TIRED EYES How To Apply Eyeshadow For Weddings
Dec 13, 2023

Eye Makeup Tips and Tricks for HOODED TIRED EYES | How To Apply Eyeshadow For Weddings
PLEASE NOTE : Due to My Chronic Illness uploading can be difficult but I am trying to upload at least once a week. If you wish to donate to my channel you can do so below, thank you for supporting me
//Creative Commons Attribution Licence video (Reuse allowed)
Show More Show Less View Video Transcript
0:00
For today's Monday makeup lesson, I'm going to recreate the look that I wore to my friend's
0:04
wedding. But I want to share lots of tips and tricks that I have for long wear eye makeup
0:09
especially if you have hooded eyes or they become hooded when you're tired
0:14
Due to the chronic illness that I suffer from, I get very tired on long days and it really shows
0:19
in my eyes the most. My eyelids become very heavy. And as we talked about in one of my last
0:24
Monday makeup lessons, which was for mature skin, I'll link it here and below if you missed it
0:29
but in that video, I talked about how some of these dramatic looks with lots of steps can be
0:34
very heavy on the eyes and make us look tired, a little bit more mature, but thankfully there's
0:40
ways that you can have your glitter and wear it too. Now, before we begin, if you don't mind this
0:45
little interruption, if you're new here to the Makeup Chair channel and you enjoy makeup videos
0:49
then I might suggest clicking the subscribe button below. But if you're already subscribed
0:54
thank you and welcome back. Now let's get started with this look
0:58
Primer is always really important for any eye makeup look, especially for long wear
1:03
Basically, an eyeshadow primer puts a barrier between the lid and the eye makeup. This prevents
1:08
the natural oils from your skin coming through and those oils have the potential to break down
1:14
eyeshadow. So primer basically prevents that. It also gives an even texture for us to work on
1:19
making your blending so much easier. And if you use a tinted one, which I would recommend
1:24
it also creates an even tone. However, if this layer is too thick, you might find that it weighs
1:31
down your lid and we don't want our first step to add any weight. So to counteract that, I would
1:37
recommend using a damp sponge to blend this out. This will create a smoother and slightly sheerer
1:43
base. Now I'm going to put my brand ambassador hat on for a moment. And if you're looking for
1:48
a good makeup sponge, then I use the ones by Blank Canvas Cosmetics and they just sent me
1:52
these adorable gift sets with a mini F20, which some of you might remember from my full face
1:58
makeup routine from a few months ago. But this set also comes with a sponge and they're super
2:03
cute. So I just had to show you. Okay, back to the lesson. Once you press and blend out the primer
2:08
you'll have a smooth base that's ready for eye makeup. Now, if you like to set your eyeshadow
2:13
primer with powder, I'd actually recommend using a very finely milled face powder instead of a
2:19
neutral eyeshadow. Eyeshadows tend to be a little bit heavier than face powders, but I do find that
2:24
the sponge just creates a smooth base anyway, but it's totally up to you. For the next step
2:29
I'm going to contour the hood of my eyes and I don't want to follow the shape of my eyes when
2:34
my eyes are awake. I want to follow the shape that I know my tired eyes will end up having
2:39
So take a shade, at least one shade darker than your skin tone on a blending brush
2:43
and we're going to look straight on a mirror and press above the pupil of the eye. I'm also going
2:49
above the crease line slightly higher than I usually would. What this will do is create a
2:54
guide for my hooded area. I then just simply blend straight across from this point to the
3:00
inner corner of the eye and blend out to the outer corner of the eye. Instead of keeping with the
3:06
natural shape of my eye, we're going to go above the crease line and this will change the illusion
3:11
of the depth. It will make it seem that the depth is basically starting at the crease and then going
3:16
upwards rather than the crease itself being the darkest part of our eye. This means that our hood
3:22
is going to be receded backwards. Once you've blended that back and forth, you should end up
3:27
with something that looks like this. Next, I'm going to take a pigment that is almost a cream
3:32
to powder eyeshadow. I talked about this product in my last lesson because it's very lightweight
3:37
but has a lot of pigment so this will add shape without adding weight. By using a very thin brush
3:43
I can really focus on the areas that I want depth and more shape. So the outer edge of the lid for
3:49
some depth, but then I'm going up into the crease line above the crease line and this will just add
3:54
a little bit more to that contoured shape. But please make sure you are not blending this up
3:59
too high. A smaller brush will make sure you have a little bit more control because our previous
4:04
eyeshadow blended a little bit further and it should always be higher than this shadow. The
4:09
great thing about this application is that has really opened up our lid space so that we have
4:14
more lid to play with which is great for the next step. So we're going to be applying glitter but
4:19
what I like to do first is apply a very thin layer of a shimmer. This is just going to give the
4:24
glitter something to sit on top of. So use a metallic eyeshadow, something close to the shade
4:28
of the glitter that you plan on applying and apply this as your base. This will just mean we can use
4:33
less glitter but we're still going to have a good shine. Glitters can be a little heavier so this
4:38
step really helps with this but I do have a trick at the end for how to apply glitter. When we're
4:44
applying the shimmer however, you want to make sure that it's slightly higher than you usually would
4:48
I'm almost going over the inner crease line going right underneath the placement that we had for the
4:54
first eyeshadow. This has given us a lot more lid space to play with but also if our hood starts to
5:00
drop at least we know that we're not adding any extra darkness to the hood. This should hopefully
5:05
catch the light and create the illusion of brightness making our lids look a little bit less
5:09
hooded. It's like turning on a lamp in a dark shady room. Time for glitter and this glitter is already
5:15
in a sticky solution which I would recommend for hooded and mature eyes. If you use a dry glitter
5:21
that needs to be used with a sticky primer or a mixing solution that needs to be applied first
5:26
you're adding a lot more weight and glitter is heavy enough but if you use a glitter that's
5:31
already in a solution it means less weight and by some amazing coincidence this glitter is exactly
5:37
the same shade as my shoes which I can't tell you how fun I found that. This is going over the top of
5:42
the shimmer that we already applied but because glitter is a little bit heavier I'm only going to
5:46
be applying it on the stable part of my lid and I'm going to let the shimmer that we already applied
5:52
do all the shine on the more mobile area of the lid. So keep this a little bit lower and then just
5:57
blend upwards to disperse the glitter evenly and the great thing is this glitter sets in place
6:03
Now for liner I don't like to line on long days because my eye shape will end up changing so what
6:09
I do is just apply a thin invisible liner right at the lash line just to make my lashes look a little
6:14
bit denser. I also like to line my upper waterline to add some depth so you can add a slightly darker
6:24
tone to the top and even a nude pencil to the bottom and this will really open up your eyes
6:28
and add some more shape. But don't worry if it's a little bit too ticklish for you to do you can
6:34
skip this step if you want. Okay so I added very heavy lashes and I kind of regret it. I do love
6:44
big lashes because they camouflage how tired my eyes can look but they also weigh down your eyes
6:50
so I kind of wish I'd gone for less weighted lashes but we live and learn and I make the
6:54
mistakes so that you don't have to. So maybe opt for just a really good mascara, some maybe softer
7:00
deeper lashes, some individuals instead even though from far away these lashes looked pretty good in
7:07
photos. And there you go my top tips for applying a special occasion eye makeup look even if your
7:13
eyes are hooded or tired or mature and I hope that it helped you. If you do have any more tips
7:19
that you'd like to share then I'd love to read them or if you do have any questions I am here
7:23
to help so just feel free to comment them below or you can message me on Instagram it's at shenadigaty
7:29
and as always my friends say it with me be kind to yourself be kind to others you are doing the
7:34
best you can and that's amazing and I'll see you in the next one. Also I'm so glad that you liked
7:40
my mistletoe video. My makeup and mythology videos they don't get many views which I don't
7:44
mind but they do help people relax and that just means a lot and I love researching the stories
7:49
so I'm already researching next month's which I hope you'll enjoy too
Beauty & Fitness
Cosmetic Procedures
Cosmetology & Beauty Professionals
Make-Up & Cosmetics
Fashion & Style