0:00
Hello everyone and welcome to MottBots. Sorry I have not put a video out in quite a while. I've been super busy and I've also been working on this project that you see in front of you for quite a while now while I've been trying to do some other things
0:20
This particular project I've shared a few posts on our social media account here and there for the past few weeks or so
0:27
So this is going to be a project on a DIY breadboard project
0:36
I think the number is a 23-3-90-point breadboard. It's a simple breadboard project
0:46
It was supposed to be simple, but I wanted to create a power supply circuit for the DIY
0:55
2390 point breadboard and this is what I've come up with so far it's a very crude
1:04
power supply I wanted it to be able to feed both six and twelve volts via a
1:10
couple of voltage regulators and then feed in whatever voltage voltage you would
1:20
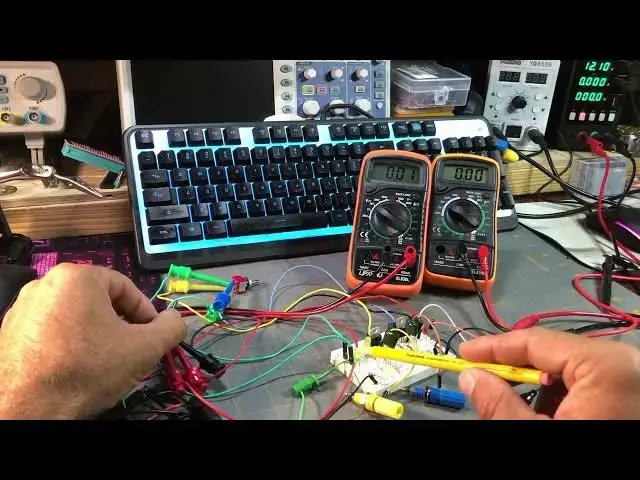
want to choose through a power supply you can see in the background here I have a
1:24
power supply set to 12 volts Again this voltage regulator supplies 6 volts and this one supplies 9 volts from a 12 volt feed right here This is plugged into the mains line and converts AC voltage from the mains to 12 volts DC at 3 amps
1:48
and brings that in through the circuitry into these two separate voltage regulators
1:55
And then we can output either 6 volts, which I've represented by this yellow banana plug socket here, and then 9 volts by
2:07
this blue banana plug socket but anyways I just wanted to show a demonstration real quick
2:12
as I've said in the background here there's a 12-volt supply ready to go all I have to do is
2:22
flip this switch here and this switch switches either in between coming in through a power
2:30
supply like the one over here or if I flip the switch the other direction it will
2:37
provide power from this adapter here. So if I flip one direction, you see a red
2:47
LED come on. This tells me that we're going to be using power from the
2:55
power supply over here. You can see the 12 volts showing up here. It's not
3:01
exact, but it's 12 volts nonetheless. So On the breadboard, you could get 12 volts directly from these two probes, your positive supply, and the ground
3:19
And then if I flip the switch the other direction this green light comes on and the red light shuts off The green LED lets us know that we ready to use either the six or nine volts supply
3:38
This one's now cut off. As you can see, this is at zero volts now
3:42
It's connected to the voltage coming in from here. It's shut off now since I've flipped this switch
3:49
green LED is on to let me know that this supply is on. If I use the second switch, I can turn on the six-bolt
4:03
supply and the yellow LED comes up, which is matched with the yellow banana plug socket here
4:11
And if I take the probe for this multimeter here, here and place it in the yellow socket we see that we have six volts here and then if I
4:27
flip the switch again for the second switch the yellow light goes off and I switch
4:33
the other way and the blue LED comes on here letting me know that the nine
4:38
volt supply is being supplied to this socket here and I'll take a measurement and
4:45
we can see on the multimeter that it's at nine volts so
4:49
So this is 9 volts If I check this one again there no reading because my blue light is on telling me that I have my 9 volt supply currently feeding in to what will be a supply to the breadboard Even if I were to try there no well let me say there
5:16
within this circuit, there's no way to have both supplies coming in at the same time
5:21
This switch here, switch that I call switch number two, only allows for one or the other voltage, either 9 volts or 6 volts
5:32
volts as such. And then this switch number one that I call only allows for either the supply coming in from this wall warp represented by the green LED or either the power supply represented by the red LED
5:56
And you can see the voltage showing up here. and that's being supplied through these two banana plug sockets here
6:05
So I just wanted to share with you what's going on so far for this particular project
6:10
Stick around and I'll have all the instructions set up as time progresses
6:15
available for you to be able to try this project out for yourself
6:19
And then, of course, the videos that I will provide for you as instructional videos to show
6:29
you how to make this particular project for yourself. So I hope you enjoyed this video
6:36
and please be patient and I'll try to get these this project out for you as quickly
6:44
as I can. So thank you for watching and I'll talk to you next time