0:00
hello friends welcome to free tutorial
0:02
and in this tutorial we will learn the
0:04
thickness features in a part workbench
0:07
if you want to learn free CAD from the
0:09
scratch then you can buy my complete
0:12
free course from zero to expert this
0:15
course also available on Udi but uh
0:19
problem is that uh Udmi only give me the
0:23
37% of a core selling you can see here
0:26
user had paid $15 but I have only got $5
0:33
if you wanted to see the review of my
0:36
course you can go to the Udemy and s
0:39
search for the free CAD and you will see
0:42
my course complete free CAD course from
0:45
zero to expert and this course is took
0:48
by the more than 2,000 students and I
0:51
have got the rating of a
0:54
4.1 for the demo lectures you can expand
0:58
it and uh see the demo lectures and the
1:02
course structure but I will request you
1:06
if you found my course interesting and
1:09
the reviews of the other student on
1:13
Udemy then I would request you to buy my
1:18
course from the my coffee shops because
1:22
if you buy from here it will help me a
1:27
so once you buy my course you will be
1:30
redirected to the Google drive and here
1:32
is the my course complete free course
1:36
from zero to expert go inside and uh the
1:41
sections I have shown you on my Kofi
1:45
shop page so exactly same lectures under
1:50
the section is created for example
1:54
section one is a introductions to free
1:57
1.0 and what is new in a freecad 1.0 so
2:01
if you go to the section one so there
2:04
are the 18 lectures and if you go inside
2:07
of the sections one you will find the 18
2:11
lecture total and once you go to the
2:14
lecture one you will find a video file
2:17
which you can download to your system
2:20
and you can watch it and this course is
2:24
uh updated on a equal interval of a time
2:28
once the new feature is came and uh once
2:31
you purchase the course you have the
2:34
lifetime access to the course and in the
2:37
case of any doubt any query you can mail
2:43
ratemnexus.com you can find my course
2:46
link on my YouTube channel you can see
2:49
the course link and uh you can also find
2:52
my Kofi course page link on uh pin
2:57
comments and uh video descriptions so
3:00
here I have a launch my precare and I
3:03
will create a new file and I will switch
3:06
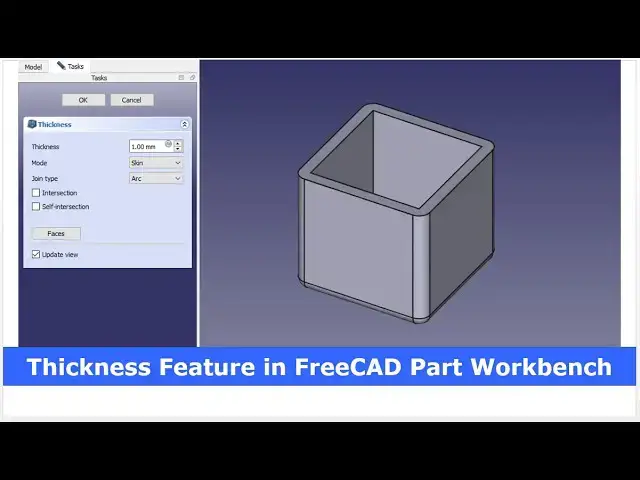
to the part workbench so basically
3:09
thickness feature is nothing but a shell
3:12
command it has the different names in
3:15
different softwares so this thickness is
3:19
a process of a shelling a part so we
3:22
will understand it with a very simple
3:24
example for example I create a cube here
3:27
and I will click on the cube and I will
3:30
give the length for say uh 300
3:38
mm and uh I will give it
3:42
200 and thickness I will give the 10 mm
3:46
or let's say the thickness I will give
3:54
plate of uh 300 by 200 into 25 now I
4:02
will use the thickness tool for example
4:05
I select this face and once you select
4:08
this face here is a thickness options so
4:14
it so you can see that uh thickness here
4:17
is a 1 mm let's I wanted to make it a 3
4:21
mm so you can see that 3 mm thickness is
4:27
now here is a joint type is the arc so
4:31
because of this frecad automatically
4:39
here now if I go with the intersection
4:45
uh fillet is removed and uh click on the
4:49
okay so you can see that
4:56
created a constance thickness from all
5:03
thickness and now I wanted to remove the
5:07
from both the sides so if I wanted to
5:09
remove the completely so I will select
5:11
the both the faces by pressing the
5:14
control key and click on the
5:18
okay so you can see that both the faces
5:23
removed click on okay and now I will
5:26
delete it now if I select this face and
5:30
click on the thickness
5:32
tool and here I will click on the
5:36
intersections so you can see that uh it
5:40
is created the constant 1 mm thickness
5:44
if I wanted to change the thickness I
6:08
so this is how to use the thickness tool
6:10
in freead for creating a constant
6:13
thickness so this is the very useful if
6:16
you are making any container you just
6:18
create outer shape and use the shell
6:20
commands and uh your job is done so this
6:24
is all about how to use the thickness
6:26
tool in free thank you for watching and
6:28
thank you for your valuable