0:00
Hello friends Welcome To frea tutorial
0:02
and in this tutorial we will learn how
0:04
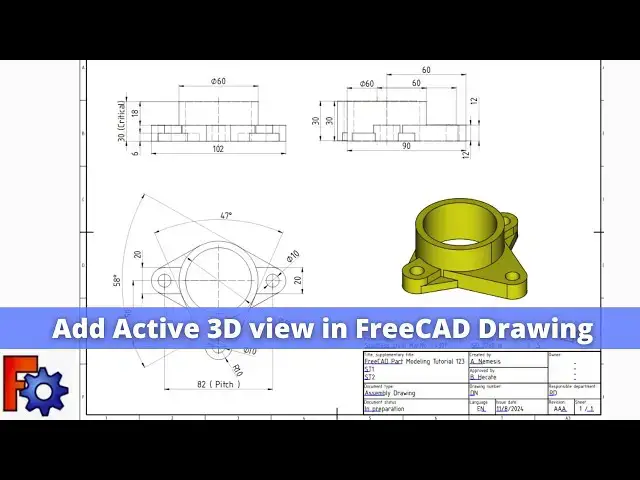
we can add a active 3D view in uh freat
0:08
drawing as you can see that uh I have
0:12
modeled this part using the part design
0:14
workbench and I have created a
0:18
orthographic drawing and here is an
0:20
isometric view so we will learn how we
0:24
can insert this isometric view in our
0:26
freat drawing you can also visit my
0:29
website Mech nexus.com where I write
0:32
articles and tutorials on freead you can
0:36
download my tutorial source file from
0:38
here tutorial source file page and you
0:42
can also support me by buying a cup of
0:46
coffee on kofi.com your uh small support
0:50
will help these channels to grow and it
0:53
will motivate me to create more awesome
0:55
content on fread I thanks to all my
1:00
those who have supported me by buying a
1:04
coffee so keep supporting and uh it will
1:09
help me to grow this Channel and it will
1:13
motivate me to create more awesome and
1:16
useful tutorials on freeat so let's come
1:19
back to our tutorial so there are the
1:21
two method to insert the view so all you
1:25
have to do is uh switch to your
1:28
model and uh select this body so here is
1:33
a first option is that insert the view
1:36
so this is the default
1:40
view which I have a set and I now I want
1:43
to insert on my drawing so all I will do
1:46
is click on this icon and move to my
1:49
drawing tab so here you can see that my
1:55
inserted now if I off my frame so you
1:59
you can see that it looks very beautiful
2:03
drawing and if I on my frame and if I
2:08
select this view so you can see that
2:11
view3 is added here and here are the
2:17
properties for example if I wanted to on
2:21
the hidden line in my isometric
2:25
view so you can see that
2:35
visible but it's look very
2:38
weird due to the hidden line so I will
2:41
uh on my frame and select this View and
2:46
make it hard hidden false so this is the
2:50
one method to insert the isometric view
2:54
in a freet drawing now if I want to
2:57
insert the view like this so all you we
3:01
have to do is first give the color to
3:04
our part to give the color select the
3:07
last features go to the appearances and
3:10
here I have selected the color yellow
3:13
with respect to my isometric
3:17
view this is the color which I have
3:19
selected now I will close it now I want
3:22
to insert this view on my drawing as my
3:26
isometric view so all I have to do is
3:30
select fit all first fit your part and
3:34
now click on here insert active view
3:38
click on it and here you will give few
3:42
options like a crop image no background
3:45
solid background or use 3D background so
3:48
I will uh prefer no background because
3:51
my drawing background is
3:53
white so I will simply say okay now I
3:58
will go to the my drawing so you can see
4:01
that my view has been inserted but it
4:05
looks very small so what I will do I
4:07
will select active View and go its
4:11
property and I will increase the
4:15
scale Let's uh make it 2.5
4:23
times and now off the frame so you can
4:28
see that how beautifully we have
4:30
inserted the 3D view in a freeat drawing
4:34
and here we have learned the two method
4:36
to insert it one with the
4:40
colored and shaded image and one is a
4:45
similar to our autographic view and
4:48
plain and simple so we have learned both
4:50
the method to insert the view placing
4:53
the isometric view on a drawing give
4:55
clear idea to the operator to read the
5:00
so this is all about this tutorial how
5:02
to insert the 3D view in free care
5:04
drawing thank you for watching and thank
5:07
you for your valuable time