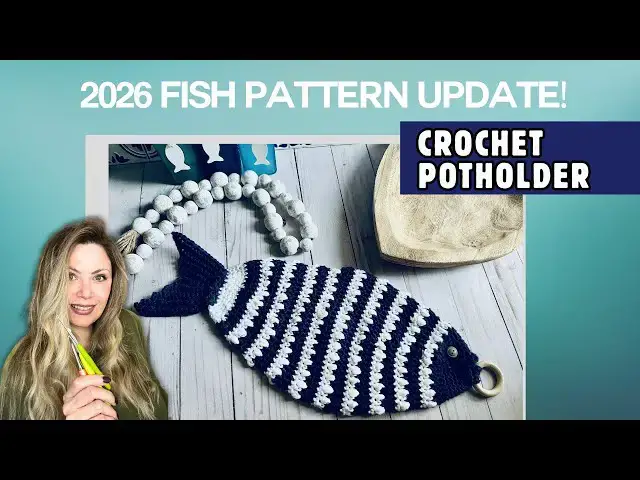
Up next in 10

Where to get the clownfish pattern:
On my website: https://livechilllife.com/downloads/clownfish-potholder-double-thick-crochet-pattern/
The set on Etsy: https://livechilllife.etsy.com/listing/1788387344/crochet-thick-potholder-pattern-fish
Ravelry:https://www.ravelry.com/patterns/library/clownfish-potholder
Show More Show Less View Video Transcript
0:00
Hello everyone. It's time for the big
0:02
pattern update for going into I think
0:06
it's the fourth year now. This is in my
0:08
top three of my bestselling of all
0:12
patterns. Over a thousand of you have
0:14
made this. You love it. And while the
0:17
majority of you have made it without
0:19
issue, there's been a few comments or
0:23
concerns. You email me about these
0:25
things. Of course, I'm always happy to
0:26
help. and your issues that were kind of
0:31
giving you a little challenge. I have
0:34
addressed them in the pattern update.
0:35
So, the pattern's been rewritten just a
0:38
bit to make issue one, how the hook is,
0:42
what your options are. Starting the
0:44
patterns gives you a little more
0:46
flexibility. Then, how the body was
0:49
filmed, I've reworked that. And then
0:52
I've also split the tutorial into
0:54
multiple sections so that as you work
0:56
each section, you can stop and then when
0:58
you get to the next section that needs
1:00
instruction, you go to the next video.
1:02
So there's four tutorials total for the
1:05
pattern. Then we have the decrease
1:07
section. You wanted the tail to be a
1:09
little easier, so I've changed the tail
1:13
instructions in the pattern, so it
1:15
should be a breeze for you now. And then
1:18
the final thing was the eye, which was a
1:22
little fiddly. Now, I didn't mind. I
1:23
make a lot of these, but we're all
1:25
different. And I want to give you plenty
1:27
of options to appeal to a broader base
1:30
of makers and you've sent me your
1:33
adorable finished fish or you've put
1:35
them in reviews. You know, you all email
1:38
me all the time and I love to hear from
1:40
you. So, your eyes, you've had like here
1:43
I've got a wood button on this one. I've
1:45
got the handstitched opin option. I've
1:47
got the option that I use on my bee pot
1:50
holder for the eye which looks like a
1:53
beautiful little flower. And then some
1:55
of you just stick on a safety eye. Now
1:59
that's not heat safe but of course you
2:01
do what you like. You might just be
2:03
hanging it as decoration. So, that is
2:06
the update and I will link the pattern
2:11
in the comment as a pin comment and in
2:13
the description. And if you already have
2:16
the pattern, if you bought it recently,
2:18
you should have the update in your
2:20
email.
2:21
And if you haven't gotten it, message me
2:23
on the platform that you bought it so
2:25
that I can get it to you. And comments,
2:28
of course, are closed for any paid
2:30
pattern because I cannot give pattern
2:31
support on a public platform. But you're
2:34
always welcome to contact me with any of
2:37
the methods in the pattern or on the
2:40
platform you make your purchase. I love
2:43
to hear from you and I love to help you.
2:44
So enjoy.
3:02
All right. Okay. So, to make the
3:03
pattern, you'll need your 5.5 mm hook,
3:07
something to mark your stitch. I'm going
3:09
to use just a scrap of yarn. Throw it
3:11
over the round. Just keep track of where
3:13
you're at. And either a tapestry needle
3:17
or my favorite little crochet tool is
3:19
the 2 mm. You probably have one floating
3:22
around in your hooks somewhere that
3:25
you've never used. This is my favorite
3:27
kind of crochet finishing tool. And I
3:29
have a whole video on how I like to use
3:31
this in different ways. Um, scissors.
3:35
And then for yarn, of course, because
3:38
this is a kitchen item, 100% cotton. So,
3:40
you'll need your main color, which is
3:42
going to be the color part of the
3:44
stripe. And then the accent color, it's
3:48
going to be some kind of white or light
3:50
color or whatever it is that you choose.
3:52
I've seen some makers not even change
3:54
the color. They don't want to fool with
3:55
it. They just want to stick with their
3:58
uh one solid color. You all have been so
4:00
creative with your makes. Okay.
4:03
And you'll need about 90 yards of each.
4:08
So, one ske is plenty in each color. The
4:10
skes generally run um 180 yards. Might
4:14
even be able to make two.
4:18
All right. So, the first issue I want to
4:20
address is the ring, the holder part.
4:23
Where's my end? And this is
4:27
I think for more beginners or people who
4:30
don't want to fool with the ring and the
4:33
mouth. So, I'm the I'm the wood ring
4:35
queen. I use them in so many things. And
4:38
originally, I had you work this in at
4:41
the start of the mouth. So, the mouth
4:43
needs to be an open
4:47
circle.
4:49
So, I will give you the option to attach
4:51
it at the end or do a self hook kind of
4:54
a single crochet up around,
4:57
work another set of crochet through it
5:00
to give it extra strength, come back and
5:01
connect it, but um I will be using a
5:05
ring and I'll show you how to put it in
5:06
at the end. All right. So, make your
5:10
slip knot, take your hook, and we're
5:12
going to start with 15 for our circle.
5:18
So chain 15.
5:43
Okay. Then I'm going to make sure that
5:45
I'm not twisted.
5:49
Come in back here at the start
5:53
loop.
5:57
Bring up my working
5:59
loop. Oops, my yarn is on the wrong
6:01
side.
6:04
Even if it gets a little twisted, it's
6:06
not the end of the world. But, you know,
6:08
do do the best you can.
6:11
Snug and pull through.
6:15
Now from here,
6:17
put that tail down,
6:20
turn upwards,
6:22
and work 15 around. So I'm going to
6:26
chain one just to give me some height.
6:29
Go back into that stitch I slipped
6:34
and start counting. There's one,
6:39
two. work in the top part of the loop,
6:42
not in the back because we're going to
6:43
use the
6:45
bottom loop when we go back and put the
6:47
ring in.
6:51
Two
6:59
3
7:04
4
7:13
Six.
7:46
There's 12,
7:54
13,
8:00
14,
8:02
and 15.
8:05
All snug there.
8:19
Now there's my chain one for height.
8:23
Here's my starting loop
8:27
or my starting of the um first stitch of
8:29
the round. Not starting loop. Slip in
8:32
there.
8:38
Chain one.
8:41
And I'm going to turn it this way. Pull
8:44
that tail through so that I know that
8:47
this is that
8:49
um the opening of the mouth down here.
8:54
Throw my stitch marker yarn over.
9:02
All right. So, I finished the round. And
9:04
before I move into round two, let's
9:07
look.
9:09
You can clearly see
9:14
use this. All of the loops are exposed.
9:18
Everything's straight and even
9:22
so that when I go back to add in my
9:25
hook, the, you know, the hook ring, it
9:27
will be no issue, right? Everything's
9:29
looking good.
9:35
Hook in. So, every round, excuse me, for
9:38
this next, let's see how many six. The
9:43
first six rounds, you will
9:47
slip stitch, chain one, move your stitch
9:50
marker. Okay, I don't repeat that in
9:52
every round. It says it at the top of
9:54
the section. So, I've done my chain one,
9:58
find my stitch. Now, for this round,
10:00
we're going to start working increases.
10:03
And increases mean two stitches into the
10:07
same stitch.
10:12
So, it says increase in first.
10:16
So, I'm going to do one single crochet,
10:20
then a second one into that same stitch.
10:29
then increase in the sixth stitch. Sixth
10:33
stitch. Okay. So, that's my first
10:35
stitch. I'm going to go to Here's stitch
10:38
two.
10:41
Here's stitch three.
10:47
four
10:53
five
10:57
here's my sixth stitch. So I'll work two
11:01
stitches into this one
11:09
and then again in the 10th stitch. All
11:11
right, this next stitch is the seventh
11:13
stitch.
11:16
Find that V. It's a little twisty this
11:19
first round and then it should kind of
11:21
even out. Won't be quite as trick oops
11:23
as tricky to get things placed.
11:28
Stitch seven
11:33
8
11:36
9
11:38
and then here's the 10th stitch
11:41
for my final increase of the round. I'll
11:44
put two in here.
11:59
There's my 12th stitch.
12:14
and 15th stitch. So the 15 stitches of
12:18
the round with three increases. This
12:20
means you will have 18 stitches when you
12:23
finish this round.
12:27
And I will slip to join. Join where that
12:30
stitch marker is. Put my hook in there
12:32
to join.
12:39
slip. Pull this out. Chain one.
12:45
Replace.
12:48
Then round three, you're going to
12:50
increase again using the same method.
12:55
This has three increases. So it says,
13:00
where am I at? Two in the first, just
13:01
like we did with the last one. Let's
13:04
find that first stitch.
13:07
It's my slip. So, it's here. One.
13:14
So, that's two in that first stitch.
13:16
Then the second stitch is stitch number
13:19
two.
13:21
Three.
13:27
Four. And now stitch five. It says to
13:31
increase, so I'll do two in there.
13:41
Stitch
13:42
six,
13:45
stitch seven,
13:49
stitch eight,
13:51
stitch nine.
13:53
Here I'm at stitch 10. Another increase.
13:57
One stitch in stitch 10. two stitches in
14:01
stitch 10, then finish my round and I
14:04
will have 21 stitches at the end of this
14:07
round. Okay, so this is how you will
14:10
increase through round six. Then we're
14:14
going to make a little bit of a change,
14:16
which I will come back for in round
14:18
seven.
14:23
Right.
14:35
So now I'm on round
14:38
seven. So at the end of round six, you
14:40
should have 30 stitches
14:43
around. And it's you'll see it's looking
14:45
like the fish in the image in the
14:49
finished image.
14:51
And so here we're going Oops. toward my
14:54
my little helper here, my little
14:59
stitch marker. So, now we're going to
15:01
start working with Hubble Hubble double
15:03
crochet. What is wrong with me right
15:05
now?
15:07
Okay, so you're going to do your chain
15:09
one still
15:11
and then we're going to work half double
15:13
crochet and that's going to really start
15:15
building out the proportion of the fish.
15:18
This is a large, not crazy big, but it's
15:20
a it's supposed to be a statement pot
15:22
holder, right? So, we want some size to
15:24
it. Finished is 8 in by 14 in.
15:29
So, I'm going to keep working the
15:31
similar increase method, but with half
15:33
double crochet this time. Okay. So, two
15:36
in my first stitch.
15:41
Half double crochet is the yarn over,
15:43
pull through three loops.
15:48
And again
15:53
first stitch and then your next increase
15:55
is at stitch number 10. There's one
16:00
2
16:05
3
16:09
4
16:12
5
16:16
6
16:22
7 8
16:27
Nine.
16:29
Now 10th stitch, another increase.
16:34
1
16:40
2
16:42
and then the last increase will be in
16:44
stitch 20. So your stitch number 11
16:50
12
16:53
13
16:56
14
17:01
15
17:04
16
17:13
17
17:16
18 19
17:22
here's stitch 20. So I'll work my two
17:24
half double crochet in here
17:28
and two and then finish the round and I
17:32
will now have 33
17:35
half double crochet.
17:39
Okay? and then you'll work your eighth
17:41
round and then go on to part two and we
17:44
will start the contrast color portion.
17:47
So I've uh broken this up into or I will
17:50
be breaking this up into smaller
17:52
sections so that you can easily
17:54
reference where you need to go when
17:56
you're working the pattern. Again, the
17:58
pattern is linked in the description
18:02
and you contact me by any of the contact
18:04
methods at the end of the pattern if you
18:06
need some help. Happy to help you.
18:14
Coming along nicely. This navy looks
18:16
really pretty, doesn't it? Very uh
18:18
nautical marine.
#Arts & Entertainment
#Hobbies & Leisure
#Crafts
#Crafts
#Fiber & Textile Arts