0:00
Welcome back to our video series on using Book Creator
0:04
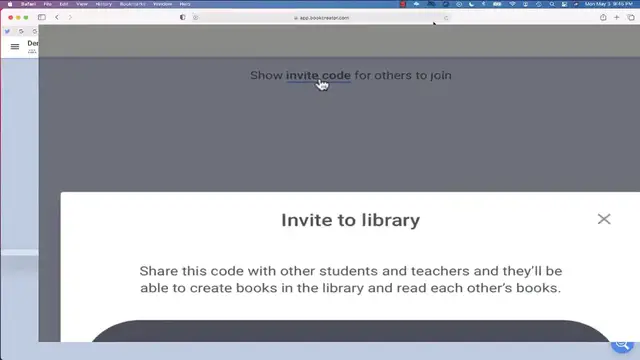
If you remember the last video, we talked a little bit about how a teacher can generate
0:08
an invite code and have students join their library. I want to go back just one second to show you some of the features that you have with
0:16
the library that you can create. You'll notice you have options that you can customize your library, including the ability
0:23
for students to search for images, the option for students to edit their own books, and
0:29
then this option, which will allow students to read each other's books
0:34
Now out of all of these options, I would keep everything on
0:37
The one option that you might want to turn off is this option
0:41
You'll see in a second when students create their own books, they'll be able to edit and
0:47
read any books that they've authored, but they won't be able to see their classmates
0:51
books in your library. So either way, you can turn that on or you can turn that off
0:57
But once your settings are set, you'll use this invite code to have students join your library
1:02
So now this is the student view and I'm inside the teacher's library. I use that code to add myself to the current library, which you can see at the top
1:11
It's just called Demo. And there's nothing inside here. So the first thing that I'm going to do as a student is click on this button that says
1:19
New Book. Now you have a few different options on here. You can choose a blank book
1:26
You can see some of the sizes right over here. This is pretty much an option that I leave to students unless you're trying to do a collaborative
1:34
book and then it's best to have all of the books in the same format
1:39
So you just may want to specify. The other option are templates where you can see Book Creator has provided you with several
1:47
different templates that you can just customize and modify. This is a great feature, which we'll look at a little bit later
1:54
But I'm just going to choose blank book and I'm going to choose landscape
2:00
And right now I'm ready to start. You'll notice that this is the cover
2:05
It's my turn to go in and design a cover and we'll talk about some ways that you can add
2:10
media in the next video. But I did want to show you one thing that will make your life a lot easier as a teacher
2:18
is once your students click on that orange button to create the new book when they've
2:22
created their size. The one thing that you might want them to do is to just click on this button that says
2:27
my books. The only books that will show up in the library will be ones that that student has authored
2:34
or the books that you author as the teacher because we turn that setting off all of the
2:39
other books that students in the class create will not be visible
2:44
But the one thing that you want to do is have students edit this section where they will
2:48
choose a name. So this is a book about a dog. I'm going to call this one my dog
2:56
And once I have that title, I can go in and edit. This will just be a lot easier than the default title, which Book Creator often leaves
3:06
So what we've learned so far, we've learned how to create a library. We've learned some of the settings that you can assign in that library
3:13
We've learned how students can join your library and how they can create a new book
3:18
In the next video, we'll talk a little bit about some of the tools that Book Creator
3:21
has available to create