Up next in 10

This video, the first episode of "Easy Canva Animations for Instagram," likely provides a tutorial on creating simple and effective animations using Canva. It may offer step-by-step instructions, showcasing specific tools and features within Canva for animating content tailored for Instagram. The tutorial aims to empower users with the skills to easily incorporate animations into their Instagram posts using the user-friendly capabilities of Canva.
Show More Show Less View Video Transcript
0:00
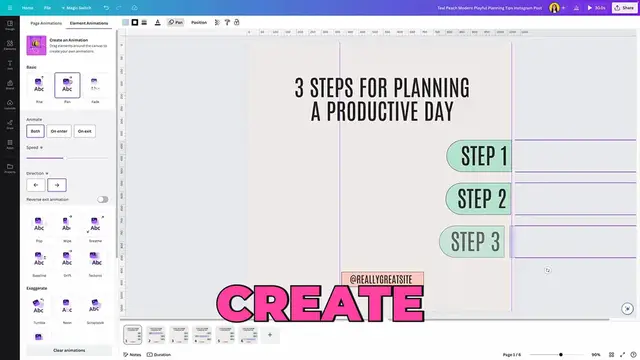
In this video I'm going to show you step by step how to create these two trendy Instagram animations in Canva
0:06
This is the first one we are going to create in which we see the animation coming from the lateral
0:11
and the second one is this one in which we are going to see the movement coming from bottom to top
0:18
This tutorial is beginner proof because the animation is pretty easy to create and you can even use a free Canva account
0:25
Are you ready? Let's start. Instead of creating designs from scratch, we are going to use templates for these projects
0:36
because I want us to focus on the animation part of the project
0:41
The templates we're going to use today are completely free to use and I'm going to leave
0:45
you guys the links in the description of the video. When you click on the first link you are going to land on this page and for you to be able
0:52
to use this template you need to click customize this template. So I'm going to click here and this is going to open
0:59
the editor. Now we need to create different scenes or basically different pages so we can position
1:06
the different elements in different places of the page and then we are going to add some transitions
1:12
to create the illusion of movement. And if you got lost in that description of the next step we are
1:19
going to create, don't worry, let me show you what I meant by that. We are going to recreate the different
1:25
scenes that we see on this video. So what we are seeing at the moment, this will be the scene number
1:32
one or page number one. Let's call them pages. If I move forward, I will see a different scene
1:39
These elements have now a different placement. And if I move forward, we will see that this one
1:45
these elements are gone. They are back to the lateral. So this is a different page. And then
1:51
this will be another page. Then you go forward, another page. And then, and then
1:55
And lastly, this will be the final page of our animation. So let's start by creating a new page
2:02
Let's go back to the editor. And from here, we are going to duplicate the page number one
2:08
So if you don't see this thumbnail right here and you see something like that, you can either
2:15
duplicate the page from here, or I do suggest that you do it from here
2:21
So you can show pages by clicking on this small arrow that is pointing to you
2:25
and then select the three dots on page number one, this little square thumbnail, and click
2:31
duplicate page. I do prefer to create these animations having these little thumbnails visible
2:37
because I can have an overview of all the different scenes in the project. And now we're going
2:43
to work on page number one. I'm going to select page number one and I'm going to start grouping
2:50
these elements. So I'm going to drag my mouse, select all of these elements and then
2:55
group doing the same process for the step number two group and same for step number three group after
3:02
this i'm going to select all of the elements and by pressing shift i'm going to drag them to the lateral
3:09
until we just see the step one two and three now we need to create some guides to be able to place
3:17
the elements in the same position on the next page so i already have my rulers activated but if you don't see
3:25
them here on top or on the lateral go to file select view settings and then show rulers and guides you
3:33
should see them like this on top and on the left and now to be able to create a guide i just simply
3:39
need to click on the ruler and drag it to the lateral and as you can see i already see my guide in here
3:47
and i'm going to position it on top of the straight line of these shapes something like this
3:53
and now let's work on page number two going to select page two and on the second page we need
4:01
this element to be visible but the last two elements are going to be still hidden i'm going to
4:08
group these elements one more time so i'm selecting them and grouping them now i'm going to select
4:15
step number two and three and holding shift so my elements go straight to the lateral this is going
4:22
to avoid my elements to move up and down so let me show you holding shift and moving my elements to the
4:29
right you see that they are not moving up and down even though i am moving my mouse up and down okay
4:36
i'm going to position this flat part of the elements aligned to this guide and then release my mouse
4:45
okay this is page number two now to create page number three really fast we are going to duplicate
4:52
page number one. So I'm going to click on the three dots, duplicate. Now I'm going to bring the
4:58
duplicate on the position number three and now you should have something like this. On page number one
5:04
you see all the steps hidden. Page number two, we only see step number one and page number three
5:10
we see all the steps hidden. Now we need to create a couple of pages more to be able to show
5:17
step number two and step number three. But we need to create another guide. So we need to create another guide
5:22
so we know exactly where to place these two steps that we are missing We going to page number two and I going to create another guide from the lateral I going to click on the ruler and drag my mouse and I going to align this guide with
5:39
the flat part of this green shape. Now I'm going to duplicate page number three and I'm going to take step number two
5:48
Remember to press shift and then drag these elements to the left
5:54
that we are trying to align this flat part of the green element to this guide and then i'm going to
6:01
again duplicate this page you can either duplicate page number one or three and bring this duplicate
6:09
to the end so we should have something like this one page with all the steps hidden then we have
6:16
step number one all the steps hidden step number two all the steps hidden and now let's create the
6:21
final page in which we see step number three so duplicating the last page taking step number three
6:29
and dragging it so we can align it to this guide now we have all of these pages but we still don't
6:37
see any fancy animations we want to make sure that we have all of these scenes ready or these
6:45
pages ready before we start working on the animations just to make the process a little bit
6:51
less confusing. Now we are going to start adding animations to page number one. This is the first
6:57
scene that people are going to see when they are scrolling on Instagram and they randomly see
7:04
your post. So we want to add some movement to catch their attention. I was thinking that it will be
7:10
nice to see these elements movements so we can show them that there is something going on in there
7:17
So I'm going to select all of these three steps. Then we're going to
7:21
to use the animate button on the toolbar on top and from here you can select any of these animations
7:29
I would suggest that you go for the purple ones. You will see that at the bottom we see some blue
7:35
icons. Go for the purple ones for this particular project. So I'm going to select for this page
7:44
the one that is called pan, and then I'm going to select animate on enter. That means that
7:51
when this page is ending we are not going to see more movement i believe that it will be nice to see
7:58
these elements moving at the beginning of the animation but because we are going to see some animation
8:06
on page number two i would prefer to limit the movements only on enter so we have selected these
8:13
three elements we selected the pan animation only on enter and now this is it for page number one now we are
8:21
are going to add a transition in between page number one and page number two so we can create
8:28
the illusion of movement of the step number one appearing from the lateral so we are going to position
8:35
our mouse in between these two pages until we see these two icons we're going to click on this
8:43
little icon that says add transition which is going to open this lateral window and from here we
8:49
are going to select the transition called match and move this is the transition that is going to work best
8:56
for this project so if you want to have this illusion of the step number one moving to the left and then
9:04
going back to the right you are going to select only this transition right here match and move and then
9:10
we are going to click apply between all pages because we need the same transition on every single page
9:18
We are almost done with this animation and I think it's time for us to remove these guides
9:24
These are not going to be visible even when we download the animation
9:28
but I would prefer to stop seeing them at the moment. So we're going back to file, view settings and then show rulers and guides one more time
9:37
This is going to deactivate the guides and the rulers from the editor
9:41
Now, I would like us to preview how this animation is looking
9:46
We're going to click on this play icon that we see on top of the screen
9:50
This is going to open the animation in this preview mode and we can see how the animation is looking
9:57
As you can see, the animations are working fine, but I do believe each section or each page
10:05
lasts a little bit too long. I want this animation to be a little bit more fluid and for it to move faster
10:13
So I'm going to close this preview mode and I'm going to reduce the length of each page
10:20
Now I'm going to select page number one's icon and then you will see that we have now a button with a little clock
10:29
From here we can edit the timing of this page in particular
10:34
So I'm going to click here and for page number one I believe we can leave it to two seconds or even like 2.5
10:42
so we can see the animation on these three elements. Moving to page number two
10:49
I'm also going to leave this page for 2.5 seconds so we can actually read the content on the step number one Then the page number three we don need to read anything else because we already read it on page number one and page number two
11:06
So this one, we are going to leave it just for one second. This page, page number three and page number five actually are just necessary for the animation
11:17
So page number three, one second, page number two, we need some time to read
11:22
so 2.5 page number 5 is just for the animation so one second and page number 6 you can also
11:29
leave it to 2.5 seconds or because it's the last light we can leave it up to 3 seconds okay
11:37
i think this animation is ready so we are going to preview it so clicking again on this
11:43
preview icon this is how your animation is going to look like when you download it from canva
11:51
Remember that this is a free template and all of the animations that we used are free to use
11:58
Also, when you download this animation, you won't have any watermark on your video
12:04
So if you like what you see, if you like your animation, you can download it by clicking
12:10
share on top of the screen, download. And from here, you can select either MP4 or if you want to use your animation as a gif, you can also select GIF
12:20
I'm going for MP4 video. I'm going to select all pages because we worked hard on all of these pages
12:28
and then I'm going to click download. And in this tutorial I wanted to focus on the animation part
12:35
you know like building the animation from scratch, not so much on the designing. But this is a template
12:43
and everything can be customized in Canvas. So you can change the text, you can change the color of your text
12:49
You can change the colors, add elements, add photos, anything that you like
12:55
Before we move on to the next animation, I want to show you an extra tip that I believe some of you
13:01
are going to like. Let's say that you are going to start creating this animation
13:06
You clicked on the link that I left in the description, but you don't really want to create
13:12
a square animation. You want to create a real or a TikTok video. You can actually convert
13:19
this design into a reel and then start working from there so you can have a reel or a TikTok at the end of the project
13:30
So you are going to click on customize this template and from here you will need Canva Pro
13:37
This is the only thing I know that I said in the beginning of the video that you were going to create everything with a Canva free account
13:46
but I believe this piece of information is valuable, so let me show it to you
13:51
Also, if you have a Canva free account and would like to try Canva Pro
13:56
we have a 45-day free trial in the description. Okay, we have this template, and we want to transform it into an Instagram reel
14:06
We are going to click Magic Switch on top of the screen
14:09
and from here we are going to select social media, and then you see that there is the Instagram
14:16
Instagram Reel option. You can also select TikTok or any kind of document that you want
14:21
I'm going for Instagram Reel and then I'm going to click Continue and you can either copy and resize or simply resize this design
14:31
I'm going to resize this design and as you can see the ratio changed automatically
14:37
Now from here if you want you can adjust the placement of the elements before you start creating the duplicates
14:46
of this page to create the animation. Once you have the layout the way you want, you can start
14:52
duplicating the page and then follow the same steps that we just saw on this video
15:02
Now let me show you how to create this animation in which we see the movement coming from
15:08
bottom to top. Remember that the link to this template is in the description so when you click on that
15:14
link you will see this page going to click on customized this template for this project we are going to follow
15:21
the same steps as the first project the first animation but still i wanted to show you how to recreate
15:28
a different movement this time not from the lateral but from bottom to top so we have the document here
15:36
if you want to change anything you know that you can do it you can double click on the text boxes to
15:41
change the text or change the color you can also select the other
15:44
and you will see the color option in here. Now, the only thing that I'm going to change on this document
15:51
is that I'm going to delete this text box right here because this is going to get in the way of my animations
15:59
So let's delete it. And now that we don't have this element on the way
16:04
we are going to start grouping this set of elements. So we have three different groups
16:11
And now I'm going to bring my rulers and guides. so going to file view settings rulers and guides i'm going to create a guide from the ruler on
16:21
top and i going to position this guide on top of these elements this is going to guide me later on when I going to start bringing my elements up
16:33
Now, I'm going to select all of these three elements, dragging down and then holding shift
16:39
I'm just going to make sure that we only see the date
16:44
So we only see the numbers right here. They are picking, but we don't see the information below
16:50
Now I'm going to duplicate the page. And this time on page number two, I'm going to bring the first group of elements up
16:59
I'm going to duplicate page number one. So I can select this thumbnail, control C, control V
17:05
You can see that I have a duplicate here on page number two
17:09
And I'm going to bring it next. Now I'm going to again, control V to create another duplicate and bring the second group of elements up
17:19
And now I'm going to again duplicate page number three, bring it here, and then control C, control V to create the last page in which we are going to see the last group of elements appearing
17:34
Now the next step is to add some animations. So we're going to follow the same process, selecting these three groups of elements
17:44
Go to animates and select Pan. I'm going to select pun only on enter like this
17:52
And then remember that we are going to add transitions. So I'm going to position my mouse in between the page number one and two
18:01
Add transition, match and move, and then apply between all pages. Now we need to adjust the timing of each of these pages
18:11
And I'm going to show you a trick so we can do it faster. I'm going to position myself on page number one
18:17
edit timing and I'm going to make sure that we are on 2.5 seconds and then we are going to activate
18:25
this option that says apply to all pages. I'm going to click here and then if I go to page number
18:32
two, you will see 2.5 page 3, 2.5 and so on. I'm just going to edit page number 3 and 5 because
18:42
we only need one second here just to create the illusion. of these elements moving. Now let's preview the animation and this is how it looks like
19:01
Remember that to download this animation you can click on share, download MP4 or give all pages and then download
19:11
As you were able to see these animations are super easy to create. You can create them really
19:17
fast and also for free. Now let me give you an extra tip because I understand that maybe these two
19:24
templates that I gave you today are a little bit limiting and you want something different
19:29
maybe a different aesthetic, different colors, different fonts. I'm going to show you what to look forward
19:34
in a design for the animation to work. So I'm going to show you an example with templates on my
19:40
Canva profile. I'm going to leave you the link in the description as well. So this is my profile and from here
19:47
search for these two keywords you can either search for steps and from here you will see some
19:55
templates that will work for this kind of animation so if i were to create an animation like the
20:01
ones that we created today i would go for templates like this one so you can see that we have
20:08
the number that we can isolate to create the animation that goes from the lateral to the center
20:14
of the design and back so this one could work. Let me go down to see if I can find another design that could work. We have this one right
20:25
here, this one could also work, this one right here. So I'm always trying to find a keyword or a number
20:32
that we can show and then some extra information to the side so we can show it to our audience
20:39
So this is basically what I look forward in a design, a title, number or a keyword and then some
20:46
extra information now you can also use the word event because we have the number and the name of the
20:54
event or some extra information you will see that we have more of the same layouts here we see the
21:01
template that we used today we could also try the same effect with something like this we also have a
21:09
similar layout we just need to remove this text box in here and then we have some other templates like this
21:15
one this one remember that we just need to move or delete these elements at the bottom of the design but
21:24
there is a lot of templates that you can use here you can browse through all my profile and find
21:31
something that you like i'm going to leave here the link to my canva profile so you can follow it and
21:37
access new canva templates every week and i'm going to leave here another tutorial i do recommend you watch
21:44
because I show you one of the newest features in Canva to create videos effortlessly
21:50
And that's it for today. Remember to subscribe to the channel and I hope to see you in the next tutorial
21:55
Bye
#Online Goodies
#Clip Art & Animated GIFs
#Animated Films