Up next in 10

This video is an ultimate tutorial for beginners, offering tips and tricks for effectively using Canva in 2023. It likely covers a range of features and techniques within Canva, providing practical insights to help beginners navigate the platform more efficiently. The video's goal is to empower users with valuable knowledge to enhance their design skills and make the most out of Canva's capabilities for creative projects.
Show More Show Less View Video Transcript
0:00
In this video, you are going to discover 16 Canva tips and tricks
0:04
that you probably don't know yet and will help you be more productive
0:08
and create unique content. In this list of tips and tricks, I'm gonna share new features and also hidden tools
0:16
Make sure you stay until the end so you don't miss any of them. So if you guys are interested in this video, let's go to my computer
0:25
Number one. Number two. If you didn't know, the templates available in the Canva library are not created only by Canva
0:36
There are plenty of Canva creators that also create these templates. And each creator has a profile
0:45
I do have a Canva profile because we contribute these templates to the Canva library
0:50
You will see that in my case, we publish templates every week
0:54
and you will see a mix of Canva Pro and Canva Free templates
0:59
The cool thing about these profiles is that if you really like the work of one of these creators
1:06
you can follow them. There is this follow button right here and by clicking it, you will start following the creator
1:13
If you follow any of the creators, you will have easy access to their templates
1:18
So let me show you how to access these templates. When you are in the Canva homepage, go to the panel on the left side and click templates
1:26
From here, you are going to click creators you follow. In this page, Canva will recommend some other creators that you may like
1:35
So you will see all of these creators and you can see more in here
1:40
If you want to discover the work of each of these creators
1:43
you can click on any of the profiles to view their templates
1:48
And of course, if you like what they create, you can follow them
1:52
And let me go back to creators you follow because in here you will see all the creators you follow
2:00
You can find their profiles in here and you can also see
2:04
the newest templates or elements that they have published in their profile
2:10
If you didn't know, there is a new feature in Canva that allows you to download every
2:20
single page as a different file. In our channel, we have a couple of videos in which we show you how to bulk create content
2:30
in Canva. In this case, I have this document open in which I have 52 Instagram Reels
2:37
which I created with this bulk create feature. Let me show you
2:41
I'm going to open the grid view. These are all the different 52 Instagram Reels that we created
2:49
So before we had to download each video or each page one by one, which took a lot of time
2:57
But now when we go to share and then click download, we will see this option that says download pages as separate files
3:06
This is a Canva Pro feature, so that's why it has this crown
3:11
So if you are using a Canva free account, you won't be able to use this feature
3:17
But if you want to try Canva Pro and try this feature out
3:22
we have a 45-day free trial in the description of this video
3:26
So if you were to check this box, you will be able to download all of these 52 pages
3:34
as 52 different video files. If that's what you want, click download and Canva will download a zip file
3:43
which contains the 52 different videos. Or you can also open this drop down menu
3:50
deselect all the pages and select only the pages that you want to download
3:56
So in this case, I will download only three pages. Click download
4:01
This is a file that I just downloaded from Canva. This is a zip file and when I double click on this file
4:09
my computer will automatically create this folder. And when I open the folder, you will see that I have 52 different videos
4:20
And each of these files are now ready to be used. This new feature is a game changer because it is going to save you a lot of time
4:30
This feature is available for Canva Pro users. This will allow you to change your logo on several documents in just a couple of clicks
4:38
Let me show you how it works. On the Canva homepage, go to the panel on the left and click on brand
4:44
Select the brand kit that contains the logo that you want to replace
4:49
In this case, I'm going to use this brand kit and this is the logo that I want to replace
4:56
So I'm clicking on these three dots and then replace across these signs
5:01
These are the four documents that contain the logo that I want to replace
5:06
So I'm selecting these four documents, then click continue. From here, upload the new logo
5:13
Select the new logo, click preview. From here, you can preview the designs with the new logo and then click replace in four designs
5:22
From here, we have access to the four different documents. So let me quickly open the four documents
5:29
We can see the new logo here. Let me go back to the other ones
5:34
We see the logo here. Let me go back to the other ones. We can see the new logo here
5:39
Let me go back to the other ones. We see the logo here
5:44
The third document with the new logo and the fourth one. I really love this feature because this one really saves you a lot of time
5:52
especially if you are working with a lot of different documents. Every Canva user can use the tip that I'm going to show you now
6:05
And this one will also help you save time while designing. This tip is to add text to line
6:13
Here I have this small flowchart and in this case, I have these two conditions like
6:19
should you buy it? Do you need it? Then we have a yes and then go for it
6:25
If the answer is no, then don't buy it, right? But what about if I wanted to move the position or the location of this text box
6:34
Then I will need to move this text box as well and same goes for this text box right here
6:42
So let me show you the trick. I'm going to duplicate this page
6:46
This one is really simple. You just need to double click on any line on your design
6:52
So let's double click on this line and you will see that automatically you will have
6:58
this text box and you can start typing on it. You will have access to these toolbars so you can change the color of your text box
7:06
change the font, change the size and there you have it. You can now delete this text box because you don't need it
7:13
I'm going to delete this one and add a new text box in here
7:19
And now every time that I need to reposition my text box
7:24
you will see that this text will move along with the line
7:32
The next tip is also related to lines because in Canva you can now create elbowed lines
7:41
How do they look and how do they work? Let me show you. If you have a line on your design, simply select the line
7:49
It can be a simple line like this one or the line can contain text
7:53
Let's say that I want to convert this line into an elbowed line
7:58
I'm going to select the line and then let's go to the toolbar, select this icon that says
8:05
line type and then select elbowed. And as you can see, my line now is an elbowed line and if you want to create more curves
8:15
on your line, you can simply drag these anchors to the side
8:20
You will see that your line will be transformed and you can do it as much as you want
8:28
You might already know that you can upload your own files to Canva, like for example
8:36
PNG, JPEG, video and even audio files. But did you know that you can also upload SVG files
8:44
And what is it special about them? Let me show you. I'm going to uploads and then upload files
8:50
I'm going to upload this .svg file that I have here. Let's bring this .svg file to my empty Canva and let me stretch it because this is what
9:03
I love about these files. These are vector files, meaning that even if you make them really big, you stretch them
9:12
out, they will never look pixelated. As you can see, I'm making this file very, very big and still looks very defined
9:23
The other aspect about these files that I really, really like is that you can change
9:29
the color to them. You can see that on the toolbar, I have these two options and if I click on them, I can
9:36
change the color of my file. I really love working with SVG files in Canva because as you were able to see, you can maintain
9:45
the quality of your elements and if you need it, you can also change the color to them
9:51
I'm taking logos as an example, but you can also upload shapes or elements or illustrations
9:58
to Canva. Let's say, for example, I have here this pattern that I downloaded from Plurana and because
10:07
this one is an SVG file, I can also stretch it out and change the color of these elements
10:15
I also have, for example, this flower right here and if I wanted to use this illustration
10:21
on any design that I want to publish on my social media, I can use my branded colors
10:27
so that this illustration fits with the aesthetic of our brand. Let's imagine that you have a PDF that you need to fix
10:39
There is one word or maybe just one number that you need to change but the designer in
10:46
your team is not available so they cannot fix it. Well, the good news is that you can edit this PDF in Canva completely free
10:56
In the Canva homepage, you will see this button that says Upload
11:01
Click here and upload your PDF by clicking Choose Files. After a couple of seconds, your PDF will be uploaded to Canva and you will see it here
11:10
under Recent Designs. This is the PDF that I just uploaded so I'm gonna open it by clicking on it
11:19
And that's it. You are now inside the editor and you can change the numbers or the words that you need
11:25
to change. So, for example, here to access this text box, I simply double click and start editing
11:32
the numbers or let's say that the name is not correct here and it's supposed to be just
11:39
Anna. And that's it. If you want to download this design again as a PDF, click Share, Download
11:47
In File Type, select PDF. You can either select PDF Standard if you want to share this file online or PDF Print
11:57
if you are planning on printing this PDF and then click Download
12:01
Remember that this feature is completely free to use and all of the features that are
12:07
coming up are free as well. I know many of you use Canva to create presentations but there is one feature that I believe
12:20
is missing and I have a simple trick for you. Sometimes when I am presenting and I have a list of different items like the ones we
12:28
see on this slide, four different items, I would like them to appear as I am talking
12:34
about them and I have a simple trick that can help you
12:38
I have this page right here. I'm previewing this thumbnail with this view so if you don't see it and you see your page
12:46
like this, you can click on this arrow pointing up to preview this thumbnail
12:52
This is going to help you out with this trick. Now I have this slide with the four different items
12:58
We are going to start with this version right here. I'm going to select the last item which is these three text boxes and I'm going to
13:09
animate it. So click Animate and then you can select any of these animations
13:15
I'm going for Pan and selecting only on Enter. Now go to this thumbnail, click on the three dots and Duplicate Page
13:24
Now instead of working on page three, we are going to work on page two
13:29
Let's delete the last item and select the previous one. Let's add the same animation, only on Enter, and let's do the same steps for the last item
13:41
So duplicate the page, work on page two, delete this item, select item number two in this
13:48
case, animate, selecting Pan on Enter and duplicate page, work on page number two, delete
13:56
this item and finally adding the animation on the first item, only on Enter
14:02
And now let me show you how this presentation is going to look
14:07
I have my clicker here and as I am speaking, we can see only the first item appearing
14:14
When I finish talking about this item, I can click and then we can see item number two
14:20
And like this, I can have more control on what appears on my presentation
14:30
The next four tips are also related to presentations and this one I actually
14:36
really like because it can make your presentations more entertaining and dynamic
14:42
So pay attention because I have a couple of magic shortcuts that are going to make
14:48
a difference in your presentations. You can press the letter B if you want to blur the current slide
14:55
So I'm pressing B, pay attention to what happens on the screen
14:59
This can help you out if you want people to focus on what you are talking about and not the slide
15:05
You can also press the letter C to have a confetti rain like the one that you just saw
15:12
If you want people to get excited about a special announcement that you
15:16
are going to make, press the letter D for a drum roll animation
15:24
You can press the letter M for a mic drop animation. O for floating bubbles
15:36
Q for quiet. U for a curtain call animation. U again to open the curtain
15:52
And you can also press shift plus slash or shift and question mark on your keyboard
15:58
to open the magic shortcuts menu, which are all the shortcuts that I just showed you
16:06
And talking about presentations, there is a tool that I love to use when I'm presenting
16:14
and it is the timer. So every time that you press any number from 0 to 9, a timer will appear on the screen
16:22
So let me press the number 3. This will add a timer of three minutes and you can start the timer at any time
16:30
by clicking on the play icon. You can reset the timer, add more or less minutes
16:41
And the next tip is related to this timer because you can add music to the timer
16:47
So when you hover on top of the timer, you will see this menu on top
16:53
And when you click on this music icon, you can select any of this music
16:58
So either focus, dramatic, a bit energetic or simply no music at all
17:05
which is the default option. Next to it, you have the volume and the minimize timer option
17:12
If you want to hear these music options that you have in here
17:15
select any of them and then hit the play icon. If you use presentations a lot in Canva, this tip is for you
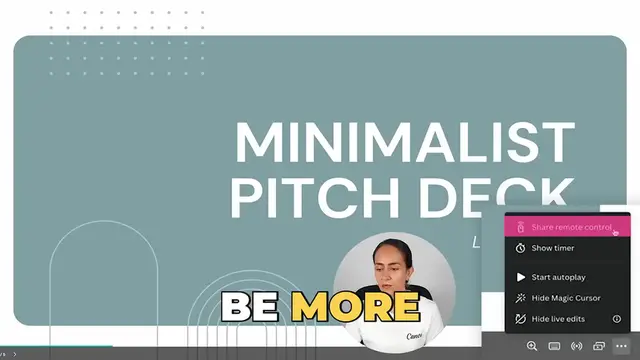
17:27
Not many people know, but you can use your phone as a remote control
17:32
to change the slides on your Canva presentations. Open your presentation document and then hit the present button on top of the screen
17:41
Then click on this other present button. Click on these three dots at the bottom of the screen and then click share remote control
17:50
Now you can scan this code or copy this link to use another device as a remote controller
17:57
I'm going to scan the code with my phone. And now, as you can see, I have these arrows on my phone
18:05
And when I click on the arrow to the right, I start to change my slides
18:12
Or if I want to go back, I simply click on the arrow to the left
18:17
The cool thing here is that you also have access to the magic shortcuts on top of the screen of your phone
18:24
And if you click on these icons, you will have access to these shortcuts
18:33
If you didn't know, your team can collaborate in real time across any document in Canva
18:39
Once in your document, click share on top of the screen. And from here, you are able to generate collaboration links
18:47
If you click only you can access, of course, only you will have access to this document
18:54
You need to open this drop-down and from here you can either select any from this team
19:01
Our team is called Team Rondi. So anyone from Team Rondi can access the design using this link
19:08
And then you can also make this link available for people just to view it, to comment or to edit
19:16
If you want people in your team to be able to collaborate in this document
19:21
make sure to select can edit. And then copy link and share it with your team
19:27
If you want another person that is not in your team to be able to collaborate
19:32
open again this drop-down and this time select anyone with the link
19:37
In here it says anyone can access the design using this link, no signing required
19:44
So click here. And of course, you can change these options. So anyone can view, comment or edit and then copy the link
19:52
When you share this link and somebody joins the document, you will be able to see it because on top of the screen
19:59
you will see that the person joining the document appears. Something interesting in here is that you can also view where the person is located
20:09
In this case, my team member or Rondi is located in page number one
20:15
because I can see his face in here. So I can go to page one and I can see in real time
20:21
what he's doing or which element he's selecting. If he changes pages, I can also see it on the document
20:29
And the same way goes for him. He can see where I am located and he can even see where my mouse is moving
20:36
and he can see the changes that I'm doing to the document
20:43
I'm about to show you a feature that I personally really love
20:47
because this really helps you be more creative with the animations that you create in Canva
20:54
This one is also free and pretty easy to use. I have here this design
21:00
I have a background image and two different elements. I want my bunny to jump from one place to another
21:07
and I want it to be very precise. So I want the bunny to jump two, three times
21:14
and then to end on top of this trunk. I'm going to select the element, go to animate
21:21
and then select this button that says create an animation. Now, the only thing that I need to do is to drag my element
21:29
around the canvas to create the animation. So I'm going to make my bunny jump three times
21:36
One, two, three and then ending up on top of the trunk
21:44
You can leave the animation as it is or you can adjust it
21:49
You have movement styles. So you can leave in the original that you just created
21:54
You can make the movement smooth or you can make it steady
22:03
I usually go for the steady movement style. You can also activate the orient element to path
22:10
This one won't work all the times. It depends on the element that you are animating
22:16
But as you can see, in this case, it doesn't look great
22:21
So I'm going to leave it as it is, deactivate it. And then you can also adjust the speed of your animation
22:29
Once you are done, click done and your custom animation is ready
22:38
And talking about animations, there is something new called motion effects in Canva
22:44
I want to add some movement to the sun, but I don't want to add a custom animation
22:50
I just wanted to have some movement and I can do it with this motion effect
22:56
I'm going to select the sun, go to animate, and right below you will see the motion effects
23:03
We have these four motion effects which are free to use. We have the rotate motion
23:10
Pay attention to the sun, not to the bunny. We have flicker, pulse, and wiggle
23:18
What is special about these motion effects is when you apply it to an element
23:24
on your video or your animation, this element will have motion for the entire length of the animation
23:33
I'm going to select rotate and for the entire 4.7 seconds that I'm playing this video
23:41
the sun will move. And something else that I want to mention here is that you can use the motion effects for free
23:49
but if you have a Canva Pro account, you will have access to these extra settings
23:56
So in this case, if you were to have a Canva Pro account
24:00
you can increase the speed of the motion or you can change the direction
24:05
You will see different settings depending on the animation or the motion that you select
24:11
but I wanted to let you know that if you have a Canva Pro account
24:15
you will have some extra settings that you can adjust. The last trick is also related to movement, to animations
24:23
but also related to Canva websites. If you didn't know, we can create websites for free in Canva
24:32
and the new thing is that we can add simple animations to them
24:36
So here I have my Canva website document open. This website is already published
24:44
this website is already published. So if I want to edit anything in here, I need to first click edit design
24:53
Now, if you want to add animations to any website, you can select the page or the section of the website that you want to add animations to
25:04
and then on the toolbar on top, you will see the animate button
25:08
From here, you have access to the basic page animations and if you want to add an animation to a particular element on the screen
25:19
you can also select the element and add the animation to that element
25:24
So I already tested these animations before filming this video because I wanted to make sure that everything that I'm mentioning here works
25:34
So I selected these four buttons and I added the pan animation
25:40
But let me try another animation to my name. So let me try Why Not This Breath animation
25:48
And I also added some animations to this button. I have added the same animation to all the buttons on my website
25:56
just to make it look more cohesive. And I think I am ready
26:01
I'm going to publish this website to show you how it looks
26:05
On top of the screen, you will see this button that says publish website
26:09
Click continue and then click publish. And the website with the animations is ready
26:16
But before, let me quickly show you how the website used to look like
26:20
It looks nice. I really like it. But it is static. It doesn't have any movement at all
26:26
Now let me show you how the website looks like with the animations
26:30
So pay attention to the buttons and to my name. So we see the button sliding and the breathing effect on my name
26:40
And when I scroll down, pay attention to the buttons. If you want to discover more tips and tricks
26:46
make sure to watch this playlist right here. And here's the link to our Canva Pro 45 day free trial
26:52
I think this is it for now. So I really hope to see you in the next video. Bye