Up next in 10

The video "How To Create Form With Password Strength Using HTML CSS And jQuery" is a tutorial that demonstrates how to build a form with password strength validation using HTML, CSS, and jQuery. Throughout the tutorial, viewers are guided through the process of creating a registration or login form that includes a password input field with a visual indicator of password strength. The tutorial covers essential concepts such as HTML form elements, CSS styling to visually represent password strength, and jQuery for implementing the password strength validation logic. By following along with the instructions and code demonstrations provided in the video, viewers can learn how to enhance the security and user experience of their forms by implementing password strength indicators that provide feedback to users as they create passwords. Whether for registration forms, login pages, or other web forms requiring password input, this tutorial offers practical insights into using HTML, CSS, and jQuery to create forms with password strength validation.
Show More Show Less View Video Transcript
0:00
Hi guys, welcome back to the new video of EZ tutorials and today in this video you will
0:04
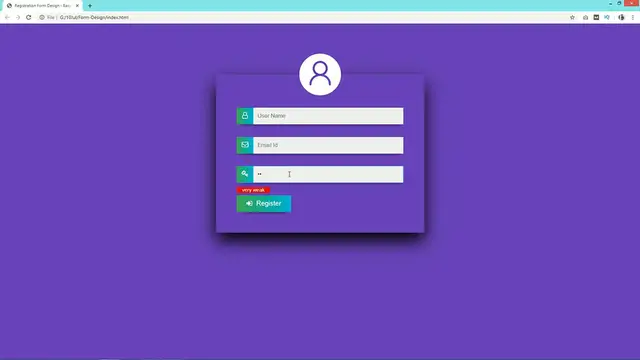
see how to create a signup form with password strength indicator. As you can see on my computer screen here is one form and in this password field as
0:13
I will enter any password it will display the password strength just below this input field
0:18
You can see the password strength very weak, weak, medium, strong and very strong
0:24
So this is very easy to create this type of password strength indicator in your signup
0:28
form registration form. So before starting this video, I will request you to please hit the like button and also
0:33
subscribe if you are new on my channel. Now let's start this video
0:40
First I have one folder here and in this folder I have one image and one HTML file and one
0:45
CSS file. Now let me open my text editor which is brackets editor
0:50
So this is the HTML file and this one is CSS file. You can see CSS file is already connected with HTML with this line of code
0:57
Now we'll come to the body tag. Now we have to add one color in the body
1:01
So just copy this one and write it into the CSS file
1:06
So here we will add background, this background color and font family
1:17
Save these changes and open this HTML file with Google Chrome. Now you can see this color over this web page
1:28
Let's come back to the HTML file. Now in the body tag, we will create one form
1:34
So I'm using form, open and close. Now just copy this form and write it into the CSS file
1:46
For this one, we will add one width. It will be 500 pixels, margin 8% from top and bottom, auto from left and right and padding
1:57
50 pixels and 0. Text align, it will be center and we'll add box shadow here
2:12
Save these changes and reload the web page. Now you can see very small box on this web page because we don't have any content here
2:19
Now we'll come to the HTML file and here we will add one div and the class name I'm writing
2:24
input box and in this div we will add one input field
2:30
So here I will add one input and type it will be text placeholder
2:39
It will be username and required. Refresh the web page and you can see this input field over this web page
2:52
Now come back to the HTML file again and just copy this input box, write it into the
2:56
CSS file with a dot. And here we will add margin 30 pixels and auto width
3:04
It will be 80% position relative and box shadow also. So just copy from here and add it here
3:17
And here we will change these box shadow. That's it. Now just copy it again
3:26
Then write input for the input field. For this one we'll add width 100% and height 40 pixel border
3:38
It will be none and background. We'll add one background color. This one adding left 50 pixel
3:50
Refresh the web page and you can see a large input box here
3:55
Next we have to add one icon. So just come to the Google and search for Font Awesome CDN
4:02
Open this first website and from here we will copy this link
4:08
Just copy this one and come to the HTML file. Edit this line and paste the URL here
4:14
Now again come to the Google and write Font Awesome icons. So just open this website and here we will search for icon
4:24
So I'm searching for user icon. So this is the user icon. Just click on this one and copy this one line of code
4:34
And add this code here within span. Remove this one area hidden
4:40
That's it. So first we have one icon then input field. Reload the web page and you can see very small icon over here in the center and below that
4:50
there is an input field. So we have to align it in the left side. So just come back to the HTML file and copy this span
4:56
Write it into the CSS file. For this span we will write position absolute and left 0
5:03
Top it will be 0 and height it will be 40px and width also 40px
5:15
Background here we will add linear gradient background color
5:26
So this is the first color and this one is the second color
5:35
Just copy this span again then write .fa for the icon. For this icon we will add padding 10px and color it will be white
5:44
Save these changes and reload the web page. Now you can see this beautiful icon over here just before the input box
5:53
Just come back to the HTML file and duplicate this entire div two times
5:57
So this is the second input field. So we will change the icon here
6:02
So this icon will be envelope and input type it will be email and placeholder it will be
6:15
email ID. For the third input field we will change the icon key and placeholder it will be password
6:25
and type it will be password. That's it. Save these changes and reload the web page
6:32
Now you can see three input field in this form. First is username second is email ID and the third one is password
6:40
Next we have to add one submit button. So after this div we will create button and type it will be submit and here we will write
6:51
the button text which is register. So you can see this button over here in the center
6:58
So just copy this one button and come back to the CSS file write it here and for this
7:04
button we will write width 130 pixel height 40 pixel and margin left 10 percent display
7:17
block color white and border zero font size 16 pixel outline none and background
7:33
So again copy this background here. And next we will add this box shadow cursor it will be pointer
7:51
Save these changes and reload the web page. Now you can see this beautiful button here for register
7:58
Next we will add one icon in this button also. So come back to the HTML file and just copy this icon code and paste it here
8:07
So this will be different icon. So I'm writing sign in. Save these changes and you can see this icon in this button
8:20
Now just copy this button here then write dot FF for the icon and here we will add margin
8:27
right 10 pixel. That's it. Now reload the web page and you can see it's looking very beautiful
8:34
Now above all these input field we will add one user icon also
8:38
So come back to the HTML file again and here we will add IMG and SRC and the image file
8:45
name which is user.png. Save these changes and now come back to the CSS file and here we will write form IMG
8:57
So it's width will be 100 pixel and margin top it will be minus 100 pixel
9:05
Reload the web page and now you can see this user icon on this form
9:09
So after adding all these input field register button and image next we will add password
9:14
a string indicator in this form. So just come to this GitHub link
9:19
You can find this link in the description. You can see he is the author for this code
9:25
And next you can see this download button. So just click on this one download and you will get a zip file
9:35
Just extract this file. And here you can see so many files
9:42
So we will copy just this one jquery.passwordstrength.js copy it and add it into your project folder
9:54
That's it. Now come back to the HTML file and now we will connect this jquery file here
10:00
So for that we will add script source and the file name
10:05
Now again come to this GitHub link and you can see this script here
10:10
So just copy this script and paste it here just above this closing body tag
10:15
That's it. So just copy this password and we will add this password as a ID in the input field
10:22
So in this password input field I will write ID is equal to password
10:25
That's it. Next we will add one more thing. Just come to the Google and search for jquery CDN
10:33
Open this link and click on this one minified and just copy this script
10:41
Copy and come to the HTML file and add it here. We can remove this part
10:46
That's it. Make sure you are adding this file above this passwordstrength.js
10:56
Save all these changes. Now reload the web page. Once I will enter any password here it will display the strength over here in the left side
11:08
So we have to align it. For that again come to this GitHub link and you can see these classes password strength
11:17
indicator. So just copy this class name and come to the CSS file
11:22
Add it here. For this one we will add font size. It will be 12 pixel
11:35
And display inline block height 15 pixel
11:48
Min width it will be 20 percent. Text align center
12:00
Position 1 second and margin 50 pixel 0. Color will be white
12:08
Reload the web page and you can see this strength over here
12:12
For all the strength it is in fixed size that is 20 percent
12:17
So we have to change this one. So come back to the GitHub link and you can see other classes here
12:25
Very weak, weak, this type. So just copy the class name
12:35
And write it here. And before that we will add this class name
12:44
For this one we will add background this color. And width it will be 20 percent
12:53
Now reload the web page. And you can see this red background color for very weak password
13:04
Now duplicate it. And head will change the class name. So this is the second class
13:15
Add it here. Now the third one. Add it here
13:26
This is the next class name strong
13:36
And this one is last class name which is very strong. Now we'll change the width for each class name
13:45
So second one is 40 percent. Next is 60 percent. The next is 80 percent and the last one is 100 percent
13:52
Now we'll change the color also. So this is the different background color here
14:01
Again different background color for third one. And for fourth one again different color
14:11
And this is the last one. That's it. Now reload the web page
14:19
And you can see as I'm adding more character in password field it is changing the password strength
14:25
When it is very strong password strength indicator is showing 100 percent width
14:32
So it was very easy to add password strength indicator on your form
14:37
I hope this video will be helpful for you. If so please hit the like button and also subscribe my channel EZ Tutorials
14:43
Thank you so much for watching this video