Up next in 10

The video "How To Create A Website Using HTML CSS And Bootstrap - Latest Website Design" is a comprehensive tutorial that demonstrates the process of building a modern website using HTML, CSS, and Bootstrap. Throughout the tutorial, viewers are guided step-by-step through the creation of a fully functional and responsive website, incorporating the latest design trends and techniques. The tutorial covers essential topics such as setting up the HTML structure, styling elements with CSS, and leveraging Bootstrap's responsive grid system and components to enhance the website's layout and functionality. By following along with the instructions and code demonstrations provided in the video, viewers can learn how to create a professional and visually appealing website using HTML, CSS, and Bootstrap, suitable for personal projects, portfolios, or business websites. This tutorial offers practical insights into web development, empowering viewers to create websites that meet modern design standards and user expectations.
Show More Show Less View Video Transcript
0:00
Hi guys, welcome back to the new video of Easy Tutorials
0:04
Today in this video you will see how to create a modern web page using HTML CSS and bootstrap
0:09
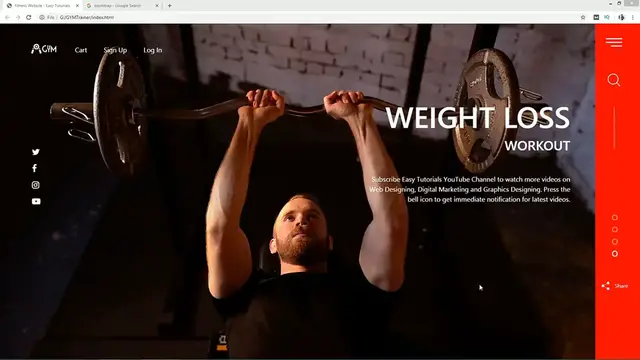
As you can see on my computer screen we have logo and menu on the top
0:13
Then we have image slider with sliding control button on the right side
0:16
You can see different message on each slider image. There is social media icon also in the left side
0:24
You will learn to create this attractive web page using HTML CSS and Bootstrap before starting this
0:29
tutorial please hit the like button and subscribe if you're new on my channel. Now let's
0:34
start this tutorial. Here you can see one folder and in this folder I have one another
0:39
folder and you can see all the images here that I will be using on this website
0:45
I have two other files also, one HTML file and one CSS file. Let me open my text editor. So
0:52
you can see this is HTML file and this one is CSS file. I have written basic HTML structures and I have a
0:59
already connected the HTML file with CSS. Now we have to add the bootstrap so search for bootstrap on Google and open the first website
1:09
Scroll down and just copy this link. Add it here and remove this part
1:19
Let's come back to the website again and copy these scripts and paste it here
1:29
Again we will remove this one and the second script we can remove completely
1:39
So after adding all the bootstrap links we'll come to the body and here we'll create one section
1:45
and I'm using the class name banner. Now we'll create one div and I'm writing the class name slider and here we'll add the slider
1:59
For that again we will come to the BootShap website, then click on documentation, then click on components
2:07
then click on Carousel. Scroll down and here you can see this cross-fade
2:18
So we have to copy this code, just select this one and copy
2:23
Add it here. Now here I have to add the images, so I'm writing image folder name and the file
2:28
folder name and the file name. So this is the first image
2:32
This is the second slider image. And this one is the third one
2:38
Let's duplicate this one to add one more image. Let's change it to pick four
2:45
So now we have the four images, four slider. Let's come back to the folder and open this HTML file with Google Chrome
2:53
Now you can see all these images on this webpage. And there is a control icon also
3:01
Let's come back to the code. And we will remove this control icons
3:07
Remove this one. And here we will add some indicators for image slider
3:13
So I will add OL unordered list and we'll write the class name
3:18
Carousel Indicators. It is a bootstrap class. Then we'll write L-I, data target
3:27
target equals and we'll write one ID slider
3:46
Data slide to 0. Let's duplicate this line and change this value
3:57
value, 1, 2, 3, that's it. Now we'll add one class name here active for the first one
4:06
That's it. Copy this ID slider and we'll add this ID here
4:12
That's it. Save these changes and refresh the web page. Now you can see this indicator at the bottom
4:20
You can see four indicators and when you will click on anyone it will change the image
4:27
Let's come back to the HTML file again. Now we have to add some text on each image
4:37
So after this IMG we'll add one div and the class name I am writing Catazel caption
4:44
It is a bootstrap class. In this div we'll add one message in H1
4:57
Now we'll add one more message in H2. Now we add some text in P tag
5:21
Simply copy this entire div and add it in all the sliders
5:33
Save these changes and again refresh the webpage. Now you can see this message on each slider image
5:40
Next we will copy this class name banner, add it into the CSS file and for this one we will fix the height
5:57
It will be 100 VH and position it will be relative
6:07
Then copy this one slider, add it into the CSS file. Let's write width, it will be 93%
6:21
Float left. After reloading this page you can see some space in the right side
6:36
Now we'll copy this class name, Carousel caption, write it into the CSS file
6:44
We will write max height, 350 pixel and max width also
6:54
Text align right, right 60 pixel and left auto. it will be 160 pixel
7:06
Let's add important. Save these changes and after reloading this page you can see all this text over here in the right side
7:22
Let's copy it again. Then write H1. So font size it will be 70 pixel
7:32
Let's copy again and write P. So for this P we'll add margin top 40 pixel
7:41
Now you can see some space around this text. Let me change the message on each slider image
7:52
The second one I'm writing CrossFit. For the third image I am writing cardio, training and the last one is strength
8:14
Let's reload the webpage and you can see different message on each image
8:29
create another div and class name I am writing side menu let's add one image here
8:45
so I am using IMG source and the file name it is menu.png let's duplicate it
8:52
and change the image name it is magnifying glass dot png let's add one class
8:59
So the class name is menu icon. Let's copy and paste it into the second image
9:09
It is search icon. Just copy this class name and come to the CSS file
9:19
Right will be 100% and width 7%. Float right. Background color it will be this color and position relative
9:37
Z index 2. Save these changes and refresh the webpage. Now you can see some icons in the right side
9:48
Let's copy this class name for menu icon
10:00
Here we will add width. It will be 40 pixel and margin also
10:08
And cursor it will be pointer. Let's copy the second class search icon
10:14
width 30 pixel and margin 30 pixel
10:24
Cursor pointer Now you can see small icons in the right side
10:38
Let's copy this side menu and here we will write after. Content it will be blank width 1 pixel and height 100 pixel
10:55
In the background, it will be white, left 45 pixel and top 200 pixel
11:07
Position absolute. After reloading this page you can see a line here in the right side
11:15
Let me increase this one. So I will change it 130 pixel
11:24
Now you can see a increased height for this line. Now we have to move the slider indicators in the right side
11:30
So just copy this class name Caduzel Indicators, add it into the CSS file and write left 85
11:39
height 40% width 95 pixel and top 55 pixel
11:52
Play will be block color white. Now we'll add important here
12:08
After reloading this page you can see all these indicators in the right side
12:14
Now we have to change the style of these indicators. Copy this one and write LI
12:28
Wits will be 10 pixel and height also 10 pixel. Border radius 50%
12:36
Margin left and background it will be transparent
12:47
2 pixel solid and this white color. Let's add important. After reloading this page you can see circular icons for this indicator
13:09
Now we have to add some space also. So here we'll add margin top and left I will increase 40 pixel
13:28
Now you can see proper alignment for these indicators. And when you will click on the indicator it will change the slider image
13:43
We'll come back to the HTML file and here we will add one div and the class name I am writing share
13:54
Now we'll add one image so I'm using IMG source and the file name
14:01
We'll add small and one message. Share, that's it
14:10
Let's reload the web page and you can see this shared icon and one, a small text
14:16
Let's copy this class name and add it into the CSS file and write margin top 60 pixel
14:32
Margin left it will be 15 pixel. write this class name and write IMG
14:44
Which will be 20 pixel and margin right 12 pixel. Cursal pointer
14:56
So you can see a small share icon. Next we have to add some menu on the top
15:03
So come to the HTML file and here we'll create one div and class name I'm writing top bar
15:10
Now we'll add UL and L
15:20
In the first LI we will add one image. So I am using IMG source and the file name that will be our logo
15:30
In the next LI we will add one link so I am using A tag and the link text is cart
15:39
Let duplicate this one and the second one is sign up and the third one is login
15:54
After reloading this page you can see all these links here at the bottom. Let's copy this class name and write it into the CSS file
16:09
Position it will be absolute. margin 30 pixel 50 pixel Z index 2
16:18
Just reload the webpage and you can see these icons and link at the top
16:31
Let's copy this class name again and write IMG So for this image height will be 30 pixel
16:39
cursor pointer. So you can see a small logo on this web page
16:49
Now we have to design these links. So just copy it again
16:56
Then write UL, display inline flex. Write it again and here we'll add L-I
17:09
List style it will be none. Margin, 15 pixel, 20 pixel
17:21
Just duplicate it and write A. It will be white, display, block, padding top 5 pixel, that's it
17:41
So after reloading this page you can see this white color for this links
17:50
Next we have to add the social media icons in the left side
17:55
So come back to the HTML file and here we will create one more div. One more div and the class name I am writing, social icons
18:05
Now UL and L.I. Then we will add anchor tag AHRF and here we will add the Fontosome icons
18:20
For that we will come to the Google and search for Fontossom CDN
18:24
Open the first website and copy this link. This link. Just come back to the HTML file
18:31
Just duplicate this line and instead of this style.cassus we will paste the URL that we have copied right now
18:36
Scroll down and here we will add the icons. So just come to the Google again and search for font or some icons
18:43
Open this website. And here you can search any icon that you want to use on your website
18:51
So I'm searching Facebook. Click on this one and just copy this one line of code. code
18:57
Add it here. Remove this area hidden, that's it, and duplicate this line
19:03
We'll change the icon, so second one I'm writing Twitter. And the next one is Instagram and next one is YouTube Play
19:24
Save these changes and reload the web page. Now you can see all the social media icons at the bottom
19:31
Let's copy this class name, Social icons. Add it into the CSS file, will add top 35%, and left 5%
19:42
Position it will be absolute. Z-index 2. Reload the web page and you can see this social media icon in the left side
19:54
Let's copy it again, then write ULI
20:03
Lister style None, margin 10 pixel 0
20:15
Font size will be 20 pixel. Let's duplicate it, then write A
20:24
it will be white. So after reloading this page you can see these icons in the white color
20:37
Like this you can easily create an attractive web page using HTML CSS and BootShrape
20:41
If you have any doubt about this video you can ask me in the comment section
20:44
Don't forget to like and share this video. Thank you so much for watching this video
20:54
Thank you
#Flash-Based Entertainment
#Programming
#Software
#Education
#Skins, Themes & Wallpapers