Up next in 10

The video "How to Add Icons with Hover Effect on Website Using HTML and CSS" is a tutorial that teaches viewers how to incorporate interactive hover effects with icons into their website design. Throughout the video, step-by-step instructions are provided on how to implement this feature using HTML and CSS. The tutorial covers essential techniques such as using CSS transitions and hover pseudo-classes to create smooth and visually appealing effects when users interact with the icons. By following along with the instructions and code demonstrations presented in the video, viewers can learn how to enhance the interactivity and visual aesthetics of their websites with this simple yet impactful hover effect. Whether for buttons, links, or other elements, this tutorial offers practical insights into leveraging HTML and CSS to add dynamic hover effects with icons to web pages.
Show More Show Less View Video Transcript
0:00
Hi Guys, Welcome back to my new video and today in this video you will learn how to
0:04
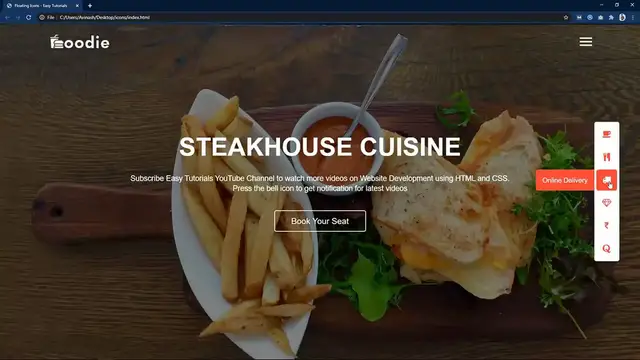
make a floating icons with hover effect on a website using html and css
0:10
As you can see on my computer screen on this website I have added some icons in the right side
0:16
When I move cursor over these icons the icons color and background is changing and it also
0:22
display the title for the icon. The hidden text comes smoothly from the icon when I move cursor over it
0:29
We will learn to make this design using html and css step by step
0:34
So before starting this video please hit the like button and subscribe to my channel EasyTutorials
0:39
if you are new on my channel. Now let's start this video
0:45
Here I have this folder and in this folder I have index.html file and one style.css file
0:50
and some images that I will be using on the website. Now I will open my text editor which is brackets editor
0:57
So this is the html file I have added basic html structures and this one is the css file
1:04
In the html file I have added title tag and link tag to connect the html file with the
1:09
css file. Next we will write the code in the body tag. So here we will create one div with the class name hero
1:16
Let's copy this class name write it here in the css file and here we will write the css
1:19
properties for this div. So first we will add width and height
1:24
Then we will add background image. Here we will add linear gradient color on the image
1:29
So here I am adding linear gradient then color code then the second color code then URL
1:35
In this URL we will add the image file path. So the image name is background.jpg
1:41
You can see this image name in the folder background.jpg. Next we will add background size
1:51
It will be cover and after that background position. It will be center
1:57
Then we will add text align center and position relative. After adding this let's open this html file with any web browser so you can see this image
2:06
on complete web page. Next come back to the html file and here we will add one nav tag and in this one we will
2:13
add two images. First we will add the image for the logo and the class name logo
2:18
Then we will add another image and the image name is menu.png and the class name is menu
2:27
Let's copy this nav here in the css file. Here we will add width margin and padding from the top
2:35
Display will be flex. Then align items and justify content
2:45
So that you can see these images are so big. So let's come back and copy the class name for the first one which is logo
2:54
Write it here in the css file and for this one we will set the size
2:58
So we will add width 150 pixel and cursor pointer. Let me just copy and paste it again and here we will write the second class name menu
3:08
Here we will write the width 30 pixel. That's it. Now you can see the logo and menu icon looks good
3:15
Let's come back and after this snap we will add another div with the class name textbox
3:20
and this one we will add one title in h1. So this is the title and some description in p tag
3:25
So this is the description. Then we will add one button and the type will be button and let's add the button text book
3:35
your seat. After that you can see these text and button on the web page
3:45
Next we have to add the css properties for these. So just copy the class name textbox
3:48
Write it here in the css file and here we will add width
3:52
Then we will add margin and color. You can see white color and some space from the top
4:04
Let's copy this one and here we will write h1 for the title. We will add margin from the bottom and font size
4:12
Let's copy the class name again. And write p for the paragraphs and here we will add font size and line height and margin
4:19
from the bottom. Now it is looking like this. Next we will write the css for the button
4:27
So let's write the class name again and write button. Let's add width padding color and font size border radius and outline
4:38
After that border and background transparent and cursor pointer. Now you can see this button looks good
4:49
Next we will add one box in the right side. So let's add one div with the class name sidebar
4:56
So let's copy the class name sidebar. Write it here in the css file
5:00
For this one we will add some height and width. And background it will be white
5:09
Let's add the border radius and position top 50% right 50 pixel and transform translate
5:17
y minus 50%. You can see this box in the right side and in this box we will add text and icons
5:26
So let's come back and in the HTML file. Here we will add one div
5:34
So let's add the class name icon box and in this one we will add to another div
5:41
So let's add the first div with the class name side text
5:47
And the another div with the class name icon. So in this one we will add the text
5:53
So let me add the text bookseed and in the icon div we will add one icon
5:59
So to add one icon we will come to the Google and search for font awesome 4 cdn
6:04
Open this website and from here just copy this URL. This is the cdn link
6:13
Just come back to the HTML file and come to the top in the head
6:17
Just add link rel stylesheet href and add this URL that you have copied
6:25
Like this. After that we will again come to the Google and search for font awesome 4 icons
6:33
Open this link. And in this search box you can search for any icon
6:44
So let me search for one icon coffee and just click on this one
6:54
And copy this one line of code. And add this one in the HTML file where you want to display the icon
7:04
So I'll add it here. Let's remove this one. And after that just come to the web page and you can see this text and icon
7:13
Similarly we will add another text and icon. So just duplicate this one and change the text
7:25
So let's add the text favorite outlet and let's search the another icon over here on
7:30
this web page. So I will use this icon. Simply copy and paste it in the HTML file
7:42
Let's duplicate it again to add another text and icon. So let's add the text online delivery and we will write the different icon code
7:53
You can search the different icons code on the same website. Next I'm adding the another text on rewards and icon
8:08
Let me add one more and here we will add secure payment. INR
8:17
You can see these icons. We can add one more. So let's come back and duplicate this one
8:26
Here we will write the text your queries and icon. Now we have added all the text and icons
8:35
Next we have to design these icons. So just come back and we will copy the class name
8:40
This one icon box. Write it here in the CSS file. For this one we will add width and height
8:47
It will be equal 50 pixel. Then display it will be flex justify content flex end and margin 5 pixel auto
9:00
Now you can see it is looking like this text and icons are coming in the same line
9:07
Now just copy the class name side text. Write it here in the CSS file
9:11
For this one we will add min width 0 height 100% and background
9:19
Let's add the color code here. Then we will add margin from the right side and line height 0
9:28
Color will be white and display flex. Align item center and justify content center
9:36
Border radius will be 5 pixel 0 0 and 5 pixel. Overflow hidden
9:44
Now you can see the changes. Just come back and copy the class name for the icon
9:50
Write it here and here we will add min width 50 pixel and height 100% border radius will
9:59
be 5 pixel. And cursor pointer
10:08
Now you can see only icons. Let's copy the icon class name again and here we will write .fa for the icon
10:15
We will increase the font size and we will change the color
10:23
Then we will add line height. Now you can see these icons looks good
10:29
Next we will add the hover effect. So just come back and copy this class name icon box
10:35
Write it here and then write hover and here we will write icon
10:42
So when we will hover we will change the background color. So here we will add background and color code
10:49
Let's copy this line and after that write .fa and here we will add the color white
10:57
So you can see the hover effect when I move cursor over this icon, the background color
11:02
and icon color is changing. Next we will display the text of the particular icon
11:16
So just come back and copy this one. Write it here and let's copy this class name side text
11:25
In this one we have added min width 0. So we have to increase this one
11:28
So we will add it here and let's add min width 140 pixel and come to this class name and
11:41
here we will add transition 0.5 seconds. So after adding this, you can see when I move cursor over this icon, the text is coming
11:53
from the icon very smoothly. So this is how we have created this beautiful design using HTML and CSS
12:05
I hope this video will be helpful for you. If you have any question, you can ask me in the comment section and please like and share
12:10
this video and also subscribe my channel EZ tutorials to watch more videos like this one
12:16
Thank you so much for watching this video
#Fun & Trivia
#Flash-Based Entertainment
#Online Media
#Programming
#Crafts
#Skins, Themes & Wallpapers