Up next in 10


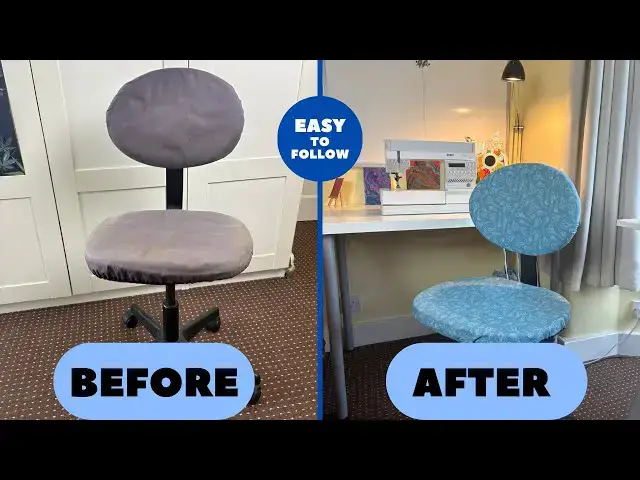
In this video you will see how I update my old office chair to improve my sewing corner.
Take an old faded and worn office chair and upcycle it to make a pretty, stylish chair for your home.
---------------------------------------------
FURTHER V I D E O S:
Upcycle Cardboard Boxes - https://youtu.be/lsm_YVwQB9E
Sewing Tutorials - https://www.youtube.com/playlist?list=PLJDvtpQDF0Pfi5eUUee_R01enTXRFuK89
--------------------------------------------
➡️ Want to see loads of written tutorials too? If yes, click here: https://christines-crafts.com/
🆓 Access my resource library for free: https://christines-crafts.com/enjoy-the-craft-gardening-resource-library/
--------------------------------------------
Enquiries: [email protected]
--------------------------------------------
Show More Show Less View Video Transcript
0:00
Welcome to my sewing corner. It's tucked
0:03
away in the corner of a bedroom and it's
0:05
where I do all my machine sewing and I
0:08
feel very privileged to have my own
0:09
little corner to be honest. And what I'm
0:12
going to do today is share with you the
0:14
chair that I use. It's an old office
0:16
chair. It's very faded, very worn, so
0:20
it's time for a refresh. And hopefully
0:22
you'll pick up some hints and tips and
0:24
be able to recover your own chair.
0:27
So, here is the chair. And all I'm going
0:30
to do
0:32
from the back.
0:34
Just going to
0:37
undo the adjusty thing that lets it go
0:40
up and down.
0:44
And there we go. That's off.
0:48
Now, the base. This is literally a
0:51
cover. So, I'm just going to
0:55
try and spring it off. I'm sure I can.
0:59
Here we go. Picking the right bit
1:02
to get started.
1:10
Going to
1:15
force that off there.
1:18
And then when I look around the back,
1:21
can I see it's been secured?
1:24
Well, I just have to
1:30
unscrew the bit down there and hopefully
1:34
that'll get me it out.
1:38
Let me have a look.
1:40
So, I've got it to this point and it's
1:42
clearly a fix in here somehow. So, I'm
1:45
simply going to
1:47
get it off.
1:49
You might find, depending on your chair,
1:52
that you can get that out. I really
1:54
can't. So, I'm just going to
1:58
take the scissors in
2:01
as close as I can
2:05
and cut it off.
2:13
And then I'm going to come from this
2:14
side and do the same.
2:24
And then I can remove it.
2:27
Everything's off the chair. So now I've
2:30
got
2:32
a foam pad which I can choose to replace
2:34
or not. That's up to me. I'm going to
2:36
have a look in my foam. I think I have a
2:38
piece of we cover that. And then I've
2:41
got the cover. This this cover is what
2:45
we can use as a template. And you can
2:48
see it's got a little elastic around the
2:51
edge
2:53
which we'll be able to replicate. Oh,
2:55
it's making me sneeze cuz it's so
2:57
trusty.
2:58
And then if you remember, we've got the
3:00
back here.
3:02
And I'm just going to pop it open. We've
3:06
got the two halves. And you can see here
3:10
that the cover has got a string through
3:13
it
3:16
which is knotted. So just undo that and
3:18
get this off. Okay.
3:25
This has been tied for a long time.
3:36
That was easier, wasn't it? Right,
3:41
that's got foam on. So, again, I can
3:44
recover that.
3:46
So,
3:48
let's put all the bits together, all the
3:50
plastic bits.
3:53
I've now got two pieces of fabric that I
3:56
need to replicate with my new fabric.
3:59
And I've got two pieces of foam that I
4:02
can choose to replace or not, which I am
4:04
going to replace cuz when I'm going to
4:05
all this trouble, why not have a nice
4:07
comfortable seat.
4:09
So, here I've got the foam that I took
4:11
off the seat. I'm just going to place it
4:13
onto my new foam and draw around it with
4:15
a marker pen. Simple as that. And I'm
4:18
going to do the same with the bit of
4:20
foam off the back. You'll see it's got a
4:21
little bit bent, so I'm just flattening
4:23
it down to make sure I make it large
4:24
enough. I'm not worrying too much about
4:27
the detail. And then those just need
4:29
cutting out. Now, I've used foam that's
4:31
quite a bit thicker, but that's cuz I
4:33
want it comfortable. And I'm just going
4:35
to cut it out with scissors. Don't worry
4:37
if you don't have lots of fancy tools
4:39
for these jobs. Ideally, you would cut
4:42
this with a knife and you get a lovely
4:43
perfect smooth edge. If you've only got
4:45
scissors, just use those scissors.
4:49
And here we go. They're all cut out. And
4:51
you can see I've not worried too much
4:53
about the edges. If you want to, you
4:55
could do you could trim them up, but I'm
4:58
just going to check it on that back. And
5:00
you could cut that corner off if you
5:03
wanted to smooth it down, but I'm quite
5:05
happy with it as it is. And I can see
5:07
that it fits perfectly. So, fabric next.
5:10
I'm using this fabulous one with sewing
5:13
items on it, scissors and tape measures
5:15
and things like that. And just place
5:18
each of your pieces of fabric down flat.
5:21
You may need to have cut some thread or
5:24
elastic that was holding it into a
5:25
curve. Just get it down flat and pin it
5:30
down. And you're going to do the same
5:32
with the seat and the back. Now, for
5:34
some reason, I didn't film the back, so
5:36
I apologize, but it's exactly the same
5:37
as the seat. Uh, pin it down flat. And
5:41
then you're going to check before you
5:43
cut anything whether you think it's big
5:45
enough. Because I'm using thicker foam,
5:48
I'm actually going to cut my fabric
5:49
bigger than the template.
5:53
So once I've cut it out, I can just
5:56
double check again that I think it's big
5:57
enough,
5:59
which I do. You can see I've cut it that
6:01
little bit larger. And then I will need
6:04
bias binding. Now, obviously, I'm doing
6:06
this both for the seat and for the back.
6:10
Do as I say, not as I do. You should
6:13
press your fabric before you cut it out.
6:16
I'm terrible. So, I'm now going to use
6:19
this foam pad that I've got. Foam pad. I
6:21
mean wool pad obviously to just press it
6:24
down flat before I go any further. My
6:26
mom used to go mad cuz I didn't press
6:28
things before I cut them out. And I
6:30
haven't learned in all these years. So,
6:32
once you've got them both pressed,
6:34
you're going to need a fabric strip for
6:37
around the edge. Now, I'm going to use
6:38
bias binding, which is perfect. If you
6:41
haven't got any, you can just use a
6:42
strip of fabric,
6:44
but you do need to press it in half and
6:47
then pin it all the way around the edge
6:50
of each of your pieces. And you're going
6:53
to pin it so that it just wraps around
6:56
the edge and makes a tube. So, you do
6:58
need to make sure you leave either end
7:01
open so that you can get your elastic
7:03
in. And then it'll be over to the
7:06
machine. So, I'm just going to show you
7:08
on here as I'm sewing. You can see how
7:10
the bias binding is literally wrapped
7:12
around the edge of the fabric. And what
7:14
I would say is wrap it round really
7:17
comprehensively. You want the fabric to
7:18
go right to the fold of the bias binding
7:21
so that you get a good engagement.
7:24
Also, as you're putting your pins in,
7:26
make sure you're going all the way
7:28
through both sides of the bias binding.
7:31
That way, we can sew it all in one go.
7:34
This isn't a prestigious job. This is a
7:36
quick upcycle of a chair that you use
7:38
regularly. Um, but that will just make
7:40
sure that you catch both sides and do
7:42
actually end up with a tube.
7:44
Hope you're enjoying the owl in the
7:46
background. He's here temporarily.
7:48
In fact, you know, I don't think he'll
7:50
be there for another video, but who
7:52
knows? So, I hope you're enjoying this
7:54
video and please give me a thumbs up if
7:56
you are so more people can upcycle that
7:58
old chair.
8:00
So, you're just going to keep working
8:01
round and you're going to do this for
8:04
both the seat and the back. And just
8:07
make sure at either end you do a little
8:09
reverse and secure your thread because
8:12
you don't want it coming undone when you
8:13
thread your elastic. So then you put a
8:16
safety pin or similar through a piece of
8:19
elastic or string and feed it through
8:22
that tube that you've just made. And
8:24
you'll do that for both pieces. And then
8:27
they're ready to go on the chair.
8:29
So, you'll notice that my foam wasn't
8:32
glued to the chair, but I've decided to
8:34
add some spray glue and just secure it
8:37
down just to hold it in place really
8:38
while I'm putting the cover on. And I
8:41
just think that'll be a little bit
8:42
easier for me. I've not put much on.
8:45
It's not about it holding it there for
8:47
all time. I just think it'll be easier
8:50
to put the cover on. So, I'm just
8:53
pressing that down. And then here's the
8:56
cover that you can see I've got an
8:58
elastic through.
8:59
And I'm just going to place it over the
9:02
seat
9:04
nice and carefully. And then take a
9:07
little bit of time to just get it lined
9:09
up so that you've got it equidistant all
9:11
the way around. And then pull your
9:14
elastic tight or string if you've used a
9:17
string. And you can see it's gone nice
9:19
and tight on the top and made a really
9:22
nice seat. And then all you need to do
9:24
is secure them to hold it there.
9:27
Now, it's up to you what sort of knot
9:29
you use and whether you want to be able
9:31
to undo it again or not. And then you
9:33
can push that into
9:36
the tube that you made. Now, I'm just
9:39
going to take the safety pin off and cut
9:40
this elastic down so that I can get it
9:43
into the tube. But, you're just going to
9:45
push it in the tube. And then, if you
9:46
want to, you can sew the tube shut. Or
9:48
you don't have to. You can just poke it
9:51
in and and hope it it stays there. So,
9:54
I'll tidy that up in a moment.
9:57
And then on the back, I'm going to
9:58
repeat that process. I'm just going to
10:00
apply a little bit of spray glue. It's
10:02
actually a can that's virtually empty,
10:04
and I'm just finishing it off on this
10:05
project. So, you'll see it's a little
10:07
bit hit and miss, but let's get some on
10:10
there.
10:13
And just secure it to the back. Just a
10:16
little bit of wiggling. Make sure it's
10:18
where I want.
10:20
And then press it in place. And again,
10:23
I'm going to take the cover that I've
10:25
made and place it over it.
10:30
You can see I'm just making sure that's
10:32
on there. Because it's curved, it's more
10:35
likely to try and push itself off.
10:38
So, just get this cover on.
10:42
And of course, this time there is a
10:44
plastic piece that goes on the back. So,
10:47
I want to make sure I get as much of my
10:49
dark bias binding tucked behind the
10:53
plastic.
10:54
So, just take a little bit of time to
10:58
make sure it wraps all the way around
11:01
evenly or as evenly as you can.
11:06
And then you can see I'm just adjusting
11:09
and just pulling a bit. And it do just
11:11
take some time to do this.
11:15
Keep pulling it and pull those elastics.
11:23
And then if you look on the right side,
11:26
you can see it's nice and taut and
11:28
looking great.
11:31
So I can secure it
11:34
and then it'll stay there.
11:37
And this time, what I'll probably do is
11:39
cut my elastics short and then just tuck
11:42
them behind the piece of plastic that
11:44
goes on the back.
11:46
I don't need to
11:49
worry about losing them up the tubes
11:52
because they're going to be hidden
11:53
anyway.
11:57
And once you're happy, you can get the
11:59
plastic bit from the back
12:01
and just clip that in place.
12:05
And you can see this is where you
12:06
realize I haven't quite got that right.
12:08
And so the adjustment starts all over
12:10
again. But you can get that back in
12:13
place and then reassemble the chair.
12:18
So simply going to
12:21
slide that on and tighten it up. And
12:25
then you can adjust it for the height
12:27
you want. You can see I'm just doing a
12:28
little bit of adjustment. Loosen it off
12:30
a bit. Slide it up.
12:33
And I've got a chair.
12:35
Just making sure it's all clipped
12:36
together properly. And there we go.
12:40
All ready for me to use for my next
12:42
sewing project. So now I'm back in
12:45
sewing corner using my new chair. How it
12:48
feels anyway. And I hope you've enjoyed
12:51
it and I hope you feel inspired to
12:53
upgrade that old chair that you're using
12:55
because it's so much nicer to use. And
12:57
hopefully I'll see you again
#Crafts
#Fiber & Textile Arts
#Home Furnishings
#Home Improvement