Up next in 10

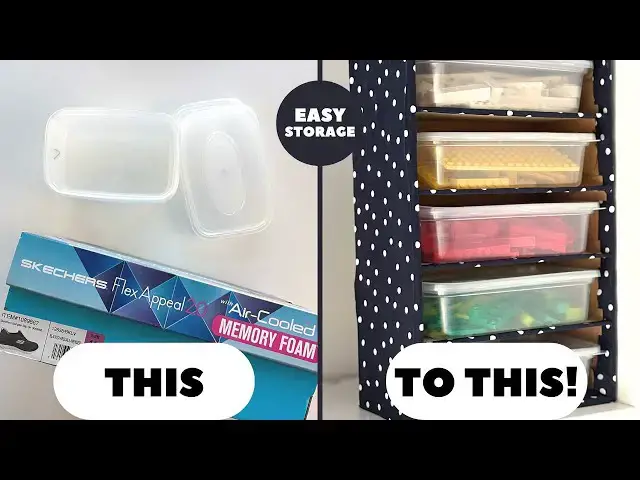
Turn OLD Shoe Box Into AMAZING Lego Storage Using Takeaway Containers!
Apr 8, 2025

Make super easy yet stylish DIY storage using old shoeboxes and takeaway containers! Super eco-friendly upcycling project for you.
V I D E O S T O W A T C H N E X T :
Upcycle old t-shirts into stylish bags at https://youtu.be/YlhgJ3A4lNg
Turn leftover embroidery threads into pretty rainbow brooches at https://youtu.be/lIcshZkop9c
--------------------------------------------
Inquiries: [email protected]
--------------------------------------------
#diystorage #upcycling #upcyclecrafts #upcyclingprojects #sustainability #sustainableliving #shoeboxcrafts
Show More Show Less View Video Transcript
0:01
join me as I take an old shoe box some
0:04
takeaway containers and turn them into
0:06
some Lego storage really useful really
0:10
easy really practical will look so much
0:12
nicer on the shelf and look at that
0:14
color coordinated Lego is anything more
0:17
satisfying of course you could use it
0:18
for buttons and craft bits or toppers
0:21
for cards or anything else you can think
0:23
of just some takeaway containers and an
0:26
old shoe box so let's get started
0:30
so this is the shoe box I'm starting
0:32
with which you can see has a lid there's
0:34
no worries we can just cut that off you
0:36
don't need one with a lid you can use
0:37
any shoe box and these are the takeaway
0:40
containers I mean the little plastic
0:42
ones that have the Snap-on Lids I mean
0:44
it's terrible that so many go to lamp
0:46
fill so let's get them reused and you
0:48
can see they're just going to stack one
0:49
on top of the other and they just fit
0:52
nicely so to start with if you have got
0:55
a lid on your box like me just cut it
0:57
off if you haven't you're just ready to
0:59
to get going um but we really don't want
1:02
that we just want the open front to our
1:06
storage a little something stuck in
1:08
there so once you've got your shoe box
1:11
we need to take some measurements so the
1:13
first thing you're going to do is
1:14
measure across the width of your shoe
1:17
box and make a note of it now you'll
1:20
notice I'm going to measure it in more
1:22
than one place because you just never
1:25
know and it's better safe than sorry
1:26
when you're going to cut your dividers
1:31
so I'm just going to note that
1:34
down and then I'm going to note down How
1:36
Deep The Shoe Box is and this is so I
1:39
can make those dividers again I'm just
1:42
going to check it on different
1:44
sides because I want to know how deep it
1:47
is but then I'm actually going to make
1:48
the dividers a little bit smaller than
1:56
that now how many of these do we L are
2:00
going in here so obviously you can do
2:02
lots of measurements and maths or you
2:05
could just pop the lids on them place
2:07
them in there and see how many you think
2:09
are going to fit which for me seems a
2:13
little bit easier you might say it takes
2:15
longer but you know I think as a visual
2:18
person you'll find it's just more
2:19
satisfying and you're more confident
2:21
that you've got it right so I can see
2:23
that five are going to fit in there
2:25
comfortably so I'm going to need four
2:28
dividers
2:30
so that I've got my five little spaces
2:33
for my boxes to go
2:37
into so I'm just going to measure that
2:40
inside
2:44
length Okay so my ruler doesn't fit
2:47
hence the tape measure and I'm just
2:49
going to make a note of that
2:54
size might just check it at this side
2:56
just to be sure this box really is I'm
2:58
going to use the word square
3:00
but you know properly
3:03
rectangular and then I know that I need
3:06
four dividers five sections so I'm going
3:10
to divide that length by five and that's
3:13
going to tell me how far apart my
3:16
dividers are going I know it's a fancy
3:18
calculator for such a simple sum but his
3:21
next math teacher that's the one that's
3:22
on my desk so all you need is your phone
3:25
don't worry
3:29
so I've got 2.3 in and no one really
3:33
uses 2.3 in do they so if we're honest
3:37
I'm going to make it 2.25 in I mean 2
3:40
and 1/4 in is a measurement we use and
3:42
is easy to measure on your tape measure
3:45
or
3:46
ruler so that's how far apart my
3:49
dividers are going to be and that will
3:51
mean that one of them is slightly larger
3:52
but no one will ever notice so I'm going
3:55
back in with a tape measure measure two
3:57
and A4 make a little pencil mark measure
4:00
two and a qu again obviously you can do
4:03
the maths and add on and just work along
4:05
the tape measure if that suits you best
4:07
but what you're doing is measuring every
4:09
2 and 1/4
4:11
in and then if you've any doubt in your
4:14
mind just measure that last section and
4:16
just make sure you've done it right
4:18
repeat at this other side and then draw
4:21
the line that meets them now I haven't
4:23
got a ruler that fits to hand so I'm
4:25
just going to use this box of uh pens
4:27
it's giving me a straight line and join
4:29
the two pencil marks you made and you're
4:31
going to get a nice clear line which is
4:33
exactly where your divider is going to
4:36
go it just makes life
4:38
easy so just mark them with whatever
4:41
you're
4:52
using and then as you can see I'm ready
4:56
to go there I've got those lines
5:06
so let's make the
5:07
dividers so I'm just using some card
5:10
here through the project and it's quite
5:11
a thick card and I do recommend a thick
5:13
card remember you don't want it bending
5:15
or
5:15
Waring um and I'm just using this
5:19
up so I measured the internal
5:22
measurements and so I'm just going to
5:24
make them the width of that internal
5:26
size but I'm going to measure them make
5:28
the height slightly smaller so you could
5:31
go an eighth of an inch quarter of an
5:32
inch it's up to you but you're just
5:34
going to measure out your dividers now
5:38
the ruler I'm using is a quilting ruler
5:40
you don't need a quilting ruler it's
5:42
just a nice easy way to keep them all
5:45
square and you can see I'm just showing
5:47
you there that I'm going to make it
5:48
slightly less than what I measured CU I
5:50
don't want the dividers to come right to
5:51
the front or stick out there's no need
5:53
for them too so I'm just going to make
5:55
them fractionally
5:57
smaller now if you're using an ordinary
6:00
ruler just take your measurements in two
6:02
places so that you keep things nice and
6:04
got to use that word again Square okay
6:07
just just so they keep them nice and
6:10
accurate so you can see I'm going to get
6:12
two out of this little bit of this card
6:14
here but I actually need four so I'll
6:16
just carry on and get all four and then
6:19
cut them out and you'll have your four
6:23
dividers now what you might find when
6:26
you cut out this thick card I'm just
6:29
reminding you of my measurements is that
6:31
they have a bit of a Scraggy Edge just
6:34
get some some fine
6:35
sandpaper and just take those Scraggy
6:38
bits off you don't have to work hard
6:40
it's just a gentle motion it's just
6:42
going to tidy them up for you it's
6:46
really worth that little bit of
6:48
time you can see how much better that
6:50
one looks so just do that with all of
6:52
them if you've got that sort of messy
6:54
Edge depends how you cut them I think so
6:58
let's just check these fit I want to
7:01
check that they fit in width ways and I
7:03
want to check that they don't stick out
7:04
the front and that's purely double
7:07
checking what I'm doing it's not
7:09
essential but you can see they're not
7:11
quite to the front but they are very
7:15
close so now what we need to do is just
7:18
cover the front of those we're not
7:20
covering the whole divider you can do
7:22
but I'm just covering the front so what
7:25
you're going to need is a
7:27
strip and that strip needs to be
7:30
as wide as the
7:33
divider but about an inch thi so you can
7:38
see I'm going to cut this section here
7:41
and then I'm going to cut inch wide
7:47
strips so we're just cutting an inch now
7:49
you can do all this really carefully and
7:52
measure it out or you could do what I'm
7:54
doing which is measure an inch C strip
7:56
measure an inch C strip and off we go
8:00
so just cut them for however many you
8:02
need so for me that's four this fabric
8:06
is not ideal it's a little bit stretchy
8:08
the best fabric I think is a nice
8:10
crafting cotton it won't stretch it'll
8:13
go down nicely and flat and it's the
8:16
best but if like me you've got something
8:18
a bit stretchy just take care so all I'm
8:21
going to do is apply glue to each strip
8:23
in
8:24
turn I'm using a fabric glue but you
8:27
could use any multi-purpose glue and
8:30
just glue it onto one Edge and the
8:33
easiest way is to put the cardboard on
8:37
the center of the
8:39
strip and then you can lie it down and
8:41
that's one side stuck and wrap the other
8:44
side over and smooth it down depending
8:46
on your glue and your fabric it might
8:48
want to jump up and if so just keep
8:51
holding it in place until it's happy to
8:53
stay there smooth it down and if your
8:57
strips are a little bit long you can
8:58
just trim those edges off now I'm going
9:00
to do it now but I'd recommend leaving
9:02
it till your glue's dry to be
9:04
honest um and then you'll have a nice
9:08
tidy divider ready to go in and just
9:11
repeat that for the others and let them
9:15
dry as I say if you need to put a book
9:17
on it to hold it down flat just do that
9:20
while they dry you see I've got all glue
9:22
on my fingers now
9:24
so once you've got all your dividers
9:27
done you can just put them to one
9:30
side and get on with the
9:32
box so we're going to wrap this box in
9:35
the fabric so I'm going to measure the
9:36
height of the box now measuring it again
9:37
I'm measuring the outside I'm making
9:39
sure I'm
9:40
accurate because when I've noted down
9:42
that
9:43
height I'm going to use
9:46
that to cut my
9:52
fabric but as you can see I'm adding on
9:54
an inch and a half you can add on two
9:56
inches if you like it's up to you it's
9:58
just going to give you that wrap around
10:00
so that it's nice and tidy and then we
10:03
need to work out how long this piece of
10:04
fabric is going to be so it's going to
10:06
be the length of the box Time
10:09
2
10:11
plus sorry it's g a bit blurry cuz I've
10:13
come near the camera the width of the
10:15
Box times
10:18
two so you can see the simple maths that
10:21
I'm
10:23
doing I'm going to add those
10:27
together and then I obviously want a
10:29
little bit extra to wrap
10:32
around so it's up to you but I'm going
10:34
to probably add an inch on so I now want
10:37
a
10:38
piece that's 40
10:41
in by 6 in and that's going to give me
10:45
plenty to wrap
10:47
around once you've cut it out we need to
10:50
glue it to the
10:51
box now I think you better adding some
10:54
glue to one of your long sides and then
10:57
putting the fabric onto it they just
11:00
think it's more effective you don't end
11:01
up with a great big piece of fabric
11:02
flopping around covered in glue it's
11:05
just asking for
11:06
trouble so we'll get all that glue
11:11
on and then place the fabric on so you
11:14
want an equal amount spare top and
11:17
bottom okay
11:19
and about half an inch 3/4 of an inch
11:23
around the corner we're just going
11:24
around the corner doesn't really matter
11:27
how far just not too far and smooth it
11:30
down and just check you've got about the
11:32
same overlap on the top as you have on
11:37
the
11:38
bottom and then it's all going to work
11:40
nicely and you can still adjust it a
11:42
little bit you glue or slide while it's
11:44
still
11:46
wet and make sure you're round that
11:52
corner once you're happy and do take the
11:55
time to be happy with this before you
11:57
set off around the rest of the box
12:00
but once you're happy you're going to
12:02
carry
12:05
on and I would carry on in the same vein
12:08
apply some glue to the Box wrap the
12:11
fabric apply some glue wrap the fabric
12:15
and then when you get right round to the
12:16
other end as you can see I'm back to
12:18
where I
12:20
started you just wrap it around smooth
12:24
it all on and then you've got this
12:26
overlap so what we're going to do
12:29
is take that end piece and we're going
12:31
to fold it so that we get a nice
12:36
Edge so we're going to end up applying
12:39
some more glue on here so we're going to
12:41
apply some more glue just to the fabric
12:43
here so that we can fold the edge
12:48
over and you can see it's a little bit
12:50
fiddly and it doesn't want to go and
12:52
this is the fabric that's causing this
12:54
problem but I like the fabric i' got it
12:57
to use up and I really wanted it on the
12:58
B at the end so I've
13:01
persevered I'd have more sense if I was
13:03
you and I'd use a nice cotton but once
13:06
you've got it
13:08
there you're going to stick that down
13:11
and just keep adding a bit of glue until
13:12
it fits nicely and you can see it just
13:14
meets up to the edge there and sits
13:16
really well if you're enjoying this
13:19
video please could you give it a thumbs
13:21
up so that more people can make their
13:22
storage whatever they want it for
13:25
obviously it's not just for Lego I'm
13:26
sure I'll be using them for crafts as
13:28
well but they were just perfect for some
13:30
of those Lego supplies that are hanging
13:32
around with nowhere better to go we now
13:35
need to deal with the overlap so cut the
13:37
corner off but not too close to the box
13:41
and then stick each side
13:43
down and then you'll get a nice tidy
13:46
bottom and there won't be a great big
13:48
bulk at the corner and it doesn't matter
13:50
if you leave a little Gap or anything
13:52
because we're going to cover the bottom
13:53
anyway or our storage unit will be the
13:56
back
14:00
and then the overlap on the inside also
14:03
needs dealing with and again just going
14:05
to apply some glue to the Box fold the
14:08
fabric over and stick it in what you may
14:11
end up doing is adding a little bit of
14:12
extra fabric in the C fabric little bit
14:15
of extra glue in the corners because
14:17
you've got that bit of extra fabric that
14:19
you just need to glue in so I recommend
14:21
doing the two opposite ones the short
14:23
ones and then do the two long ones and
14:26
just fold it over work those Corners any
14:30
excess fabric just snip it off so that
14:32
you end up with a nice tidy finish and
14:34
you can see I'm just adding a little bit
14:36
of glue just to get it to hold
14:43
down and you can see it's really
14:45
starting to come together and you can
14:48
use these skills to cover any boxes if
14:50
you like now I like the back of my
14:52
storage covered if you don't want to you
14:55
don't have to bother but I do think it
14:57
finishes them off nicely
15:00
so I'm going to make a piece to go on
15:04
the outside so all you need to do is
15:08
measure the bottom and cut a piece of
15:10
cardboard a little bit
15:12
smaller just make sure it's quarter of
15:14
an inch smaller that should be enough
15:16
smaller and then it won't stick out and
15:19
show at the front now I've just used the
15:22
back of an A4 pad you know a
15:24
notepad and it's just about the right
15:27
size just cut it down on the width so
15:29
any old card will will work so long as
15:31
you can stick your fabric to it doesn't
15:34
need to be especially strong or fancy
15:37
yes I am that person that saves the back
15:39
of notepads cuz they always come in
15:42
handy and then you need to cut a piece
15:44
of fabric that's a little bit bigger
15:46
than that so you'll see I'm just
15:48
checking it's not going to stick
15:50
out so cut your piece of fabric about an
15:53
inch bigger all the way around or 3/4 of
15:55
an inch all the way
15:56
around and then apply load of glue to
15:59
your
16:00
card and place that card on the center
16:03
of your
16:07
Fabric and just smooth it all
16:12
down and then we're going to wrap those
16:14
edges around so again snip off the
16:17
corners we don't need all that
16:22
bulk and then glue each of those edges
16:25
down
16:32
again if you've got silly fabric like me
16:34
they'll try and peel up but what I did
16:37
was I got all of these stuck down and
16:38
then I put it under a book and then once
16:41
it's all dry apply glue make sure you
16:45
get a good covering around the edge and
16:46
a little bit in the middle just to hold
16:48
it
16:51
nicely and then stick it to the bottom
16:54
of the shoe box
17:03
and there we
17:07
go so now we'll turn our attention back
17:09
to the dividers we need to stick these
17:11
dividers in so you need to cut a whole
17:14
load of bits of brown paper or just a
17:17
soft paper the length of the divider or
17:21
maybe slightly shorter but certainly not
17:24
much and we're going to cut some that
17:27
are the height of the div wider but
17:29
certainly a bit less than the height and
17:31
cut them an inch wide and you're going
17:34
to end up with loads of them so for each
17:37
divider you need two long
17:40
ones and four short ones cuz on each
17:43
side you're going to fix two small ones
17:46
and one long one just like
17:48
that so then all you need to do is glue
17:51
them on so you want to glue them on both
17:54
sides let it dry and then we're going to
17:57
glue them in the box now you can see
17:58
have glued two in and now I'm just going
18:01
to apply the glue to this one and show
18:03
you you can put the glue in the Box I
18:06
prefer to put it on the divider and get
18:09
it all the way along all my pieces of
18:11
paper and then glue that
18:15
in so you can see it's all the way along
18:19
just open that box of touch slide it in
18:23
and straighten it up now obviously you
18:25
want it nice and square and you want
18:26
them all in the right position so just
18:28
wiggle them around a bit till you're
18:29
happy and then let it dry once it's dry
18:33
you can simply pop your boxes in and
18:35
Away you go pop it up on your shelf and
18:38
enjoy your storage whatever you're
18:40
putting in it so thank you for watching
18:42
and do enjoy all your storage solutions
#Packaging
#Crafts
#Crafts
#Home Improvement
#Home Storage & Shelving