0:00
In this video I'm going to show you a great alternative to greeting cards using acrylic
0:04
paint pouring. These are really inexpensive and actually cheaper than buying greeting
0:08
cards and much more personalised. I'm Christine of Christine's Crafts and this channel is
0:13
dedicated to crafting on a budget. So what are you going to need for this craft activity? You're going to need some small
0:19
canvas boards. Now I've got a pack of six of these for £2 here in the UK. They're very
0:26
inexpensive and about the size of a greeting card. You're going to want some acrylic pouring
0:31
paints or ordinary acrylic paints that you water down. Something to pop them in, it doesn't
0:36
matter if they're fancy cups like this, anything, so that you can pour it onto your canvas
0:42
Some sort of tool to tidy up around the edge of your canvas, any old plastic knife would
0:45
do. And you're going to need some thick paper or thin card to do the back of them to put
0:51
your message on. I use a thin card because I think it covers the back well
0:57
So the first thing you want to do is check the size of your canvas boards and then you
1:02
want to make a piece of your card to cover the back. Now make it slightly smaller than
1:08
your canvas board otherwise it'll stick out over the edge and just not be precise enough
1:13
And just mark it up on your paper. You'll see I'm measuring two places just to make
1:18
sure I get good straight lines that are square to each other and then cut that out. And that's
1:24
what you're going to write your message on. And you need one of those for every canvas
1:29
that you're going to do. So you can see that that will just cover nicely on the back and
1:35
just leave a small area around the edge and that should look fabulous. Now you can write
1:41
whatever message you want on there, you can decorate it however you want, but it's going
1:46
to also mean that it covers any excess paint you get on the back of your canvas
1:52
So to start with you need somewhere that you don't mind getting painty. Now I use just
1:56
my ordinary desk but I do use a tray to capture all my painting. You don't have to but remember
2:04
you are going to get paint all over it and you're going to need to clean up. Whichever
2:09
way you do it you're going to need something to place your canvas on so you can get your
2:13
fingers underneath the canvas to move it and to clean it up. So prepare your paints
2:19
you might want to use them straight out of their container but I'm choosing for this
2:24
first one to put a different colour paint in each pot and then I can apply them separately
2:30
If you stay till the end you'll see me use lots of different acrylic paint pouring techniques
2:34
and you can see how they all work out. So in this one I'm simply taking each colour
2:42
and spreading it, just one after the other so one is going to go on top of the other
2:48
Now you can see I'm trying to get some of it within the others so that it's not just
2:52
one big pile but it is quite haphazard so don't worry you can put it wherever you like
2:59
I haven't put a lot of paint on this one and I'm just relying on being able to get it to
3:05
go everywhere I want to as I tilt it and tip it. And that's the basic technique for acrylic
3:10
paint pouring, put on your paint and then tilt it so that it goes where you want. Now
3:15
you'll see I've just not quite got some on some of the edges and I'm just tidying up
3:19
using my tool. And then once it's tidy and you're happy you just need to put it to dry
3:25
In the meantime I'm doing another one where I've mixed my paints up into two pots and
3:31
then I'm pouring them on so that they go on together. A lot more paint this time, a lot
3:37
easier to cover the canvas and a slightly different effect. The beauty of acrylic paint
3:44
pouring is that you can play around like this and do them all differently but on each one
3:49
as you can see you tidy up the edge before I pop it somewhere to dry. This one, a little
3:54
bit different again, twirling around, making sure I've got paint everywhere I want it
4:00
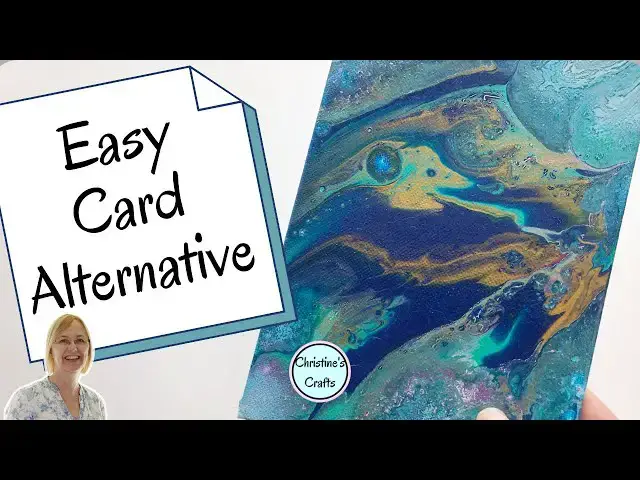
touching up those corners and then the traditional tilt it. And you'll see I've used a lot
4:06
richer colours on this one, I've got some gold and some dark blue in there and this
4:11
actually is my favourite of them when it comes out the other end. Absolutely love this one
4:19
And they're all going to sit and dry. So whilst they're drying you can prepare your messages
4:24
Now I choose to hand write mine but one thing you can do of course is print messages off
4:29
on the computer and then stick them on for a very professional finish. I prefer the personal
4:36
touch and of course you can put your name on, you can put anything you like on here
4:43
And then once they're all dry and you've got all your messages you want it's just a case
4:47
of choosing the message to go on the canvas. So you can see I'm using a different coloured
4:53
card for the back, different messages. You can use these for lots of different opportunities
4:58
you're not restricted to just birthdays, you could use them for anything you might send a card for. So I'm just going to show you now how I've finished one off. Take your
5:10
canvas, check your message fits on there nicely and I've found the best way of attaching them
5:16
is using double sided tape. You get a nice clean tidy finish and it's pretty strong
5:24
Now you could just glue them on but this really is an instant it's done and then you could
5:28
pop it straight in the post if you wanted to. Make sure you put your tape round the
5:33
edges so they don't curl up and they don't get caught on things. And then it's a case
5:41
of placing it carefully onto the back of your canvas. And that really is all there is to
5:48
it. And you've now got something that you can send as a card but also doubles up as
5:54
a gift as a small piece of artwork for the person you send it to. Now if you've really
6:00
enjoyed doing your acrylic paint pouring here or you think this is the thing for you, if
6:04
you click on the video on the screen you'll see a great video about paint pouring on rocks
6:09
which is another way of doing it. Or under the video there is a playlist of all my acrylic
6:15
paint pouring videos so far. So if you fancy seeing some more please click on one of those
6:19
and have a look. If you've enjoyed this please subscribe and give me a thumbs up below and
6:25
any comments you want to add I do try and reply to them all. Thank you