Up next in 10


Sew your own adorable lavender bag sachet hats this year. Great for freshening your drawers and cupboards. Plus fabulous little gifts and charity fundraiser items too!
You only need a small amount of fabric, lavender, needle and thread. Plus some embellishments if you want them, such as ribbon, lace, beads, etc.
If you enjoy crafting my blog is full of great ideas and tutorials. Plus if you subscribe you gain access to my free resource library, which includes a home crafts e-book, planners and much more, and get to hear about my latest projects first. Take a look at https://christines-crafts.com/
Enjoy watching and sewing your own lavender bag hats. Please leave me a 'thumbs up' if you enjoyed this video and subscribe so that you get to see all my videos as they are posted.
You can also find me across social media. To see all my information and ideas find me at https://linktr.ee/Christines_Crafts.
If you are thinking of opening an Etsy store then use this link and get off to a great start with 40 free listings https://etsy.me/32xoPdg
Show More Show Less View Video Transcript
0:00
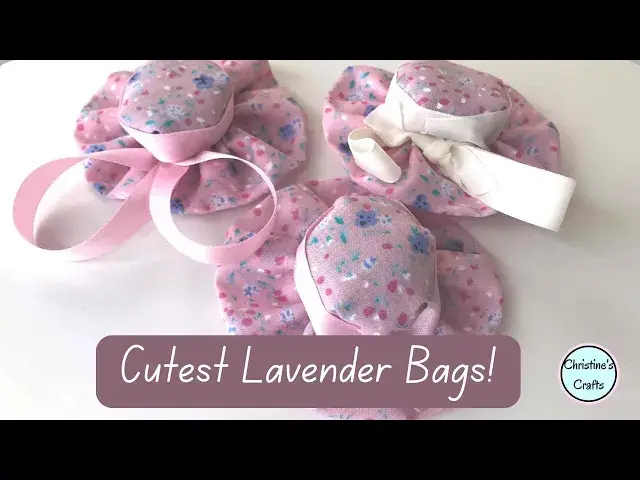
In this video, learn how to make these cute lavender bag hats
0:03
They're great for you to put in your drawers or hang in your wardrobe, but they're also great for little gifts or fundraisers
0:09
Brilliant, because they only use scraps. So let's get started. You're going to need a circle of your chosen fabric
0:16
3.5 inches across. That's approximate. You can see I'm just using a convenient jar lid
0:22
So you do the same, just find something about that size. And I do suggest a nice thin cotton
0:29
I don't know how well these would work with a thick fabric, because they're drawn up, they work really well with a nice thin crafting cotton or similar
0:35
And then we're going to need a piece for the brim. So the brim is made out of a rectangle
0:41
and it's 3.5 inches wide, which I'm about to measure. And I'm using a ruler and a pen
0:51
so I'll show you that everyone can do this, but obviously if you have a rotary wheel and a cutting board, you can use that
0:58
And if you're going to make loads of them, it's a good idea to make your rectangles all at the same time
1:02
Make it a lot quicker and easier. And the length of this rectangle, if I get to it, is 11 inches
1:10
So you'll see I'm just drawing on here with pen. These edges will never be seen
1:14
so it doesn't matter that there'll be bits of pen potentially showing, if I don't get them all cut off
1:19
So make sure you cut out your rectangle, and then you've got all the bits you need to make a hat
1:25
You'll see later I sometimes add other bits, but that's all you need to make your hat
1:29
So we'll start by making the top. You just need to run a little gathering thread all the way around the edge
1:36
Stay nice and close to the edge. I use a double thread so that it doesn't snap when I pull it up
1:42
And you'll see that I put a knot in one end, and then just work my way round
1:47
I think I do it that way because my mum did. I know a lot of people leave a long length
1:51
and then pull both ends to draw it up, but this is how I've always done drawing up things
1:57
So once you get all the way round, you want to form a little pouch like I have done
2:03
But make sure your hole in the top isn't too small, or you'll have trouble
2:07
And then just fill it with the lavender that you've got. Mine's lavender out of the garden
2:12
You might have bought yours, it doesn't matter. Just push it in
2:16
You want to get as much in there as you can. So just keep pushing it down
2:20
and filling it. When you think it's full, just draw your thread up
2:27
and then check what your ball looks like. And it should be nice and tight and full
2:32
If it's not, just open it up and put a bit more in. I think I'm happy with mine
2:37
Once you're happy, pull that thread nice and tight. That's why you made it double
2:43
Then do a little stitch, and put your needle through the loop
2:47
Now, I tend to do two or three of those, because I'm a worrier
2:52
it's up to you. And then I recommend pushing your needle through the ball of lavender and out the other side
2:58
before you cut it off. Now you'll notice in a minute, I forgot
3:02
But it does mean that you leave a nice tail, which makes it even more secure
3:06
So I definitely recommend it, even though I didn't do it. So you've got a nice ball for the top of your hat
3:12
We need to turn our attentions to the brim. Let's just clear that lavender away a little bit
3:16
So you've got your rectangle. You want to fold it in half
3:21
but you want to make sure you've got the right sides facing. So the right sides are facing each other
3:25
And then you're going to sew along those short edges. You can hand sew it
3:29
or you can machine sew it like I did. But you're just going to sew them together
3:33
with a small seam. It doesn't really matter the size of it
3:37
And then you want to press that seam open. Or you could do like I'm doing
3:41
which is just run your fingernail along it. That's sufficient for a little seam like this
3:45
Then fold the tube you've made into half, So you're going to end up with a tube
3:52
but it's just half the size. So match up those seams and make sure they're still pressed open
3:58
And clip your raw edges together or pin them together. And then you can press it
4:04
And you'll see I'm just running my fingers on it. If you press it, it'll stay together much better
4:08
If not, your edges might try and move about a bit. But what you're going to do is run a new thread
4:12
to draw raw edges on. And you're going to do that. And then you're going to sew
4:18
to draw up along the raw edges. So you're using a little running thread
4:22
a little running stitch to sew the two raw edges together. And then we're going to use it to draw them up
4:30
So just work your way all the way round. If you're enjoying this video
4:36
please give me a thumbs up so it spreads to more people. I know a lot of us might
4:40
like Mike, I know a lot of us like to make lavender sachets
4:44
and lavender bags and use them as gifts for other people. Also great for your little fundraisers
4:53
So let's get it out there. Once you're happy with your drawstring
4:57
you're all the way round, pull it up tight. Now I recommend you taking a little bit of time
5:03
to flatten that down and make it how you want it to look
5:07
because you might find it's drawn up a bit more on one side than the other
5:11
and it's not so even. So just lay it how you want
5:16
Pull it, make sure it's tight and do some little stitches. And remember
5:22
you want to do your little stitch and then you want to put your needle through the loop
5:26
And do as many stitches as you think you need to be secure
5:30
but don't cut your thread off. We're going to use that thread
5:34
to sew the top onto the hat. So again, I'm just easing those gathers
5:40
and making it look how I want. Then you need to sew
5:44
that ball onto the middle. So you're going to place it on there
5:50
and sew it in place. Now I take a little bit of the ball
5:54
and a little bit of the brim and that will just sew
5:58
the two together. And work your way all the way around the gathers of each
6:06
Now you can stay nice and tight in the middle or you can start to work your way out
6:11
and sew it so it comes flatter. It's up to you. I do recommend doing a little circuit
6:17
all the way round, nice and tight into the centre of the gathers
6:21
just to secure the ball in place. And then it's up to you
6:25
if you want to do another row further out to pull the ball down flatter
6:29
That's a personal preference that's you getting creative. So I'm just going to go round it once
6:35
I'm not going to make you sit here and watch me go round it more
6:40
So you'll see that you don't have to go out more but if you want to
6:44
feel free to just keep going round. Once it's all secure and you're happy
6:50
it's time to finish off your thread in the usual way. Little stitch, needle through the loop
6:56
and as ever I don't settle for one. And then just push the needle
7:04
through the ball and then cut the end off and you'll actually have a hat
7:10
but why stop there? So you've now got what does look like a little hat
7:16
but I do recommend embellishing it. So you could use little flowers
7:22
beads, buttons lace, ribbon I'm using a piece of ribbon on this one
7:28
and if you're going to do that just lay it around the hat
7:32
and measure it. Now I'm doing a little overlap because I think that looks pretty
7:39
and once you're happy just cut it to length. You could just wrap it round the brim
7:43
round the top of the hat and leave it at that it's up to you
7:49
What I find in doing this is because you're not sticking to a flat surface
7:55
it's actually easier to glue the ribbon, the trim that you're putting on
7:59
If you find it easier to put it on the hat on the top of it, that's fine
8:06
but because it's not a flat surface I actually find it sticks better if I put it on the ribbon
8:10
I also find the easiest way of doing it is to try and stick
8:16
the middle of the ribbon on first. So you'll see I'm going to pick it up at the middle
8:24
and drape it over the hat and then I can just wrap each side round
8:30
and I can make sure I end up with the right amount overlapping
8:36
and then you can just press it in place so it sticks
8:40
Yep, I'm getting glue on my hands and you will. And then yes you could add beads
8:46
little flowers, whatever you want. You just need to let that glue dry
8:52
Now if you're happy at that point that's great or you could add some big loops
8:58
so that you can hang it which you'll have seen I did on another one
9:03
and if you don't like the look of the gathers on the bottom you can cover those
9:07
and I often do just by using a little circle of felt
9:11
so I'm just drawing round a cotton bobbin, you can use any little circle
9:15
you've got and you're just going to glue it over it's just quite nice to finish them off
9:21
especially if you're going to gift them or use them as charity fundraiser
9:25
So enjoy making your lavender bag hats and if you're looking for something else
9:29
how about trying the lavender baskets that you see on your screen now
9:34
Happy crafting
#Crafts
#Fiber & Textile Arts
#Fiber & Textile Arts
#Apparel
#Clothing Accessories
#Headwear
#Sleepwear