0:00
Hi, welcome to British Girl Bakes
0:02
I'm going to show you how to decorate a cake that any mermaid lover will love
0:06
First, we're going to make the mermaid decorations for this cake. I'm using a silicon mould to make a mermaid tail
0:12
Rub it with shortening, dust it with powdered sugar, or you can use cornstarch
0:18
and then push your fondant into it. I've mixed my fondant with a bit of tie-lip powder, so it firms up quickly
0:24
Use a sharp knife to trim off any excess fondant, and then wiggle your mould to loosen the fondant
0:32
And then peel the mould off to let the tail fall out, being especially gentle where the tail is narrowest
0:38
And making two of these, and then brushing some water on the back to stick them together to make a complete tail
0:47
After lining the two halves up, pinch them together to hide the join
0:51
Put a wooden skewer into the middle to give it some support when you place it on your cake
0:56
and leave it for a day to set. for a day to set. Once the tail is firm, I'm using a paintbrush dipped in turquoise gel
1:02
colour to brush some shading onto it. I'm leaving that to dry, which only takes about an hour
1:07
and then brushing on some pearl luster dust mixed with clear alcohol This makes the tail look glossy and shimmering
1:23
Now I'm making some shells and starfish to place on my cake. I'm rolling fondant into little bowls, flattening them
1:30
using my fingers to squeeze out the base of the shell, and then using a toothpick to indent the shell
1:40
the shell. For the starfish, I'm rolling out balls of fondant and then pinching out five prong
1:47
A small round tipfish gives the starfish some nice texture
2:09
To make a conch, I'm rolling out a long string of fondant, brushing it with water to make it stick to itself, and then coiling it up
2:16
If you find this tutorial useful, please click the thumbs up button and subscribe to my channel
2:28
And I rolling out a few balls for some added texture on the cake Now we going to build the cake
2:38
The detailed instructions on how to do the Ombre frosting, watch my tutorial, How to Frost an Ombre Cake
2:44
I'm spreading different shades of purple frosting onto my cake, smoothing the frosting
2:50
and then applying some texture with an offset spatula. This is going to be a two-tier cake
2:55
and the top tier is going to be turquoise, also with different shades in an ombre design, and with matching texture
3:02
If you make a single cake instead of a two-tier, you can blend two colours together
3:06
maybe blue and turquoise to represent the ocean, or you could do a single colour and apply this
3:11
texture to be reminiscent of the waves. I'm stacking my cake and touching up where the two join
3:19
And now I'm adding little white sugar pearls in a few places. You should do this immediately after frosting your cake, so they stick to the frosting
3:27
because the frosting will crust after about 15 minutes, and then the pearls won't stick
3:31
Now I'm applying some tiny purple sprinkles by throwing them at the cake
3:35
Yes, I'm literally throwing them. Placing them on one by one would be insanely time-consuming
3:40
so this works much better. I'm doing the same with tiny white sprinkles
3:44
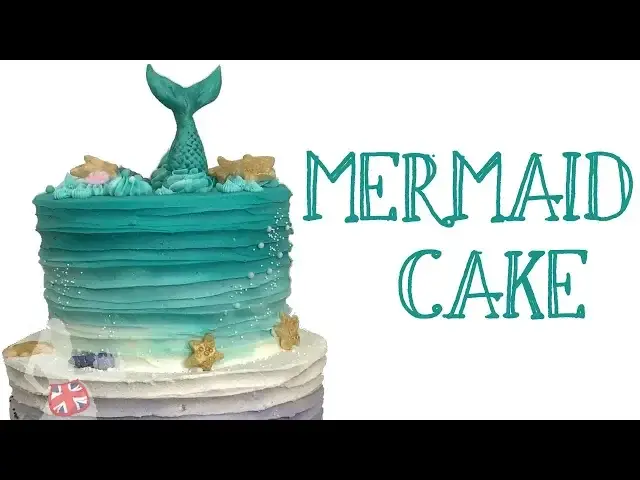
throwing them onto the sides of the cake in a few places Now it time to add the decorations we made earlier The Starfish which I painted with some gold luster dust mixed with clear alcohol and a purple shell
3:57
And on top of the cake, I'm piping some rosettes using leftover turquoise frosting, and a star tip and an open star tip
4:04
I used the frosting that I scraped off as I smoothed my cake, so it's a blend of the different
4:08
shades, and that makes the rosettes blended as well. Very oceanic. placing the decorations on top of my rosettes to give them some height and make them more visible
4:17
when you look at the cake from the side. Now for the mermaid tail. Hold it in front of the cake
4:25
with the base of the tail at the height it will eventually be. Now mark where the stick would hit
4:30
the baseboard of the cake and cut the stick. My mermaid is going to be diving into a rosette
4:35
of frosting, so it looks like she's leaving a splash behind her. The stick will go in all the way
4:40
down through the cake, supporting the tail so it doesn't fall over. T'da! A few more frosting rosettes using a small open start-up
4:49
And a few more starfish and shells. And we're finished! The gorgeous mermaid cake
4:56
If you follow this tutorial, please tag British Girl Bakes on social media and subscribe to my channel
5:01
for new cake decorating tutorials every week