Up next in 10


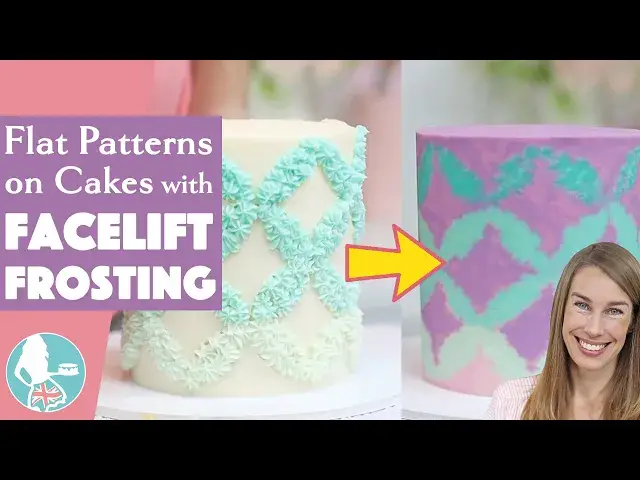
Turn piping into flat patterns like stripes, circles, diagonals and triangles by giving the frosting a facelift! In this tutorial I’ll show you everything you need to know about this technique:
0:00 - Introduction to flat patterns on cakes with facelift frosting
0:15 - Prepare your cake
0:28 - Mark your pattern on a cake
2:00 - Prepare your colours
3:56 - Pipe and chill
5:24 - Fill and chill
6:21 - Give your frosting a facelift!
*Start your FREE 7 day trial on my cake school
https://britishgirlbakes.teachable.com/p/all-you-can-cake/
*LEARN The Basics of Cake and The Basics of Buttercream in my most popular online courses!
https://britishgirlbakes.teachable.com/
*My 4 Minute Buttercream recipe
https://www.britishgirlbakes.com/recipes/buttercream-frosting/
*READ a written version of this tutorial (with photos!)
https://www.britishgirlbakes.com/flat-patterns-on-cakes-with-facelift-frosting/
Show More Show Less View Video Transcript
0:00
Turn piping into flat patterns like stripes, circles, diagonals and triangles by giving the frosting a facelift
0:08
In this tutorial, I'll show you everything you need to know about this technique
0:15
After assembling your cake, cover it in a thin layer of frosting to trap any crumbs that might come off the cake and to give the cake a neat shape
0:23
Even though this is going to be covered up, it is important that the sides are straight and smooth
0:28
Before creating your pattern, I really recommend marking or scoring it onto your cake first
0:34
A pattern is an arrangement of lines or shapes in which the same shape is repeated at regular intervals
0:41
which means the placement and spacing of each shape is really important
0:45
If you try to freestyle a pattern and the shapes are different distances apart from each other
0:50
it won't look like a pattern. You can use cookie cutters to mark your pattern, lining the shape up so that the edges touch
0:56
or leaving the same amount of space in between them, or overlapping them by the same amount
1:02
If you don't have a cookie cutter the shape you're looking for, you can use part of another one
1:06
For example, I'm using this heart to make triangles. If your pattern is in lines
1:12
going around or up and down your cake, you can use your cake comb to score the lines
1:16
to then follow when you make your pattern. If your pattern follows lots of horizontal or vertical or diagonal lines
1:23
make your own grid to space the entire pattern evenly. Wrap a piece of string or ribbon around your cake to measure it
1:30
and then cut a piece of parchment paper the same length, and also the same height, so it's long enough to wrap around your cake
1:36
and goes just up to the top of the cake too. Do this after the frosting has set
1:40
which takes about 30 minutes in the fridge, so that the paper doesn't stick to it
1:45
Fold the paper in half and half again and again, in both directions, and when you unfold it, you'll have a grid
1:51
Wrap it around the cake and poke a pin or toothpick through every point
1:55
where the creases meet, transferring the grid onto your frosted cake. Your pattern will be piped onto the cake and there are lots of ways to prepare the colours You can use several piping bags with different piping tips or you can mix different shades by using different amounts of the same colours
2:12
and I like to mix small amounts of buttercream like this in a cupcake pan, so I don't have to wash lots of little bowls afterwards
2:19
You can mix different shades of colours in just one bowl by starting with the lightest colour
2:24
scooping some into a piping bag, and adding more gel to the leftover buttercream to make the next shade or colour
2:30
scooping up some of that and repeating. You can layer different shades or colours within the same piping bag
2:36
to create a gorgeous ombre effect with your piping. Lay out a piece of plastic wrap and spoon or spread or pipe your colours side by side onto it
2:45
going from light to dark or dark to light. Lift up the plastic wrap around the colours and roll it into a log
2:52
and cut off the end with the colour you're going to pipe first and drop that end down into the piping bag
2:58
The shades will be layered neatly within the piping bag so that they come through after each other
3:03
but they'll also blend slightly for a gradual subtle umbrella effect which you'll see in a moment on the cake with the circular pattern
3:10
You can skip the plastic wrap step and just spin the colours straight into the piping bag
3:15
but they won't layer as neatly as they do in the plastic wrap log
3:19
and you'll see what that does on the circular pattern too. Let's talk about how much buttercream you'll need
3:25
If your pattern only covers a small part of the cake you'll only need a spoonful of each colour
3:29
but enough to be able to comfortably hold and squeeze the piping bag. If your pattern covers the whole surface of the cake
3:35
of course you'll need much more butter cream. You'll see the results of different piping tips in these patterns
3:40
but I'll mention now that for star tips, the ones with long prongs that are spaced widely apart from each other
3:46
like these ones, will give you better results than these tiny tight prongs
3:50
because these details will tend to get lost, and your piping will look like circles instead of stars
3:56
Okay, let's start piping. Using the markings you made on your cake, pipe the pattern you've chosen
4:01
Aim to pipe everything the same thickness, because the next step is to take off the outer layers of this piping
4:07
and if some parts of the piping are thicker than others you have to take off lots of that piping to get level with the rest of the piping This will make more sense in a minute Keep in mind that this technique works best for fairly simple patterns with space in between each detail
4:23
so that those details really stand out. Also, what you can see now of the piping, the peak or tip or outer edge
4:30
is going to disappear when you flatten your pattern. For example, the peaks on the rosettes don't all need to point in the same direction, straight out
4:38
from the cake, because those parts will be taken off later. For this circular pattern, I'm using
4:43
a star-shaped tip to fill in the areas where the circles overlap each other, and I'm using the
4:48
plastic wrap method for the Ombray effect, starting with the lightest shade of turquoise at the bottom
4:54
When you finish piping a section and you want to move on to the next colour, just squeeze out
4:58
some of the buttercream from the bag until you see the colour changing, and then pipe the next section
5:03
Unlike the other two cakes, this piping isn't spaced apart, so the star shapes will blend together
5:09
and their shape will only be noticeable around the edges of each section of piping
5:14
After piping all of the details of your pattern, chill this part before adding the background
5:19
colour or colours. Put the cake in the freezer for 15 minutes so that the piping becomes firm
5:24
Then cover the cake with your background colour, which is best to do with the piping bag
5:28
because it applies the least pressure to the piped pattern. If you spread it straight on, your offset spatchelor can knock off parts of the piping
5:37
I like to start with the top of the cake because you'll prevent drooping edges
5:41
getting sharper edges around the top of the cake this way. After piping the background colour onto the cake
5:46
spread it gently to push it into any gaps within the piping, and also to scrape off the excess to leave a relatively level smooth layer of frosting on the cake
5:55
Don't press hard enough to touch the piped pattern, because if any parts of that piping break off
6:00
you'll spread those pieces around the cake and you'll end up with unexpected details in your pattern
6:06
Now put the cake in the freezer for 20 to 30 minutes until this frosting is cold and firm
6:11
The exact time depends on how cold your cake layers already are. You don want to freeze the frosting completely because then it will be much harder to remove the outer layers when they frozen Okay here comes the really fun part Let give this frosting a facelift
6:26
Pour boiling water into a cake pan, or anything wide enough to fit the edge of a metal
6:30
cake comb into. Leave your comb in the water while you take your cake out of the freezer, and then dry the comb
6:36
on a towel or paper towel and scrape around the cake. This is a process, and you'll question it during the first few scrapes
6:43
The hot metal will take off layer after layer of frosting, revealing the colours of your piping
6:48
Keep scraping, taking off the top layers of the piping to reveal a cross section
6:52
which will be the middle part of whatever shape you piped. You're giving the frosting a facelift
6:58
Different parts of your pattern might become visible before others, where you spread the background colour more thickly over the piping
7:04
so you have to scrape off more of those parts before the pattern will show through
7:08
If there are any indents in the frosting, caused by air pockets within the frosting
7:12
or where the frosting wasn't spread or piped as thickly as on the rest of the cake
7:17
fill those in by piping or spreading on more buttercream of whatever colour that part of the pattern should be
7:23
So either the piping bags that you used for the details of your pattern or the frosting you used for the background colour
7:29
Then scrape again straight away to take off the excess so that the pattern is visible
7:34
and now it's also smooth because that buttercream you just spread or piped on
7:38
has filled in the indents. Now you have a perfectly flat pattern on your cake
7:43
which looks like it's been printed or painted on, but it's just butter cream
7:48
I used my four-minute butter cream for all of these cakes and the recipe is on British Girlbakes.com
7:52
and the link is in the video description and at the top of the screen. I can't wait for you to try this technique
7:58
Tell me in the comments when you do and tag British Girl Bakes or Facelift Frosting
8:02
in your photos on social media so I can see your creations. Visit my cake school on British Girlbakes.com
8:08
to learn more fun cake decorating techniques all broken down step by step, showing all of the tiny details
8:14
so that you can achieve these techniques and make cake masterpieces of your own. Thanks for watching
#Visual Art & Design
#Cooking & Recipes
#Hobbies & Leisure