Up next in 10


In this cake decorating video I'll show you three easy cake designs for Valentine's Day with simple steps and no fancy tools needed!
0:00 Introduction
0:13 How to layer and frost a cake
1:06 Pointillist bee cake (turn an image into an edible cake design)
4:49 Sunset frosting with a silhouette of a couple
6:59 Piped heart design
⭐Join this channel for members-only perks!
https://www.youtube.com/channel/UC1k3PDqnjUG8wMH1vY3yojA/join
🥣My Recommended Cake Decorating Tools: https://www.britishgirlbakes.com/my-recommended-tools-for-cake-decorating
💫Start your FREE 7 day trial on my cake school: https://britishgirlbakes.teachable.com/p/all-you-can-cake
🎂Take my FREE course on 10 Frosting Techniques: http://britishgirlbakes.com/free-course
👩🏼🍳My 4 Minute Buttercream recipe
https://www.britishgirlbakes.com/recipes/buttercream-frosting/
📄READ a written version of this tutorial (with photos!)
Show More Show Less View Video Transcript
0:00
Let's make these three fun cake designs
0:01
for Valentine's Day. Using simple
0:03
techniques and no fancy tools, I'll show
0:05
you how to make each design step by
0:07
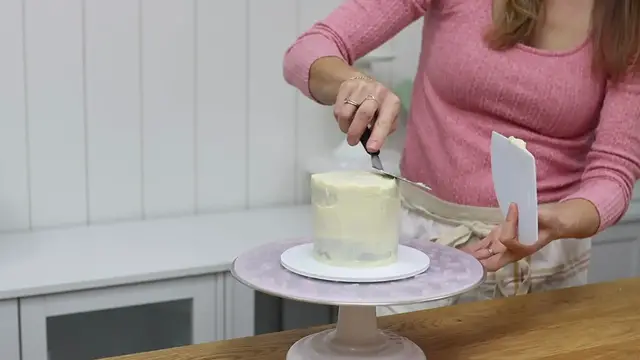
step. Starting with how to frost a cake,
0:10
but you can skip to the next chapter if
0:11
you already know this part. A dot of
0:13
buttercream on the cakeboard attaches
0:15
the cake to it so it doesn't slide
0:16
around. And after alternating cake
0:18
layers and filling, chill the cake in
0:20
the freezer for 15 minutes or the fridge
0:23
for 30 minutes so it firms up before you
0:25
frost it. Start with a crumb coat, which
0:27
is a thin layer to trap any crumbs that
0:29
come off the cake. And then chill again
0:31
before spreading on the final layer. And
0:33
since the crumb coat has set, no crumbs
0:35
will get into this layer. Spread the
0:37
frosting on fairly thickly and make sure
0:39
it sticks up above the top edge of the
0:41
cake, which will give you nice sharp
0:42
angles at the top later. Reach as far as
0:45
you can around the cake and pull long
0:47
smooth spins of the turntable to get
0:49
smooth sides. And warming up your cake
0:51
scraper with hot water or a hair dryer
0:53
or blowtorrch will make the frosting
0:55
even smoother. Level the top edge of
0:58
frosting by swiping sideways without
1:00
pushing down to prevent bulges around
1:02
the top. Put the cake in the fridge for
1:03
30 minutes to set the frosting before
1:05
you decorate. Let's start by turning an
1:07
image into a cute edible character on a
1:10
cake. For this technique, you'll need a
1:11
toothpick and a piping bag. And if you
1:14
have one, you can use a small round
1:15
piping tip. or if you don't, you can
1:16
just cut a tiny piece off the end of
1:18
your piping bag, or even use a Ziploc
1:20
bag or sandwich bag if you don't have
1:22
any piping bags. Outline your design
1:24
onto a cake. I'm just looking at my
1:26
image as I draw, but you can print it
1:28
off and cut it out and trace around it
1:30
if you like. This is a toothpick, and
1:32
I'm drawing gently over buttercream
1:34
frosting after chilling the cake in the
1:35
fridge for 30 minutes, so the frosting
1:37
is firm, and the toothpick lightly
1:39
scores it. Gently brush off any crumbs
1:41
of buttercream with a paintbrush or a
1:43
kitchen towel. Now, tint a spoonful of
1:46
buttercream for each color of your
1:48
design. That's not helpful. Let's see it
1:50
step by step instead. Spoon your
1:52
buttercream into the sections of a
1:54
cupcake pan or small bowls, and add food
1:56
coloring. I like gels because they're
1:58
the most concentrated so you get really
2:00
bold colors. I'm using white for the
2:02
bee's wings, yellow and orange for the
2:04
stripes, red for a heart, and black for
2:06
the bee's antenni and arms and legs. I
2:09
like to use a cupcake pan for this. If
2:11
you don't have one, you don't need one.
2:12
You can use lots of little bowls
2:14
instead, but using the cupcake pan makes
2:16
it so quick to tint the small amount of
2:18
buttercream into different colors, and
2:20
you only have one thing to wash up at
2:21
the end. A quick tip for opening these
2:23
gel bottles when they're new is instead
2:26
of peeling this cover off, unscrew the
2:28
lid and use the point on the inside of
2:30
the lid to poke the cover, which is
2:32
exactly where the drops will squeeze out
2:34
through the lid. To make buttercream
2:36
really black, use just a little bit of
2:39
black gel on any color of buttercream.
2:41
I'm using leftover pink. And then put
2:43
the bowl into the microwave for 5 to 10
2:45
seconds to melt the buttercream, which
2:47
makes it much darker, but also melts it.
2:50
So then put it into the freezer to bring
2:51
it back to room temperature. And the
2:53
cold will darken it even further. Stir
2:55
it until it's smooth and it's ready to
2:57
use. Spoon your first color of
2:59
buttercream into a piping bag fitted
3:01
with a small round piping tip. This is a
3:03
Wilton number three. And pipe dots to
3:06
cover the section of that color. To pipe
3:08
a dot, hold the tip slightly away from
3:10
the cake. Squeeze the bag while holding
3:12
it still to allow the buttercream to
3:13
bulge out and attach to the cake. And
3:16
then release your pressure on the bag as
3:18
you pull it away from the cake to leave
3:19
a dot with a point. This technique is
3:22
called pointalism and it's an easy way
3:23
to create multicolored designs without
3:26
needing stencils or buttercream
3:27
transfers or fondant. Fill in all of the
3:30
sections of this color and then switch
3:32
to the next color. If you don't have
3:33
couplers and you only have one small
3:36
round piping tip, you'll need to squeeze
3:38
all of this color out of the bag and
3:40
then push the piping tip out of the bag
3:42
and wash the tip and the piping bag and
3:44
dry them. And then put the piping tip
3:46
back in and spoon in your next color of
3:49
buttercream. Then pipe this color
3:51
wherever it needs to go. If you have
3:53
couplers or multiple small round piping
3:55
tips, the process of switching between
3:58
colors is much quicker. I missed a
4:00
section of yellow. And to fill that in
4:02
now, I'll show you how to use a piping
4:04
bag without a piping tip. In case you
4:06
don't have a small round piping tip,
4:08
just cut a tiny piece off the end of a
4:10
piping bag and pipe through that. And if
4:13
the dot isn't big enough, cut a little
4:14
bit more off the bag. The dots won't be
4:17
quite as round as if you use a piping
4:20
tip, but once you have hundreds of dots
4:22
on the cake, you won't notice. I'm using
4:24
white buttercream for the wings, and
4:26
piping in rows or lines will look the
4:28
neatest. rather than piping an outline
4:30
first and then filling that in. Black
4:33
buttercream for the antenna and legs and
4:36
arms and curved lines for the eyes and
4:38
mouth using black as well and then red
4:41
for the heart that the bee is holding.
4:43
This little bee is adorable. You could
4:46
write be mine on the cake as well, which
4:48
would be cute. For this next cake
4:49
design, all you need is a piping bag
4:51
with no piping tip and a piece of
4:53
parchment paper or wax paper. You'll
4:55
turn a clip art image like this
4:57
silhouette into an edible image on a
5:00
cake. Start with one of my favorite
5:02
techniques, which is layered piping or
5:04
lazy piping by mixing colors in a
5:06
gradient and then pushing each color
5:08
down to the end of a piping bag, pushing
5:10
it all the way with the edge of a cake
5:12
scraper. And by layering the colors in
5:14
this order, each color will pipe through
5:16
the next to make a pretty ombre or
5:19
gradient, which I'm using here to make a
5:21
sunset. Pinch the bag at the top and
5:23
twist it tightly to make piping easier
5:25
so that just a light squeeze will push
5:27
the buttercream out through the end of
5:28
the piping bag. Start at the bottom of a
5:31
crumbcoated cake and work your way up
5:33
and you'll see all of your colors come
5:34
through one by one as you pipe. If it's
5:37
taking too long to go from one color to
5:39
the next, squeeze a bit of the
5:41
buttercream out into a bowl until you
5:43
see the next color start to come
5:44
through. Finish with the top of the cake
5:46
and then use an offset spatula or angled
5:48
pallet knife to smooth the frosting on
5:50
top like this. Switch to a cake scraper
5:53
for the sides and after scraping once or
5:55
twice, use the tip of your spatula or a
5:57
spoon to wiggle up and down between
5:59
colors to blend them together more
6:01
subtly. Scrape until the frosting is
6:03
smooth. Level the top edge and then put
6:06
the cake into the fridge while you make
6:07
a cheap and easy stencil. I'm tracing
6:10
this clip art image from my phone onto a
6:12
piece of parchment paper or you can use
6:14
wax paper and cut it out to leave only
6:17
the surrounding paper there for a
6:19
stencil. Press this against your chilled
6:21
cake and it won't stick because the cold
6:23
frosting is firm. Spread black
6:25
buttercream over the stencil and scrape
6:27
off the excess to leave a thin smooth
6:29
layer behind. Then peel the stencil off
6:31
and voila. You can scrape off any
6:33
smudges with a toothpick and you won't
6:35
damage the frosting underneath because
6:37
that is still cold. and firm. To add
6:40
detail, you could pipe a border on top.
6:42
This is a 4B piping tip with leftover
6:44
purple buttercream. Start at the side of
6:46
the cake so that the join of the piping,
6:48
the beginning and the end of it, is in
6:50
the least visible place when you look at
6:52
the cake from the front. I love how
6:54
bright this cake is rather than using
6:56
the traditional pink and red. Going back
6:59
to something more classically
7:01
Valentine's Day themed, outline hearts
7:03
on a cake after chilling the cake so
7:05
that the frosting is firm. You can use
7:07
cookie cutters or score the hearts using
7:09
a toothpick. Or cut out paper hearts and
7:12
trace around those with a toothpick.
7:14
Tint buttercream different colors. I'm
7:16
starting with the lightest color, plain
7:18
white buttercream, with pink gel
7:20
coloring. Mixing that in. Adding more
7:23
buttercream and adding a drop of red to
7:25
make a darker pink. And by going from
7:27
lightest to darkest, you can mix all of
7:29
your colors in the same bowl without
7:31
washing it in between. I'm using a
7:33
number 363 star tip, a tiny number 16
7:37
star tip, and a small round tip, a
7:39
number three. Any round or star- shaped
7:42
tip will work. Pipe around the outlines
7:44
you left on the cake. And for the
7:46
neatest piping, your piping bag should
7:48
be between a/4 and 3/4 full of
7:50
buttercream so that it's easy to grip.
7:53
And the buttercream should be stiff
7:54
enough to hold its shape, but not so
7:56
stiff that it's difficult to push
7:58
through the piping tip. In cold weather,
8:00
it helps to microwave the buttercream
8:02
for maybe 5 seconds before piping with
8:04
it so it's not really firm from being
8:06
cold. To add some extra detail and
8:09
height and color and texture to your
8:11
cake, pipe your leftover buttercream
8:12
onto a piece of cling film or saran wrap
8:14
to make a log of striped buttercream.
8:17
Roll it up and cut off the excess
8:19
plastic wrap off one end and drop that
8:21
end down into a piping bag fitted with a
8:23
1M star tip. Then pipe swirls of
8:25
buttercream around the top of the cake
8:27
for multicolored swirls that match the
8:29
hearts on your cake. To transfer any of
8:31
these cakes from their cake boards onto
8:33
a cake stand or platter, chill the cake
8:36
and pipe or spread some buttercream onto
8:38
the middle of the stand or platter. And
8:40
then slide an offset spatula or angled
8:42
pallet knife underneath the cake. To
8:44
separate it from the cakeboard, lift it
8:46
up and center it onto the stand or
8:48
platter. And now it's extra pretty for a
8:50
display or a photo. I hope you've seen
8:53
something you'd like to try. Join my
8:55
YouTube membership for access to
8:56
exclusive videos and my course on
8:58
perfectly smooth frosting. And visit my
9:00
cake school on britishgirlbakes.com to
9:02
learn hundreds of cake decorating
9:03
techniques and designs. See you there.
9:08
[music]
#Cooking & Recipes
#Desserts