Up next in 10


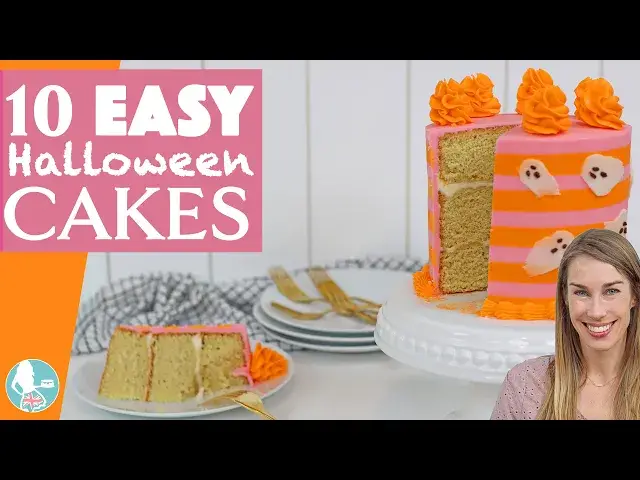
Here are 10 easy ideas for Halloween cakes and cupcakes. You don’t need any cake decorating experience for these and you can even do some of them with kids!
0:00 Introduction
0:09 Haunted house cake
1:21 Spreadable ghosts
4:28 Piped ghosts
5:35 'Boo' cake topper
6:02 Halloween messages on cakes
6:36 Monster cakes
8:17 Monster cupcakes
8:35 Monster donuts or mini bundt cakes
9:31 Pumpkin patch cake
10:20 Jack-o-lantern cake
💫Start your FREE 7 day trial on my cake school
https://britishgirlbakes.teachable.com/p/all-you-can-cake/
🎂LEARN The Basics of Cake and The Basics of Buttercream in my most popular online courses!
https://britishgirlbakes.teachable.com/
👩🏼🍳My 4 Minute Buttercream recipe
Show More Show Less View Video Transcript
0:00
here are 10 easy ideas for Halloween
0:02
cakes and cupcakes you don't need any
0:05
cake decorating experience for these and
0:07
you can even do some of them with kids
0:09
all you need is parchment or wax paper
0:12
for this first Halloween cake design
0:14
make an eerie purple sky by tinting
0:16
buttercream purple and then putting half
0:19
into another bowl and adding a few drops
0:21
of black to that spread this buttercream
0:24
onto the top of the cake and smooth it
0:26
and then spread it around the top of the
0:27
sides of the cake too spread purple
0:30
around the bottom and then mix the
0:32
leftover purple and gray together and
0:34
spread that over the middle press your
0:37
spatula lightly into the frosting and
0:39
drag it up and down as you spin the cake
0:41
to make these zigzags which blend the
0:43
colors together to make ombre instead of
0:46
Stripes of color around the cake smooth
0:48
the frosting with a cake comb and leave
0:50
the top Edge uneven like this which is
0:53
trendy at the moment or flatten it by
0:55
swiping sideways with your spatula all
0:58
around the cake now put the cake in the
1:00
fridge for about an hour to chill and
1:02
set the frosting while you make some
1:03
stencils using parchment paper or wax
1:06
paper draw a bat silhouette and fold the
1:08
paper a few times before you cut it out
1:11
so that you'll have a few identical bats
1:13
you don't need the surrounding paper for
1:15
this so throw that away but for the next
1:18
stencils you'll do the opposite draw the
1:20
outline of a haunted house cutting along
1:22
the bottom Edge and then cut the house
1:25
out and throw that away but keep the
1:27
surrounding paper which will be your
1:29
stencil I'm drawing a few windows and
1:31
cutting those out too which is an extra
1:33
step that you can skip if you're in a
1:35
rush Trace around something round like a
1:37
bottle to make a circle for a moon
1:39
stencil too now you're going to apply
1:41
these in three stages start with the
1:44
bats pressing them onto the cake on the
1:46
darkest gray frosting towards the top
1:49
and they'll stick because the warmth of
1:50
your fingers will soften the cold
1:52
buttercream to make it slightly sticky
1:54
as you push against the bats then press
1:57
the moon stencil on so that it overlaps
1:59
one of the bats pipe or spread white
2:02
buttercream over the stencil scraping
2:04
over it a few times to flatten and
2:06
smooth the frosting and then peel the
2:08
moon Stancil off next use edible glitter
2:11
and a wide powder brush to gently dab
2:13
the frosting over the bats so that
2:15
there's quite a lot of glitter all
2:16
around them then slide your spatula or a
2:19
toothpick under each bat to peel it off
2:22
and it will look like the bats are
2:23
flying in the moonlight now wrap the
2:26
haunted house stencil around the cake
2:28
and you want this to wrap really tightly
2:30
since the bottom Edge is cut so use pins
2:32
to attach both sides to the cake add a
2:35
drop of black to your leftover gray
2:37
buttercream and spread this color over
2:39
the haunted house stencil and then
2:41
scrape over it once or twice so that the
2:43
black buttercream is smooth pull the
2:45
pins out of the cake and peel the
2:47
stencil off and voila if you're adding
2:49
Windows put the cake into the fridge for
2:51
15 minutes to set the house and then
2:54
press the final stencil onto the house
2:56
then spread white buttercream over the
2:58
windows scrape off the excess peel the
3:00
stencil off and this cake design is so
3:03
simple to make but with glitter it looks
3:05
so fancy for this next cake I'm using
3:08
non-traditional Halloween colors with
3:10
pale pink and orange which I love but
3:12
for this design you can use any color or
3:14
colors you like plain orange orange and
3:17
black whatever you feel like the two
3:20
important things here are to use
3:22
buttercream that isn't very stiff so add
3:24
a splash of milk to thin it out until
3:26
you can stir it easily like this and
3:28
Spoon it into a piping bag the second
3:31
important thing is to chill the cake in
3:32
the fridge for at least an hour before
3:34
you pipe onto it squeeze a blob of white
3:37
buttercream onto the cake and then use a
3:39
spatula to gently spread it in any
3:41
direction you're making floating ghosts
3:43
on the cake they don't all need to be
3:45
identical so pipe different sized blobs
3:48
before you spread them and Go in
3:50
different directions so the ghosts are
3:52
flying to the left right up down and
3:54
when you finish making the bodies melt
3:56
some chocolate chips and put them into a
3:58
sandwich bag like a ziplock bag bag and
4:00
cut a tiny piece off one corner squeeze
4:03
the bag to pipe two eyes and a mouth
4:05
onto each ghost if the chocolate pulls
4:07
away with the bag use a toothpick to
4:09
nudge it flat against the cake the trick
4:12
to melting chocolate without it seizing
4:14
and becoming grainy or getting that
4:16
white Haze when it sets is to heat it
4:19
slowly and gently so if you use the
4:21
microwave choose 50% power for 30
4:24
seconds at a time stirring before
4:26
repeating until the chocolate is smooth
4:28
for more detail tailed ghosts or any
4:30
other figures use the poist technique
4:33
where you outline a shape on your cake
4:35
using a cookie cutter or Draw it with a
4:38
toothpick and then fill it in with tiny
4:40
dots by using a small round piping tip
4:43
like a number three your dots will look
4:45
the neatest if you pipe in rows this
4:47
dotted effect is so unique and easy to
4:50
make look neat even if it's your first
4:52
time doing it this technique is a bit
4:54
timec consuming but I love the result
4:57
the consistency of your buttercream is
4:59
really important for this if it's too
5:01
stiff you'll have to squeeze the bag
5:03
really hard to pipe the dots switch
5:05
colors to add more details for a simple
5:08
design like this or a more elaborate one
5:11
like this and this is one of the cakes
5:13
from my layer up program which has 14
5:16
hours of video modules teaching hundreds
5:18
of cake decorating techniques and
5:20
Designs start a free 7-Day trial of my
5:23
cake school by clicking the link in the
5:25
top of the screen or in the video
5:27
description or go to British gals.com
5:30
so which ghosts do you prefer swished or
5:33
pointer list tell me in the comments
5:36
make easy Halloween cake toppers with
5:38
melted chocolate in a sandwich bag with
5:40
the corner cut off writing whatever word
5:42
you like the thicker the letters the
5:45
better press a toothpick into each
5:47
letter and then pour sprinkles on top
5:50
the sprinkles will stick to the melted
5:51
chocolate but when they set after about
5:54
30 minutes in the fridge you can lift
5:56
the lettuce up and poke the toothpicks
5:58
into a cake to make a delici delicious
6:00
cake topper to write a longer Halloween
6:02
message like this one use buttercream
6:05
that's thinned out with a bit of milk so
6:07
that you can pipe it with a small round
6:08
tip and the lines won't break apart if
6:11
you struggle to pipe letters like this
6:14
which does take a bit of practice use
6:16
the pointless technique like I used for
6:18
the second style of ghosts and pipe dots
6:21
to form your letters it's much easier to
6:24
pipe onto the top of a cake than the
6:26
side of a cake and if you pipe anything
6:28
you don't like as long as you've chilled
6:30
the cake so the frosting is firm you can
6:32
just scrape the lettuce off with your
6:34
offset spatula and start again to make
6:37
cute little monsters layer a cake or
6:40
I'll show you how to do this with
6:41
cupcakes in a second and pop it into the
6:43
freezer for 15 minutes or the fridge for
6:45
30 minutes then use a serrated knife
6:48
like a bread knife to trim around the
6:50
top to make a dome spread a thin layer
6:53
of frosting to cover the cake to stop it
6:55
from drying out and you can use the same
6:57
color as the monster fur is going to be
7:00
or a flavor like chocolate or the plain
7:02
white buttercream anything works by
7:05
chilling the cake before this it will
7:07
stay firm instead of Leaning or toppling
7:09
over as you trim it and frost it and it
7:12
will also be a lot less crumbly now put
7:14
the buttercream for the fur into a
7:16
Piping Bag with a grass tip like this or
7:19
any star-shaped tip like this 4B or a 1
7:22
M or whatever you have start at the
7:25
bottom of the cake squeezing to push out
7:27
the fur and then releasing your pressure
7:29
on the Piping Bag as you pull away so
7:31
that the buttercream pulls away neatly
7:33
work your way up to the top of the cake
7:35
and piping from the bottom to the top is
7:37
a good idea for two reasons firstly so
7:40
that you can see what you're doing
7:42
because if you start at the top by the
7:44
time you get to the bottom you'll have
7:45
to crouch down to see where you're
7:47
piping and secondly for fur piped with a
7:50
grass tip each row of fur will overlap
7:53
the row below so by starting at the very
7:55
bottom you'll create this Shaggy effect
7:58
straight after piping the fur while the
8:00
frosting is still soft and sticky cut
8:03
mini marshmallows in half and press a
8:05
toothpick through the middle of each
8:06
half push a mini chocolate chip into
8:09
that hole and you have an eyeball press
8:10
the eyeballs into the monster's fur to
8:12
complete the monster you can do this
8:14
with cupcakes instead which is a fun
8:16
activity with kids and to make it easier
8:19
use an elastic band or a strong clip to
8:22
pinch the Piping Bag at the top so that
8:24
it's easier to squeeze the buttercream
8:25
out through the piping tip with a few
8:27
drops of color and some Mini
8:29
marshmallows and mini chocolate chips
8:31
you can make these fun Halloween
8:33
cupcakes in just a few minutes another
8:35
easy monster option is to use a donut or
8:38
mini bun cake mold spooning or piping
8:41
cake batter into it after they cool make
8:43
a Drip by measuring one cup of white
8:45
chocolate chips and then heating a third
8:47
of a cup of heavy cream or double cream
8:50
until it starts to Bubble pour the hot
8:52
cream over the chocolate push all of the
8:54
chocolate underneath the cream and let
8:56
it sit for about a minute and then stir
8:58
it until it's smooth and then add
9:00
oil-based color this is yellow and blue
9:03
to make green don't use water-based
9:06
colors that you would use for
9:07
buttercream because those can make the
9:09
chocolate seize when the drip cools to
9:11
room temperature do a test drip on the
9:13
side of the bowl and you're looking for
9:15
a thick slow drip spoon this over the
9:18
cakes and it's best to chill the cakes
9:20
first I put this one in the freezer for
9:22
5 minutes just before because the cold
9:24
cake will help the drip stop dripping
9:26
push in some candy eyeballs and it's
9:28
done another fun one to make with kids
9:31
now let's make some pumpkins use a
9:33
star-shaped piping tip like this number
9:35
32 tip or a medium round tip like a
9:38
number eight start on the edges and work
9:41
your way in to make the pumpkins look
9:43
more rounded and realistic now for the
9:46
fun part that will grab everyone's
9:48
attention pipe a few pumpkins onto
9:50
parchment paper or wax paper flat and
9:53
also standing upright like these put
9:55
them into the freezer for 10 minutes to
9:57
chill and Harden and then brush them
9:59
with edible gold paint getting into all
10:01
of the grooves to cover them completely
10:03
or just painting some accents then lift
10:06
them up and press them onto your cake to
10:08
make gold buttercream pumpkins so
10:10
elegant pipe stems using brown
10:13
buttercream or chocolate buttercream and
10:15
a small star-shaped tip or a round tip
10:18
such a cozy fall or Autumn themed cake
10:21
to make a pumpkin that's a jackal
10:23
Lantern Frost your cake and put it into
10:25
the fridge for at least an hour draw a
10:27
face onto parchment or wax paper and cut
10:30
out the features leaving the rest of the
10:32
paper intact press it down onto the cold
10:34
cake and spread black frosting over the
10:36
top scraping a few times to leave a thin
10:39
flat layer then peel off the stencil and
10:42
you have a jackolantern cake that took
10:43
you 2 minutes to decorate which cake
10:46
would you choose to eat which one would
10:48
you make tell me in the comments and
10:50
visit my cake school to learn hundreds
10:52
of other cake designs and cake
10:54
decorating techniques thanks for
10:56
watching
#Cooking & Recipes
#Desserts
#Holidays & Seasonal Events