Up next in 10

https://kick.com/anthonyxcadette
https://www.twitch.tv/anthonyxcadette
https://www.instagram.com/acgraphicartist101/
https://ko-fi.com/liquidlion/tiers
Show More Show Less View Video Transcript
0:01
so hey guys it's your boy Anthony and
0:04
this is the second video that we will be
0:06
continuing so see that's how we are
0:09
inside of
0:11
here we want to save this make sure you
0:15
save before going any further right so
0:19
come here save as I already have it
0:25
saved
0:27
us over right all judge right so what
0:32
we're going to do here
0:34
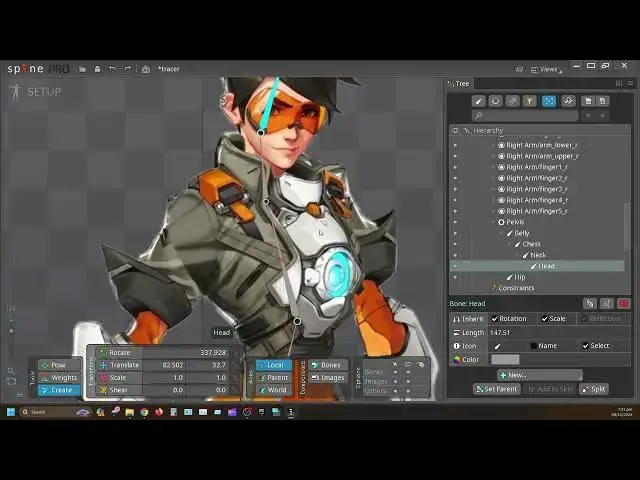
today we are going to add bound to the
0:37
character you're going to add meage
0:40
message
0:42
meshes like all of a sudden I can't even
0:44
pronounce words meshes and we are going
0:48
to connect the meshes to the bones that
0:52
is connected to the character
0:55
okay and then we are going to the I
1:00
frame and so we got to do three things
1:02
in this video here so follow
1:06
along right we have time to waste all
1:09
right one minute right all right
1:12
so I done saving we going first thing
1:17
first you want to close that and right
1:20
click here by using your mouse button
1:24
right click and drag I show you guys
1:27
before and you want to hit root
1:31
when hit root this will pop up down here
1:35
right you want to click new and add
1:40
B now this B will come down here right
1:45
underneath and this is what we'll be
1:47
working from right connecting
1:50
everything so I want to move that b and
1:55
bring it right here
2:00
put by the pelvis this will be the
2:03
pelvis
2:05
B right pelvis
2:08
B the pelvis bone we're going to press n
2:11
or we just come here create create new
2:16
bone right and cre a bone here but
2:20
before we do that on the pelvis bone we
2:23
don't want it to look like the root move
2:26
so we want to change that right don't
2:29
want to confuse
2:30
so so you going to change that change
2:33
that to this right change that great
2:38
good to
2:39
go right if you want to change the name
2:43
of the Moon you come here you double
2:46
click on it um we will name it
2:48
Elvis
2:54
p
2:57
s you spell that right not
3:02
kind
3:04
what
3:06
this and we will come here create and we
3:12
going to connect this to the here right
3:16
selected and now
3:19
come right here we come down
3:30
connected disconnected that and now
3:34
going to connect another part of right
3:37
so come back to
3:40
this come back to this C
3:44
that and now we come in here now to a
3:50
little right
3:53
here
3:57
right from here going to go up the line
4:01
here
4:04
right go up the line here we see press
4:08
View Press C and rotate this a little
4:14
bit so then press back
4:18
in right you see how this red line here
4:22
connected to to this one and this one
4:25
you're going to know later on why you
4:28
have to do like that right
4:31
trust me you want it to be like
4:34
that you try not to screw that
4:39
up all right so so we have the waste
4:44
spon we have this
4:48
waste next part of the
4:50
waste belly call this belly here chest
4:56
Bo going to be going up from here to
5:00
here CH
5:03
spoon and
5:07
neck NE bone you're going to put
5:10
that like right here and headbone you're
5:14
going to put
5:16
this here so head neck
5:27
chest and here right so everything is
5:32
interconnected one connected with the
5:35
other as you can see here on the other
5:37
side here all of these here is name
5:39
pelvises right we don't want that we
5:42
don't want to confuse ourself later
5:44
on all right
5:47
so here this
5:52
P name this as W or see hip name this as
5:57
hip this one is hip
6:02
press okay right so that changes tip
6:05
come here this
6:09
belly I'm just going to name it belly
6:12
that's what belly is belly yes I know
6:17
very
6:20
we choice of words but this what is
6:38
right
6:48
chest here neck
7:13
oh
7:18
[ __ ] right you want all these to be name
7:21
so be confused later
7:25
right so all of these name here you're
7:27
already seven minutes in let's wrap this
7:30
up as fast as
7:32
possible right so we have all of this
7:35
here right so now you want to connect
7:38
the
7:42
hands to this one here right so how you
7:44
connecting the hands you want to click
7:46
this one here
7:54
right bom this hand here
8:00
right this will be connected with this
8:08
here put like right here
8:14
so another one right
8:19
here RK
8:21
mov
8:23
[Music]
8:25
all press
8:27
alt you can press all to to kind of
8:30
delete that now I say kind of delet it
8:33
but like to reset it so if you you
8:36
know set that or just like control Z the
8:44
back like should I make it that yeah
8:47
I'll make it
8:50
that that from right here
8:56
so here
9:01
that's and the F on
9:09
them they selected
9:13
so let's connect
9:26
[Music]
9:28
them and we have
9:30
this here we
9:34
can
9:42
here
9:44
shift and then press control P control
9:49
select
9:52
we
9:57
s well bet you don't even need to do
10:00
that what you could do is after you
10:02
select
10:04
this and you come here you just put that
10:06
one there
10:08
boom and
10:10
now come back to
10:16
this add another one
10:19
here
10:22
right
10:24
this hold control so you could select
10:27
the one that you going to put the bone
10:28
on
10:30
they not really put the bone on it now
10:31
just selting it so they could go back to
10:35
this here up here this going to be the
10:37
parent of all of these and then Come
10:39
Down Bam control hold control again
10:43
while you're holding down
10:45
shift hold control while you're holding
10:48
on shift hold shift then hold
10:51
control then select let go control while
10:56
still cooling shift
11:01
okay make another one
11:04
bam see go back up everything you create
11:07
one is going to go back up to this one
11:09
here then hold control again click left
11:13
click select it Lego sh Lego um
11:17
control and create another
11:20
one right so that's how you're doing
11:22
that right now to cut all of this into
11:26
TW or trees or whatever do you going to
11:31
select it
11:33
right select
11:35
that P control select all of them select
11:40
that one come across here to the right
11:44
click splits and we to split them into
11:49
two splitting them into two and that's
11:52
how you get them into
11:53
two
11:55
nice simple straight to the point
11:59
something went wrong here this get
12:02
selected we don't want
12:05
that all right so we control again see
12:08
that this right come here split and has
12:14
two B so this is two this is two I know
12:19
the fingers on them might be in trees or
12:21
something so but I
12:24
showing right this will come in great
12:26
handy when you see um you're adding mesh
12:28
later
12:29
you will see why it will come in great
12:33
time all right so we have all of this
12:35
set up here we're going to go to the
12:37
next hand set up the next
12:42
hand this outside here so
12:47
[Music]
12:54
up another coming to the next hand
13:01
to the next one so you to click this
13:03
again this B here you want to click that
13:05
b you want to press
13:08
n and you want to go across here to this
13:14
m
13:23
right
13:25
so
13:27
Down Bam
13:33
see you
13:37
here
13:40
um right click and grab to
13:55
drag here shift or shift
14:01
control click release release
14:05
control
14:07
control
14:11
down let's controller again
14:17
cck control Vol sh Release
14:27
Control you custom
14:34
to right so all of this here selected
14:37
right so
14:42
now select all this
14:45
here by holding Shi sh
14:49
control all like that b to split does
14:55
two
14:57
B all right so we have that and that
15:01
organize head
15:06
organize want to put something here on
15:08
the here this here also so we're going
15:11
to select this and now we going to press
15:14
n on the
15:16
keyboard I'm going to add a part here
15:20
too so I'm going to add a part
15:24
right right
15:26
here right here
15:33
and I want to cut this up into
15:36
pieces so I'm going to give it my
15:57
tree e
16:37
like can see
17:04
put like
17:05
that me it you see I
17:21
PlayOn why like this I you to see pring
17:26
so even shortcuts all the time
17:29
right so we establishing here we
17:32
establishing head the neck the Torso the
17:35
chest
17:37
belly the hips pelvis the hands both
17:42
hands
17:43
fingers establish all of that on top
17:45
here right so now we going down to the
17:47
bottom
17:48
now up to the
17:50
bottom going to click here Click N on
17:54
the keyboard oh it just come here I
17:57
click this and now we have going down
18:01
down
18:04
down a little
18:06
bit so for this part here we're going to
18:10
come
18:13
right
18:24
here right here
18:27
so on right there
18:29
here for this
18:43
[Music]
18:49
here check
18:51
some this
19:04
right so we want to make sure I prob up
19:11
here to that
19:18
[Music]
19:26
right right so you're going to press and
19:28
again again well just come here and
19:30
press
19:31
this select
19:34
this
19:35
[Music]
19:40
create
19:43
right
19:51
nice like this I'm going to do the same
19:54
thing on this side here a little bit up
19:59
right since this is a
20:03
big right
20:17
yes here
20:35
bring this
20:43
here right so we have 10 minutes again
20:46
let's get this on the
20:49
wraps so in 10 minutes let's do this all
20:53
right so you're see that we have all of
20:55
these things here
21:00
I was going
21:14
to right
21:20
everything minutes right
21:22
so see now everything is in order
21:26
now make sure you Sav contrl s and
21:30
C you
21:35
add going add in the the meshes
21:42
now be able to do this
21:46
within 30 minutes but I can see let's go
21:51
to the next video that is
21:53
all so you guys are keeping up and
21:57
understanding what I'm doing that's all
21:59
that
22:00
matters I hope that's I hope the video
22:03
in you guys it's
22:07
very
22:13
right see
22:16
what's that's
22:19
why
22:22
that's
22:25
this this supposed to be going down in
22:27
our line
22:29
one controlling the other not
22:34
separately
22:51
separately continue from
22:54
that you come back up here you going
22:56
continue from that
23:05
right all right so that's that's how you
23:08
want it to be see red lines them red
23:11
lines there that's how you want to one
23:14
control each other so none will be
23:17
separated from each other once once this
23:20
move this other move if this move
23:25
this you you
23:28
key in it right so
23:32
right so
23:33
we establish
23:36
now yeah good to go with the next set
23:39
next U
23:42
phrase
23:44
so see start that I don't think we can
23:48
start that now I think I should end the
23:51
video like right here and go on to the
23:55
next
23:56
part yeah I'll do that
24:00
yeah I'll do that so I'll for this year
24:04
um I'll go end it right here and we will
24:08
go on to the next video right I want you
24:10
to go over all those 24 minutes right
24:14
now into the video but we'll be going
24:17
into the next video when I'll be showing
24:19
you guys how to mesh everything together
24:22
don't worry all these videos are going
24:24
up one at a time well all at once so you
24:28
don't have to worry yourself in waiting
24:31
for the next one to come out once one is
24:33
put the next one is going to come after
24:35
and then the next you going to follow
24:38
suit so if you guys have liked what you
24:40
see and you want more please like And
24:43
subscribe and follow from now
24:46
right leave a leave comments
24:49
Below in St whatever let's leave your
24:53
comments if you like the video and if
24:55
it's a liking and if it's detail enough
24:58
to your understanding all right laters
25:02
for now mov on to the next video