Up next in 10



Quick DIY repair of a serpentine belt on my brother's bmw e36. Very simple, easy repair to do for the DIY mechanic. Belts are typically very easy and straight forward to replace on most cars, however snags are possible.
In the six cylinder e36's, especially 328I and M3, there is very little space to replace your serpentine belt. Also, if your tensioner pulley threads are stripped, it can be a little more difficult to replace the belt.
The most important thing is to remember how the belt was oriented, and that the AC belt has to be removed prior to the serpentine belt.
Show More Show Less View Video Transcript
0:00
Hey E36 Fanatics, Steven here
0:02
Today I'm going to do a quick easy fix on a BMW, my little brother's 1997 323i
0:13
I'm changing the serpentine belt on his car. It's really easy to do and it's a great way to save a few extra bucks if you don't want
0:21
the mechanic to do it. The biggest thing about changing your serpentine belt is you want to draw the diagram before
0:29
you actually remove the original serpentine belt. That way you're not because almost always when you're changing the belt and you didn't
0:37
write down the diagram it almost always ends up in trying to google it and find out how
0:45
the route is. So you just want to draw it before you actually remove it and now I'm going to go ahead and
0:51
do the job. So the basic thing to watch for with serpentine belts is as they start aging they crack and
0:58
they start making a noise and by that point you know it's obviously time to do it time to replace
1:06
it and this is a very easy diy job to do um you really need to jack up the passenger side of the
1:14
vehicle and i know you can see the jack but i got jack stand under there and the reason for that is
1:20
you have to get to the ac belt and these bmws are very low to the ground so unless you want to try
1:27
and get under the car while it's just sitting there I suggest jacking it up on the passenger
1:33
side so if you're wanting to replace your serpentine belt you first have to actually
1:39
pull off the AC belt that's because the AC belt come under here let's see this is the AC belt
1:52
right here now if you see it on the main crankshaft there is see there's two belts
2:03
there one here and one here and there one here this is the serpentine belt behind the AC belt So you have to actually pull off the AC belt before you can pull off the serpentine belt
2:18
Technically you don't actually have to even have an AC belt, but I like my compressor working so I
2:23
can have AC. So whenever I replace my serpentine belt, I also replace the AC belt. Over here
2:32
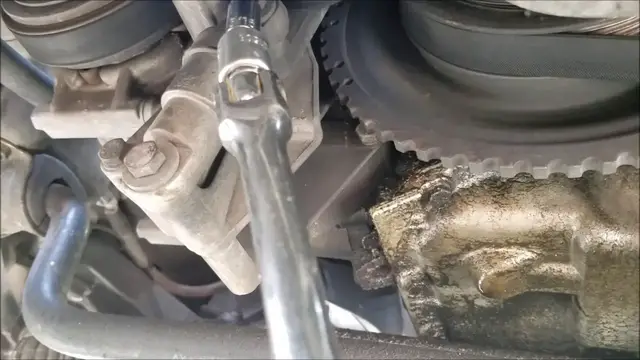
here's the tensioner for the ac uh belt it's an eight millimeter it's a hex eight millimeter
2:39
and what i do because i only have these little hex tools and it doesn't give me enough torque
2:45
i actually rig something up with a breaker bar i take a socket that will fit into
2:52
the hex right here which is like an eight millimeter socket regular and i fit it in here
2:58
and have it going sideways and that'll provide enough pressure to turn the tensioner as you can
3:14
see it turning. So all you got to do is loosen tension on basically pull it so it loosens the
3:24
tension on the belt and then you can pull the belt off while you got it that way. Okay so here's the
3:30
first belt. So I got that off. Now I'm gonna go ahead and remove the serpentine belt. First thing
3:36
I'm gonna do is go ahead and remove these two bolts right here or these two nuts. They're 10
3:40
millimeters that hold in the cruise control module and the air box right here. And the the goal is to
3:48
get the air box out of the way so I can have some more space to work with the serpentine belt down
3:52
here. So it's just two 10 millimeters right here and then I'm just gonna cut
4:00
the airbox of the mass airflow sensor so you just got these two little clips that
4:05
pops right out. Okay so quick tip for y'all if y'all were doing a serpentine
4:12
belt and maybe the tensioner that you supposed to be tensioning which is Which is right here Say that the the socket in there is or the the threads are
4:29
Twit are mangled up and you can't actually use anything and when you keep turning it it just
4:36
It's just it's not actually tensioning at all. It's not doing anything
4:39
There is a second option which I've already had to do once and this is my second time doing it now because his threads on his tensioner
4:48
Toast or his tensioner pulley and that is there's a bolt right above the tensioner pulley and it's a 16
5:02
So if you're looking at the tensioner pulley from the driver side it's gonna be to the left and
5:08
and above a little bit right right here and you can actually do the same exact thing with this because it's it's a tensioner bolt
5:22
and you can actually use it to take the tension off and that's exactly what i'm about to do with it
5:31
So once you've got the serpentine belt off, as I do now, you gotta thread it around the
5:40
fan blades right here to finish getting it out. And then at that point you need to throw in your new one and it's the same process, you
5:50
gotta thread it through the fan blades first. And should be as easy as cake really to put it back
5:59
If you didn't write down your path, this is the typical path for a BMW E36
6:07
You got your... It goes around the water pump alternator, then down to the power steering pump, then to the crank
6:15
and then it goes around the tensioner and back to the water pump
6:19
It's pretty straightforward, really. Now I going to go ahead and put the new serpentine belt on I show you all what the old ones look like Okay so I got them both off Serpentine and AC belt And look at this serpentine belt
6:39
Cracks are very pronounced. I don't wait until the serpentine belt gets this bad to replace it
6:50
this was a belt that was squeaking bad on my little brother's car
6:55
so it needed to be replaced very badly as you can see it's well cracked through
7:01
at this point this belt was at the risk of completely failing dirt
7:09
while it was driving and then your vehicle would be immobile and if you didn't catch it quick enough
7:16
it could overheat and blow a head gasket so that's great that got rid of this the AC belt isn't as bad but I mean it's it's got all these
7:29
cracks all these hairline cracks it's very ready to go then compare it to this brand new belt right
7:35
here you know it has no cracks at all it's in it's brand new so it's ready to go on so I'm gonna go
7:44
ahead and put this new belt on and trash these old belts. Wow look at that. That's
7:52
that was definitely ready to go. Last but not least I like to take a look at my
8:00
belts make sure that they're lining up right on the ridges along the whole
8:04
thing and let me see besides that once I've fed it through the once I fed it
8:13
through the fan again. I go ahead and put everything around except for the tensioner
8:20
and then I go ahead and re-tension it again to put the belt back on and you're done with your
8:26
serpentine belt. Then just repeat the same process for the AC belt and you're done
8:33
Hope this video helped y'all out. If it did, please like, comment, and subscribe
8:39
Thanks and y'all have a good one
#Autos & Vehicles
#Autos & Vehicles
#Vehicle Parts & Services
#Vehicle Repair & Maintenance