live_tv
Livestream Starting Soon
00
Hours
:
00
Minutes
:
00
Seconds
Up next in 10


This video is a part of a coolant system rebuild on my E36 BMW.
E36 Coolant Level Sensor: advanceautoparts.rt8x.net/Lbz9V
E36 Aluminum Thermostat Housing: advanceautoparts.rt8x.net/2xGog
E36 Beck Arnley Water Pump: https://amzn.to/32FLIN5
The Water Pump was the most important part of the replacement, and is generally pretty easy to remove and replace once you have removed everything in the way.
Remember that it's an extremely good idea to put some lithium grease anti-seize around the bolt holes on the new water pump, so there is a reduced risk that it will be seized whenever it needs to be replaced again.
**This description contains affiliate links. If you buy a product through my custom link, I will earn a small commission at no extra cost to you.**
Show More Show Less View Video Transcript
0:00
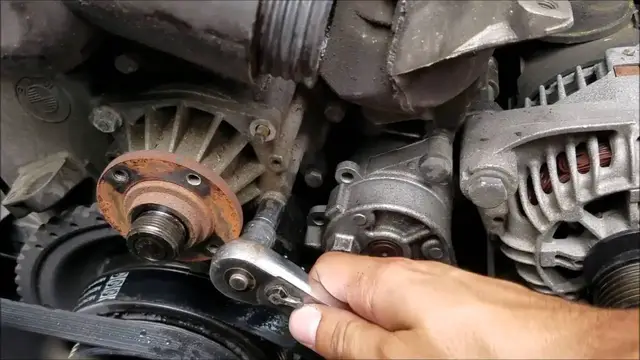
Okay, so at this point I've pulled the fan clutch out so I'm gonna go ahead and remove the serpentine belt
0:12
Okay, so I'm getting off the four bolts on the water pump pulley now
0:17
So basically just get these four bolts out of the water pump pulley
0:34
Then it will come out
0:49
Now before you pull all the bolts out, go ahead and take the serpentine belt off
0:56
Just get them loosened, that way the pulley doesn't shoot out at all
1:02
So how I do it, remove the serpentine belt, you know, you have a pulley right here
1:07
However, I screwed up the pulley bolt because somebody replaced it and put in a non-OEM bolt into it
1:14
So I used the wrong thing and messed it up. So I just do it from here. Hopefully I'll remember how to put this back on
1:32
Okay so at this point I'm on to removing the water pump. First thing I'm going to go ahead
1:43
and do is remove these four bolts that are holding the water pump in. They're not actually
1:53
the only thing holding it in either. The real part of the job is threading
2:00
threading two bolts into it but this is the first part. So go ahead and get these
2:08
four bolts out Okay so okay how do I just film your face like tell me how to do it It already playing Oh Well you can just film what I doing here
2:18
I've gotten the four uh the four bolts out and now I've I uh bought two bolts or four bolts
2:28
from Lowe's Home Improvement. Uh you can go Lowe's or Home Depot wherever and you just get some m6
2:34
size bolts, they got to be at least 1.5 inches and you basically thread both of them into the
2:44
two holes that are in the water pump and you got to do it evenly and what I do what I do is I try
2:54
and do like three or four turns each then I go to the other side and do three or four turns each
3:04
And this way it stays even because the worst thing that can happen is this pump actually breaks
3:17
Or part of it breaks and then you're screwed basically. So you just want it to come out real evenly
3:26
okay so um i i got it out with the thread the thread process like i said uh issue is it dumped
3:43
out coolant like crazy i did not drain it from the block there's a drain plug on the block as well
3:50
if you want to look up how to do that before you do this that might be a smart idea because
3:57
man it it dumps quite a bit of cooling out but here's the old water pump and to be honest with
4:08
you it's i mean it's got this crappy plastic design that i really don't like uh but it's it's
4:14
not in bad condition really it's not that bad i mean you can definitely see where it's it's got
4:20
some wear on it on the inside here and it rusted so I mean it definitely could have been replaced and I don want to risk I had this car for about two years now and never replaced it so I don want to risk it blowing
4:35
so now what I'm going to do is I'm going to clean out the the area on the inside here for the new
4:43
water pump and then I'm going to take a wire brush and lightly scrape around here and then it'll be
4:51
time to mount the new water pump in it. So at this point the water pump is now
4:56
out and removed and what I'm gonna do is I got this little wire brush I'm just
5:02
gonna basically scrape just rough up the mating area a little bit and then I'm
5:09
gonna wipe it clean after that and this is just to get some of the grime and
5:13
crap off that's collected on this over time. Okay so at this point I'm done lathering up the water pump, the new one, and I've
5:38
I've cleaned out the area right here for the mating surface. So, I do, and as you can tell, I bought the plastic one
5:51
I don't recommend it. I recommend getting the metal one just because the plastic one's been known to break over time
5:59
And the parts can go, you know, if it breaks, it goes into the engine block
6:03
However, I'm a poor college student, so plastic is what I'm getting
6:09
So, at this point, what I've done is I've put on two different stuff on this
6:17
And a lot of people say you don't need this. I do it anyway. On the O-ring, you can see I've got this silver stuff on it
6:27
That is gasket maker, water pump gasket maker. I put a little bit of that on it just to make a better seal and then you can see around the around the holes for the bolts I also have some silver stuff Now that a different compound though
6:47
That is lithium grease. It's anti-seize. If you've ever pulled out a water pump
6:54
before and it's been stuck to the block, it's because the area around the holes
7:00
got stuck to the block and I don't ever want to have to. I've had to do that
7:05
before and I've had to saw it out I don't ever want to have to do that again so I always put
7:10
some anti-seize around the bolts like that so now I've got it seated and now I'm gonna just
7:18
I'm gonna go ahead and screw the the nuts in so how you do that is you don't want to do them
7:26
you don't like just do one at a time you do a few turns
7:31
you do a few turns each on each one that way you get it you get it to seal properly
7:53
you don't want to just tighten one and then go to the next one you do a few turns each one
7:59
So last but not least on this, once you're done tightening it, make sure you don't over
8:06
tighten this water pump. You would think you'd have to really tighten it a lot, but I think the
8:13
specifications only call for eight foot pounds, which isn't much at all. So just keep that in
8:19
mind when you're tightening it. Once you got a couple turns on it and it's
8:29
solidly in there then it's good. So that's the process on installing the
8:36
water pump. Keep watching for more videos on this. The next thing I'm going to be
8:41
doing is taking off this thermostat housing unit right here and replacing
8:46
my thermostat. I hope y'all enjoyed this video. If you did, please like, comment, and subscribe
8:52
Thank you, and y'all have a good one
#Autos & Vehicles
#Vehicle Parts & Services
#Vehicle Repair & Maintenance