Up next in 10


You'll learn how to calculate your buttonhole sizes, confirm the distance between your buttons and my top tips to create a neat opening to your buttonholes.
View the written pattern for the All Buttoned Up Dress here:
JOIN THE COMMUNITY: https://www.facebook.com/groups/CosyRosieCrochetCommunity
JOIN THE NEWSLETTER - and get updates when the next square design is released: https://landing.mailerlite.com/webforms/landing/y7s4x3
NEED MORE CROCHET INSPO?
Find me here:
Website: https://www.cosyrosieuk.co.uk/
Instagram: https://www.instagram.com/cosyrosieuk/
Facebook: https://www.facebook.com/cosyrosieuk
00:00 How to crochet a button band
01:58 Materials Used
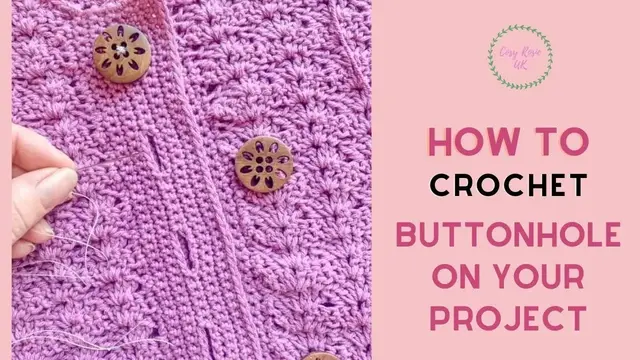
02:05 Check buttons evenly placed
04:54 Mark start of 1st buttonhole
05:38 Measure Stitches between buttons
06:52 How to crochet a buttonhole
Show More Show Less View Video Transcript
0:00
So welcome back to another crochet tutorial with CozyRosieUK and today I'm going to be showing you
0:04
how to calculate your button spacing along with how to crochet a buttonhole. So whether you're
0:09
looking to create either a vertical or a horizontal buttonhole this technique can be used to change
0:14
the number of buttons you're using, increase it, decrease it to fit your pattern or of course to
0:19
change the button size. Before we get started don't forget to hit the subscribe button and of course
0:24
the notification bell so that you never miss out another one of my crochet patterns or tutorials
0:28
again. Now using buttons on your crochet projects can give you the opportunity to find some really
0:33
cute additions to any of your projects, whether you're working on a crochet garment, a cushion
0:38
cover, a hat, even just adding it as a final flourish. You may find that your crochet pattern
0:44
has already given you directions as to how big your buttonhole needs to be and of course the size
0:49
of button that they recommend using. It is important to check the button size that's in the
0:54
crochet pattern because that's going to determine how big your buttonhole needs to be. Now the
0:58
buttons that I'm using today are just under an inch wide so they're about two centimeters wide
1:06
and this is going to be part of a new design which is an extension on an existing design
1:12
So this is part of the all buttoned up collection so this is going to be the dress version so I'm
1:19
going to be using eight buttons along this buttonhole panel. The buttonholes are usually
1:24
worked on the edge of your projects creating a button panel and of course a button hole as well
1:30
so the two panels would then sit on top of each other neatly so they'll meet up to the edge of
1:35
your fabric and fold over each other passing a button through the button hole. The part where
1:40
you sew the buttons on is usually referred to as the button band which is also worked in
1:45
US single crochet. The reason that US single crochet is used is it creates a really firm
1:50
fabric that is less likely to stretch than if you were to create a space in a lacy stitch such as
1:57
this one. Some of the tools that you're going to need to create an evenly spaced button layout
2:01
is I would use some pins and some stitch markers. Once you've placed that first button, so for
2:08
instance if we start at the edge here, I would make sure that I mark that in place with a pin
2:14
It's not going to go anywhere just so I know exactly that's actually one stitch too many
2:18
told her I would have calculated this so this is the top of my project I would have a space before
2:24
the first button so I could make sure that the buttonhole isn't right at the edge of my project
2:29
you can then take a moment to space your buttons evenly by eye and then we're going to double
2:35
check that they've been spaced evenly and we can use our pins to hold them in place while we're
2:40
counting. Get your first button in place and then place your buttons roughly where you would like
2:46
them and then we're going to double check that they have been placed evenly. Make sure that you've
2:50
marked your first and your last button exactly where you want them, leaving a couple of stitches
2:55
so that your buttonhole isn't right on the edge of your project. Because I can only fit four buttons
3:00
on my screen at this moment I'm just going to work with these four and we're going to check that they
3:05
are placed evenly apart and there is an easy way of doing it and it's simply like many things just
3:11
counting your stitches in between the bottom of your button. So as you can see here this button
3:16
can turn and be moved so if you're finding that you've got two holes in your button you can always
3:20
place a second pin just to stop it turning and changing where the bottom is So at the moment I have four stitches from the edge of my project one two three and there four just underneath that lip there
3:33
all the way down to the end of the button. Now to make sure that all these buttons are actually evenly spaced appropriately
3:41
you can count the stitches in between, making sure that there is the same number
3:46
so if you'd like the spacing between these two buttons get your pin ready and count down from
3:52
the bottom of this button i've got one two one two three four five six seven eight nine
3:59
ten eleven twelve stitches just going to place that pin there and again i'm going to grab another
4:06
one because i don't want that to move spin it around it does work better if you use on a sofa
4:13
like on your sofa or something so make sure you've got your 12 that's gone straight there we go
4:20
now once you've got that 12 stitch placement in between you can count down again from the
4:26
bottom of this button making sure that you've got 12 stitches to the next one
4:31
my eyes are pretty good so I usually don't have to make a huge amount of adjustments
4:41
for making sure that my buttons are in the right place. So continue to do that all the way down, making sure you've got them evenly spaced
4:49
with the same number of stitches in between these buttons. Once you've got all your buttons evenly spaced out
4:55
and you know where your first buttonhole needs to start, you're going to count down to find that stitch that is just in between your buttonhole top
5:07
which for me is going to be stitch number five. Now the reason you're doing that is because you don't have to remember that number for a start
5:14
and both your button band and the button hole band need to have the same number of stitches
5:20
so they do cover each other nicely but your button hole band will have one extra row to allow
5:27
to cover this section here at least on this pattern. Make a note of the number of stitches
5:34
in between your buttons and then the final thing to note is how many stitches are underneath your
5:40
button. So again you can use just a needle or something just to mark the top of your button
5:46
and the bottom, I'm going to take that one out and then I can remove that button and I've got one, two, three, four, I knew that anyway
5:57
I've got five stitches in between the button. Now the reason we need to know how many stitches it
6:04
covers is because that's going to tell us how wide a buttonhole we need for our button to fit
6:10
through. So make a note of the number of stitches between your buttons and the number of stitches
6:15
underneath your button. Knowing those numbers will mean that we can crochet our buttonholes
6:20
really easily. It is important to note that there are some crochet fibres or fabrics that we create
6:26
that are a little bit more stretchy than others. So for instance things like 100% cotton they do
6:31
tend to stretch over time so when we calculated the number of space we need
6:37
to leave for our buttonholes we need to keep that in mind as well so once you've
6:41
marked how many stitches you want between each of your buttons we can remove everything we not sewing our buttons on yet we gonna wait until we got our buttonholes made so let make those buttonholes so I already worked half the number of rows that I made in my button band where I going to sew my button on
6:58
And I've made half the number of rows that I made. The reason I've done that is that is where the buttonholes are going to be so that the buttons can be placed in the middle of my button band
7:09
So make sure you've done half of the number of total rows you made for where your buttons are going to be placed
7:15
and obviously that's also determined by the size of your button you want it to fit nicely on there
7:20
so to work the row with our buttonholes in make sure you've started with a chain one of course
7:26
we're going to work the number of stitches that we had marked on the button band so i know that i
7:33
have to work four stitches before i start my first buttonhole we mark that with our stitch marker so
7:39
I'm going to work those first four stitches before I start my first buttonhole. That's one
7:45
two, three, and four. So to make our buttonholes it is really simple. We're going to chain the
8:02
number of spaces we need to fit our button through. In my case I had five stitches underneath my
8:08
button that I'm going to skip so I'm going to make a chain of five. That's one, two, three, four and
8:16
five and then we skip the same number of stitches underneath. So one, two, three, four and five
8:25
We then work our next single crochet into the next stitch and that's it. That's our buttonhole
8:32
made. Now of course we can take a moment to test our buttonhole. It's not going to be 100% accurate
8:38
but as long as there is a little bit of tension with that button going through your buttonhole
8:43
will be accurate. If you are working this buttonhole right on the edge of your project and you're not
8:48
going to work any additional rows make sure your buttonhole is nice and tight because that will
8:53
stretch a lot. In this case I'm going to be working some additional rows so there'll be a piece of
8:59
fabric on the other side which will help prevent some of the stretching. We then need to work the
9:03
number of stitches that we had in between our buttons. In this case I had 12 stitches and this
9:10
first stitch counts as the first stitch between. So I need to work a further 11 stitches before we
9:17
work our next buttonhole. So work the stitches you need to work and I'll meet you ready for our next
9:23
buttonhole. So I now have the stitches I need between my first buttonhole and
9:29
ready to work my next buttonhole. So I'm going to once again make a chain of five
9:34
one two three four and five and skip the corresponding number of stitches so one
9:43
two three four and five. Then we're ready to work the first stitch of those
9:49
stitches in between the buttons. Continue to work all of the buttonholes you need to make
9:54
then I'm going to show you the best way to work into our chain to make sure that we keep an even
9:59
opening all around this buttonhole. I'll see you in a moment once you've worked all your buttonholes
10:07
Once you've worked all the way back down to your project, turn as normal and complete your chain
10:12
one and we going to be working back into our chain spaces but directly into the chains and this this is what really going to make your buttonholes look beautiful So single crochet up to the start of your chain space and you can see that we have our normal chain here to
10:32
work. Now what I'm going to recommend is that you turn your chain so that you work
10:37
into the back loops of your chains rather than through the top of your
10:41
chain. The reason for that is it will leave the V section of your chain
10:47
unworked and it will push it into the front of your buttonhole. So by turning
10:53
your chain and working into those back loops it gives you a really neat opening
10:59
It's a little bit tricky to find that first one so count down from how many
11:03
chains you know you've got so that's one two three four there's number five but
11:08
it is turned you can see that you've got the V facing you and it's that back bump here that
11:15
you're looking for. You need to pop that onto your hook. You might have to encourage it with your
11:19
nails in my instance and once you've got that loop on just complete your single crochet as normal
11:26
So that's one and we're going to do that on all of these chains. It'll get easier as you get further
11:35
away from that first one to identify. It does give you a nicer edge on your buttonhole, I assure you
11:42
So work into each of the back loops and then work one single crochet into each of the next few
11:47
stitches onto your next chain. I'll meet you there in a moment to work our next buttonhole
11:53
So I've reached my next buttonhole and I'm going to do the same by working into the back loops of
11:57
this chain because although it is fiddly it really does give you the best buttonhole opening. It looks
12:03
like you have stitches on both sides of your buttonhole. There's no need to work around your
12:08
buttonhole openings. Now of course this is the real test as to whether or not your buttonhole is the
12:13
right size. Does it glide through or should it? Yes, got a bit of a push to it and that is just
12:20
what we want. I want it to be pushed through so that it stays in place. Once you've completed all
12:27
of your rows, so I'm going to carry on and work my other four rows after this one to give me a
12:32
total of 11 rows of single crochet altogether I'm then and only then am I going to sew my buttons on
12:40
so let's imagine that this project or this row of buttons is completely done I would grab my button
12:46
placing it over the hole or popping the hole over it making sure that I can see
12:51
this is a bit difficult because you've got so many holes in this button but I'd have the hole
12:56
the button straight so that you've got the four you can have it whichever way you like
13:00
and kind of position it where I think it needs to go and just make sure that the buttonhole
13:05
is over the middle. Obviously I'll have some more rows here. The opening or the holes of the button
13:11
are in line with the buttonhole opening and that means when it is fed through
13:16
the buttonhole and the project will keep closed exactly where you want it. I would use my pins
13:23
and just sew this one straight away. I really hope you've enjoyed this kind of quick tutorial
13:28
on how to work crochet buttonholes and it means that you're going to have the confidence to go on
13:33
and add buttons to your projects whatever they might be with confidence thank you so much for
13:38
joining me as always do let me know in the comments what projects you're going to be adding buttons to
13:42
and I will see you for the next video
#Hobbies & Leisure
#Crafts
#Fiber & Textile Arts