Up next in 10

React.js Image Upload Preview Animation and Validation Component Using react-images-upload Tutorial
Jan 9, 2025
Get the full source code of application here:
Show More Show Less View Video Transcript
0:00
uh hello guys welcome to this video so
0:02
in this video I will be uh introducing
0:04
to a new reactjs image validation
0:07
Library drag and drop it supports uh
0:11
validation you can select which files to
0:13
upload maximum you can even put a
0:16
restriction which extensions how much
0:19
size it's a drag and drop library and
0:22
there is this
0:24
interface either you can drag and drop
0:26
or you can select your images so once
0:28
you select the images it will give you
0:30
this nice little animation you will also
0:32
have this cross button where you can
0:34
actually individually delete any sort of
0:36
images that you select you will also see
0:38
the live preview of whichever images
0:40
that you selected right at the bottom
0:42
side of the corner so in this
0:45
way uh this is actually the actual
0:48
component for react CH the name of the
0:51
package is react images upload so if you
0:55
just go to npmjs and just search for
0:58
this package react image is upload so
1:01
it's a drag and drop image upload
1:04
component with validation and live
1:06
preview it's almost got 31,000 weekly
1:09
downloads so this is actually the
1:11
command npmi react images upload I've
1:14
already installed it so I will show you
1:17
this example so just make a simple
1:20
functional
1:21
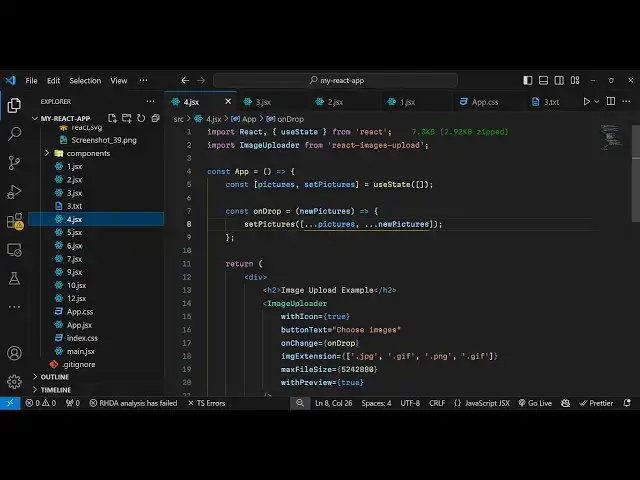
component and uh we will just import
1:24
this component using the import
1:25
statement so import image uploader
1:30
and from react images upload so we are
1:34
importing this component it is having
1:36
image uploader so now to use this we
1:39
need to keep track of which images are
1:42
uploaded so you'll have a variable for
1:45
this pictures set pictures and we'll be
1:47
using the UST State
1:49
hook initial value will be Mt
1:54
AR so after this we will inside the jsx
1:58
it is very easy to configure this
2:00
so we will have a H2
2:03
heading and will simply say image upload
2:10
example and then have we have this
2:12
component image uploader and inside this
2:15
component it Tak some options first of
2:17
all with
2:19
icon so if you also want to show the
2:21
icons you can put it to true and
2:24
whatever is the button text you want to
2:25
configure you can configure it using
2:28
this option choose images let we choose
2:30
it then we can even provide whichever
2:34
image extensions we will be accepting so
2:37
we will be accepting JPG
2:39
files so jpg
2:45
dog.png so in this way you can configure
2:48
this and also we can configure the
2:49
maximum file size of each image so this
2:53
is the value inside
2:55
bytes so it's roughly equal to 5
2:58
megabytes and then if you also want to
3:00
show the preview of the image you can
3:02
even configure this it's a Boolean
3:04
parameter I can say true so if you just
3:07
refresh your application you will see
3:09
with this code you will guess this nice
3:12
little component with the default
3:14
styling if you choose the
3:17
files you will see the preview of the
3:20
files will be there you will also get
3:21
this cross icon if you click any of this
3:24
the images will get removed with this
3:27
nice little animation so this this is
3:29
the component and also we can show the
3:32
images which are
3:34
selected and we can even bind a on
3:39
drop on change event handler so whenever
3:42
you select some images so we can Define
3:44
this function on drop it's a custom
3:47
function
3:48
so WR
3:51
here
3:54
onrop so you'll get this pictures which
3:57
are selected right here and uh you can
4:00
set the
4:01
pictures dot dot dot in the
4:09
array so inside this UST State variable
4:12
we are just looping just adding it to
4:14
the array whatever pictures selected by
4:16
the user now to show those pictures it's
4:19
very easy we
4:23
will inside this H3 tag we will say
4:27
selected images preview
4:33
and I will just Loop through each image
4:35
by using the map function we can inside
4:37
cly bracket we can say pictures.
4:40
map and for each picture we
4:46
will have the image tag and inside this
4:49
image tag we will actually display each
4:52
image so we can display this image right
4:55
here so we can give it a width of 100
4:59
pixel margin 5 pixels so in this way you
5:02
can show the image so whenever you
5:04
select now the images you will
5:06
see the selected images preview so in
5:09
this way you can choose your images so
5:12
thank you very much for watching this
5:13
video and do check out my website as
5:15
well free mediat tools.com which
5:18
contains thousands of free tools
5:19
regarding audio video and image and I
5:21
will be seeing you in the next video