Up next in 10

Node.js Express Project to Export Multiple Images to PDF Document Using ImageMagick in Browser
Jan 9, 2025
Buy the full source code of the application here:
https://procodestore.com/index.php/product/node-js-express-project-to-export-multiple-images-to-pdf-document-using-imagemagick-in-browser/
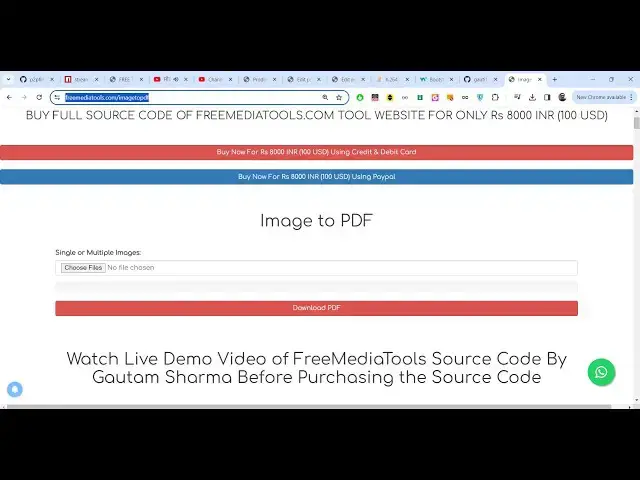
See the Live Demo of the tool here:
https://freemediatools.com/imagetopdf
Official Website:
https://freemediatools.com
Show More Show Less View Video Transcript
0:00
uh hello guys welcome to this video so
0:02
in this video we will actually build out
0:04
a web application which allows you to
0:06
convert images multiple images to PDF
0:09
document using image magic library in
0:11
nodejs Express so you can basically see
0:14
this is the application we will building
0:16
and I'm just running this application on
0:18
Local Host 3000 and uh here you need to
0:21
have this is actually interface which we
0:23
developed using bootstrap and here we
0:26
have this choose file Button as you
0:28
basically select this button air drop
0:30
down will open here you will be able to
0:32
select your image images so I will go
0:36
into this so you can basically select uh
0:39
image files like this let me select
0:42
these two images and then click on this
0:44
button convert to PDF so it will
0:47
actually use the image magic command
0:49
automatically it will convert those
0:51
images to PDF document so now you can
0:53
see it has taking the full space in the
0:55
page so this is actual first page in the
0:57
PDF document which contains the first
0:59
image
1:00
and this is a second image which
1:01
contains the second page of the PDF
1:04
document so in this way we will able to
1:07
convert our multiple PNG jpg images to
1:10
PDF document using nodejs Express so you
1:13
can basically select as many images as
1:15
you want let's
1:17
suppose
1:19
I select all these images six
1:24
images and you will basically see now it
1:27
has
1:28
uh
1:30
six six pages each image taking the full
1:34
page of the PDF document so if you need
1:37
uh basically the live demo guys I have
1:39
also deployed this application on my
1:42
free uh media tools website so this is
1:45
the URL you can go and uh this is my
1:49
official tool right here you can check
1:50
out the live demo as well here you again
1:53
need to check uh just paste your images
1:56
whichever images you are taking so just
1:59
click download PDF so it will upload the
2:01
files with the progress bar and now
2:03
you'll basically see it will uh just
2:07
give you the PDF file so you can also
2:09
try out this application I've deployed
2:11
this on the URL I have given the link
2:13
you can just try out on my free media
2:16
tools website image to PDF and we will
2:19
building this tool and if you need the
2:21
full source code guys I have also given
2:22
the link in the description for the
2:24
source code you can directly purchase it
2:26
it uh you will get a zip file which will
2:28
actually contain this directory
2:29
structure you can purchase it after the
2:31
payment you will be able to download it
2:33
from Google Drive now let's get started
2:35
by building this application so the we
2:38
are actually using image magic Library
2:40
if you don't know image magic it's a
2:42
free open source image processing
2:45
library and uh it has its own command
2:48
line tool utility we are using that and
2:50
you just need to download that for
2:52
Windows it is available for Linux
2:54
Windows Mac it's a crossplatform
2:56
software so once you install this exe
2:59
file you just just need to open your
3:00
command line and just type magic so as
3:02
you type here magic the command will
3:05
work so successfully we have installed
3:07
image magic so now we are in a situation
3:11
to actually make our file so what I will
3:13
do is that I will delete all the source
3:16
code and start from scratch so here
3:19
first of all guys what we need to do
3:21
right here we need our Express server so
3:24
we are developing this application in
3:26
nodejs Express so we need some modules
3:30
so right
3:31
here we need to install npmi Express and
3:35
then malter so these two packages are
3:37
required for this application guys so
3:39
Express will be the backend server on
3:41
which our app will be running and malter
3:44
will be the library which will be
3:45
allowing us to actually upload the image
3:47
files to our web backend server so these
3:50
two modules are required simply install
3:52
these by using this command so I have
3:55
already installed this so I will just
3:57
start my application node more index GS
4:00
so now right here we will basically
4:03
import our Express module so we will
4:06
import the express module and we will
4:08
actually make a new app
4:11
Express and we will listen this app on
4:14
port number 5,000 so in the call back
4:16
function we can simply write a console
4:18
log statement that app is listening on
4:21
Port
4:22
5,000 so if you just refresh now and see
4:25
app is listening on Port 5,000 so after
4:28
that guys we also Al need to uh import
4:31
some uh just show some thing on the
4:34
screen so we will make a get request so
4:37
some if someone goes to the homepage we
4:40
will actually show the template here
4:43
response send file
4:45
and in the root directory we will be
4:49
making a file which is index.html so
4:52
right here what we are telling right
4:53
here if someone opens the homepage we
4:56
were we are sending this template right
4:57
here we will actually change this title
5:00
to image to PDF and simply have a
5:03
heading which is image to PDF converter
5:07
so if you just write this and just go to
5:09
your local host 5,000 you will actually
5:12
see this will be coming right here the
5:15
heading is coming so now we just need to
5:17
construct our template so the template
5:20
is very simple we here we are actually
5:24
using bootstrap so simply include the
5:26
bootstrap link tag after the title so we
5:29
have included the bootstrap CDN so after
5:33
that guys we also need to use the
5:35
container class of bootstrap inside that
5:37
we will show a heading so we will have a
5:41
text Center class of bootstrap to
5:43
actually align the heading in the center
5:45
position so we will say that convert
5:47
image to
5:52
PDF so then we will actually have a form
5:56
tag SL merch and here we make a simple
6:00
post request and encoding type you need
6:02
to make multiart form data because we
6:04
are uploading images so these three
6:07
attributes we need to give to the form
6:09
tag and then we will have the form group
6:12
class so bootstrap and here we will
6:14
actually have input type file where we
6:17
will allow the user to upload files so
6:19
here we need to give this name attribute
6:21
which we will be using in the backend
6:22
server code uh you need to just give it
6:25
a anything you can give I'm just giving
6:28
files here and we will the user to
6:30
upload multiple files so we will give it
6:31
this multiple attribute and this is a
6:34
required field so user must submit the
6:36
files and we will be giving a class to
6:39
it of form control it's a bootstrap
6:41
class so if you just refresh now you
6:43
will actually see this aligning here
6:45
this is a choose file button and here
6:47
you will be able to select your PNG and
6:49
jpg images after that guys what we need
6:52
to do is that we need to have a button
6:55
again we will give a form group class
6:57
and here the button will be a convert
7:00
image to
7:03
PDF we'll give it a class of BTM these
7:06
are our bootstrap classes BTN BTN danger
7:09
BTN block so if you see there will be
7:12
this button it will take full space
7:14
convert image to PDF you can even change
7:17
this color to primary so this will
7:19
change to blue color so various classes
7:21
are there in bootstrap
7:26
so so now if you see the it will will
7:29
change to blue color so now we just need
7:33
to now make this post request when we
7:36
actually make this post request we need
7:38
to make this/ merge in our backend code
7:41
so right here we will make this post
7:43
request app post SL
7:46
merge so before you basically convert
7:50
the images to PDF you need to upload the
7:52
images for uploading the images we need
7:55
to import our malter package so right
7:57
here at the very top we will need to
7:59
import the M
8:02
package so we also need the path module
8:05
which is a built-in module so require it
8:09
and here we will also need to uh include
8:13
two more lines for the body parts of
8:17
middle we so here express. URL encoded
8:20
extended to false this is required guys
8:23
because we are working with FS because
8:26
we have given this name attribute right
8:27
here so now to get this value in the
8:29
backend server we need this body passer
8:32
middleware so these two lines we need to
8:33
write which is Express Json Express do
8:38
Json you need to write this line so
8:41
after you do this guys uh now what we
8:45
need to do is that we need to first of
8:47
all make the storage for storing the
8:52
files for uploading the files for doing
8:54
that we need to make a object of storage
8:57
and malter contains these two methods
8:59
either you can store it on the disk
9:01
physical dis storage so we will be
9:03
storing it inside our backend server and
9:07
here we will provide a destination
9:08
location where you need to actually
9:10
store the files so we will be storing it
9:13
inside uh a directory here we will
9:16
mention this directory called as in the
9:18
public sl/ uploads so just make sure you
9:22
create this directory structure in the
9:24
project just create a public directory
9:27
inside that we will create a uploads
9:29
directory so here all the image files
9:31
will get uploaded once the user selects
9:34
them so we will I provided this location
9:37
after that the actual file name what
9:39
file name it will be given so function
9:41
request file call back and here we will
9:44
give it the actual file name that it
9:47
will be giving so file do field name and
9:51
here we will
9:53
be using the date. Now function which
9:56
will automatically every time it will
9:58
give it a unique
9:59
name and also we will be concatenating
10:02
the extension using the path module so
10:07
it will get the extension of the file
10:09
using their original name this is the
10:11
actual storage object that we defined
10:14
and also now we will also be defining uh
10:17
filter so that we only select image
10:20
files we can even Define that at the
10:23
client side also because we do have this
10:25
attribute called as accept so we can
10:28
only accept accept image files but uh if
10:31
you want to implement it on the server
10:33
side malter do have this filtration
10:36
available so we can basically Define
10:39
Mage filter which will actually take a
10:41
call back
10:42
function and here we can simply compare
10:45
the file. MIM type property if the MIM
10:49
type we only need these three MIM
10:53
types image/png for the PNG files and
10:57
the second MIM type will be
11:01
for the jpg and the third MIM type will
11:05
be
11:09
for double equal to image/ jpg so in
11:13
either of these three cases we will
11:15
simply process the file and return true
11:18
here if this not the case in the else
11:20
block we will simply say for false you
11:23
will return and also return an error
11:25
message back to the user that new error
11:29
that
11:31
only PNG uh do
11:38
jpg and Dot
11:41
jpg format
11:45
allowed like this we return error like
11:48
this so we have basically provided the
11:51
storage and the image filter now we just
11:52
need to construct our malter middleware
11:56
so we'll call This malter And basically
11:58
pass these through which is the storage
12:02
that we defined and the file image
12:05
filter so there is a file filter
12:07
property in molter and we will provide
12:09
our own filter that we created which is
12:11
image filter now we just need to
12:14
Define
12:18
actually basically right here in the
12:20
post request we will
12:23
actually call this middleware which is
12:26
upload Dot and it contains uh a method
12:29
called as array which allows you to
12:31
upload multiple files and we will
12:33
provide this name parameter that we
12:35
Define in the index for HTML so you you
12:37
need to provide the same name parameter
12:39
right here and the second parameter is
12:42
the number of files that needs to be
12:44
uploaded at one time so we will be
12:46
uploading 100 files a Max of 100 files
12:48
we will allow the user to upload it at
12:50
one time so after that the files will
12:54
get uploaded and we will simply console
12:56
log request files just to check if it is
13:00
uploading or not now let me select our
13:02
image
13:05
files I selected these files and just
13:08
see basically uh just go to the bottom
13:12
side and now you will basically see it
13:13
will contain the array here array of
13:16
object each file has these properties
13:18
called as field name original name uh
13:21
this is a destination which is stored
13:23
you will see the full path right here if
13:25
you check your directory the files are
13:27
uploaded in the backend server
13:29
so now the code is working guys we now
13:31
need to process these files so first of
13:34
all we will create a global variable
13:37
which is list right here at the very
13:47
top so just create a list so we can
13:50
access it right here globally so we will
13:53
simply say if
13:55
uh request if the files are it in that
14:01
case we will basically say request
14:04
files. for each
14:06
file for each image file we will uh add
14:10
this to the list plus is equal
14:12
to and in backtick symbol we will print
14:16
the path file. path and list plus and
14:19
then we will
14:22
be plus is equal to and we will give it
14:25
a some space right here like this and
14:27
now if you see
14:32
so I think if you console
14:36
loog
14:40
list uh basically list will contain all
14:42
the file paths that we have in this
14:44
format so file path will be there space
14:48
the second file will come third file
14:50
will come like this so after we do this
14:52
we we have this in mag image magic we
14:55
have a command right here which we can
14:58
execute and for executing
15:00
programmatically we will actually use a
15:02
module called as
15:04
execute from Child process so this is a
15:07
built-in module in
15:09
nodejs and we will make use of this
15:12
image sorry
15:15
execute and Magic
15:18
convert and here we will provide our
15:22
list and here we also need to give it an
15:25
output file name output file name let me
15:27
construct it
15:29
and date. now every time it will be
15:31
unique
15:34
output.pdf we'll give it this output
15:37
file
15:40
name and then error standard output
15:44
standard error this is a call back
15:46
function and inside this we will
15:48
basically say if any sort of error take
15:51
place then we will throw this error if
15:53
no error take place then we will
15:54
actually download the file so for
15:56
downloading the file in Express we have
15:58
the download function and output file
16:01
name we will download this that's all
16:05
this completes the application let me
16:07
format the code right
16:11
here so if you basically now select our
16:16
images so now you can see that your
16:19
images are successfully converted to PDF
16:22
documents right here and uh you can see
16:24
that you can even try out my tool which
16:27
is deployed guys you can go to free fre
16:29
mediat tools.com images to PDF I have
16:31
given the link in the description you
16:33
can try out the live demo and if you are
16:34
interested you can also purchase the
16:36
full source code as well if you have any
16:38
sort of Doubt so this was the
16:41
application guys so please hit that like
16:45
button subscribe the channel you can see
16:47
that you can select multiple images like
16:50
this click on this button and it will
16:53
basically download it as a PDF document
16:55
so please hit that like button subscribe
16:57
the channel and I will be seeing you in
17:00
the next video
#Programming
#Web Services