Up next in 10

Next.js Html2canvas Example to Capture Webpage Screenshot as PNG Image in Browser Using React.js
Jan 9, 2025
Buy the full source code of application here:
Show More Show Less View Video Transcript
0:01
uh hello guys welcome to this video so
0:02
in this video we'll look at how to
0:04
convert your export your uh canvas to an
0:09
image so how to take a screenshot of
0:11
your web page using HTML to Canvas
0:14
library and we will be using next CH I
0:17
will show you this application you on
0:19
your screen that you can see we have a
0:22
canvas right here and we have a button
0:25
as well so if I click this button of
0:27
capture screenshot it will actually take
0:30
the screenshot of the canvas and you
0:32
will see now there is an option to
0:34
download the screenshot as a image file
0:37
if I click this button you will see the
0:38
image will get downloaded and actually
0:41
the screenshot if you see the screenshot
0:44
has been downloaded as a PNG image so we
0:47
are actually using html2 canvas library
0:50
to actually export the canvas as a image
0:52
file this is actually the library they
0:54
have their own website official website
0:57
when you'll be using next ch
1:00
for building the UI so next CH is a
1:04
framework for react so first of all you
1:07
do need to install this package HTML to
1:09
Canvas so it's a npm package you can
1:13
install it using the npm command so let
1:17
me
1:18
just open the zoomit
1:23
tool this is a package HTML to Canvas
1:27
and it has almost 1 million weekly
1:29
download down Lo
1:33
s so after you download this you can in
1:37
actually directly use this so what I
1:41
will do I will make a brand new
1:44
component a functional
1:47
component so we have this functional
1:49
component right here after you install
1:52
this package you can directly include
1:55
this at the very top like this HT uh
1:58
import HTML 2 can
2:01
from HTML to
2:04
canvas in this way you can import this
2:06
package at the very top and then we need
2:09
to
2:11
write the actual code
2:24
for so now to make this component
2:32
first of all you do need
2:41
toes yeah the very first thing we need
2:43
to do uh inside this component we need
2:46
to add a return
2:47
statement and inside this we need
2:50
to actually have a
2:54
button the button will be responsible
2:58
inside the div
3:00
we will have a button to
3:03
actually capture
3:05
screenshot so the label of the button
3:07
will be simply captured
3:10
screenshot and we can actually bind a
3:13
onclick listener to the button so when
3:15
we click the button we will be executing
3:17
this function which is handle
3:26
capture so if you try to run this
3:28
application it has compiled successfully
3:32
and it will actually show you a
3:35
button we do need to execute this
3:38
function handle capture we do need to
3:40
write this
3:42
function so we can actually declare this
3:45
function at the
3:49
here it will be a Asing function
3:53
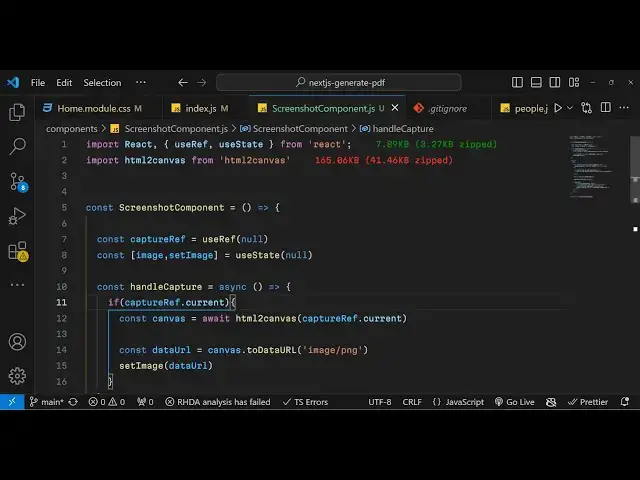
so for doing this we need to declare two
3:56
State variables inside next chair so
3:59
simply say capture ref use ref and we
4:03
need to declare it as null the second
4:06
one is the actual image that will be
4:08
taken image set image and UST State hook
4:12
we will use of react Chas and it should
4:14
be null these two State variables we
4:17
will have and when we click this button
4:20
uh we will first of all need to have a
4:24
div area that needs to be captured so
4:26
inside this we will have another
4:30
diff which we will give it an ID here to
4:33
this
4:36
div sorry you'll give it a ref attribute
4:40
so this will be capture ref that we
4:45
declare and we will be giving basically
4:47
a style to it in double quy brackets you
4:50
can
4:52
write attributes we can give padding and
4:55
then we can also give background color
5:04
of gray color F3 F3 F3 this is a white
5:10
color whitish color and then we can even
5:13
give a border of one
5:16
pixel
5:18
solid this color that you see so after
5:23
you do this
5:25
uh inside your H1 tag we will
5:29
have a heading which will simply say
5:32
hello next CH and HTML to
5:37
Canvas and then you have a simple
5:39
paragraph you can have any HTML that you
5:42
want I'm just having some basic HTML
5:45
this is the area that we want
5:47
to
5:49
capture as a
5:51
screenshot so we just have the set of
5:54
HTML elements that we will
5:58
capture and capture it as a image so
6:02
when we click this button we'll have
6:04
execute this function handle capture
6:08
so now what we need to do we need to
6:11
capture this as a image file so first of
6:15
all have a if condition right here if
6:17
capture ref do
6:19
current so here we are simply comparing
6:22
so we have given this capture ref ref
6:25
attribute to it so we just comparing it
6:28
that if this attribute exist then only
6:31
execute this code and in that case we
6:33
need to capture the screenshot and we
6:36
will simply say
6:37
await and we will initialize this
6:40
Library HTML to Canvas and then we
6:43
simply say capture ref and we will
6:46
current capture the current reference
6:48
and now we need to convert this into a
6:51
base 64 URL so we'll be using two data
6:55
URL and we'll simply say image/png
6:59
and then we will set this image data URL
7:03
like this so you can see we are using
7:05
this canvas API to actually convert this
7:07
into a base 64 URL and then we are
7:10
setting this image by using this UST
7:13
State hook function set image now we
7:15
need to show this image in the browser
7:18
now to show it just after this button we
7:22
will simply inside Cy bracket image if
7:25
the image exist in that case only in add
7:29
condition
7:30
we will have writing this GSX code
7:32
dynamically will show this image so
7:35
inside this div we will have the style
7:38
attribute and margin top 20
7:44
pixel so inside this we will have
7:46
basically our image
7:50
tag we show the
7:56
image have a alt attribute of captured
8:05
screenshot and we will also have a href
8:09
when we click this download button we
8:12
will have a download
8:14
attribute it will show screenshot PNG so
8:18
this will be the file
8:20
name we also be giving display to
8:24
block
8:28
so it will simply label will be simply
8:31
download screenshot so if you refresh
8:34
the application now click the button and
8:38
you will actually see it will capture
8:39
the screenshot using this HTML to Canvas
8:43
library and uh then it will show this
8:45
button download screenshot if you click
8:47
it you will actually download the image
8:50
as a screenshot and you will see that
8:52
the image is successfully taken of the
8:55
canvas and as a image file and it has
8:58
been downloaded so in this this way you
9:00
can do this integrate your HTML to
9:02
Canvas library inside uh next chairs and
9:06
react chairs you can write a simple
9:08
component where we have a button we
9:10
click the button and then we take the
9:12
screenshot and download the image as it
9:15
and in the the browser as an attachment
9:18
so thank you very much for watching this
9:20
video guys and do check out my website
9:22
as well free media tools.com which
9:24
contains a free tools regarding audio
9:27
video and image and I will be seeing you
9:29
guys in the next video
#Other