live_tv
Livestream Starting Soon
00
Hours
:
00
Minutes
:
00
Seconds
Up next in 10

Javascript RasterizeHTML.js Example to Take Screenshot of HTML as PNG Image in Browser
Jan 9, 2025
Get the full source code of application here:
https://gist.github.com/gauti123456/ffcb8239ee6f26b0dea2c902400d772b
Show More Show Less View Video Transcript
0:00
uh Hello friends welcome to this video
0:02
so in this video we'll talk about
0:03
another JavaScript open-source Library
0:06
which allows you to capture the
0:09
screenshot of a HTML element or part of
0:13
the web page and convert this into a PNG
0:16
or JPG file so this is actually the uh
0:19
application right here you will take the
0:21
screenshot of this section you have this
0:23
button out there if I click this button
0:25
you will see it will take the screenshot
0:26
of this section and we can download this
0:29
as a PNG file image file so you can just
0:32
see the section has been converted to a
0:35
image file so the library that we will
0:38
be using for this is
0:41
rasterize
0:42
HTML this is actually the library it's a
0:46
open source uh JavaScript library which
0:48
works in the client site it also has a
0:51
nodejs module as well which has got 8,5
0:55
to 5 weekly downloads but we'll be using
0:57
it in the browser using the CDN this
1:00
this is their official
1:02
website so what this it does it actually
1:05
converts the Dom right here it allows
1:07
you to capture the screenshot of part of
1:09
the web page and download as a PNG file
1:12
so all the source code will be given in
1:14
the description so if you need the
1:16
source code you can go to the
1:17
description so just create a simple HTML
1:21
file right here and we giving
1:24
a title to it and we do need to include
1:27
the CDN for this for using this slide
1:30
library and also we will be using
1:32
Tailwind
1:34
CSS for making the user
1:39
interface and then you'll be giving BG
1:42
gray 100 and then we'll be having the
1:46
container
1:48
class to make it in the center
1:53
position so here you'll be having a
1:55
simple H1
1:58
tag so if I just open this now it will
2:01
look something like
2:03
this so here we we need a simple section
2:07
where we will have that
2:11
section we'll give it an ID here capture
2:14
section and
2:19
some Tailwind classes BG white padding
2:23
it and it will be rounded large divided
2:27
Shadow on large devices
2:30
and here you'll be having a set of HTML
2:33
we will have a heading and a paragraph
2:34
simple you can have more HTML elements
2:37
as well so I'm just taking a simple
2:40
example to tell you about it so we have
2:42
this section right here which has a
2:44
heading and a simple
2:49
paragraph So This is actually
2:53
the simple section that we will try to
2:58
convert that into a image file then
3:01
after that we will be having a
3:05
simple button which will simply say
3:08
capture
3:13
screenshot we will be giving an ID to it
3:15
of capture
3:19
button so we'll be
3:23
giving some classes to the button
3:25
Tailwind classes
3:30
so it will look something like
3:34
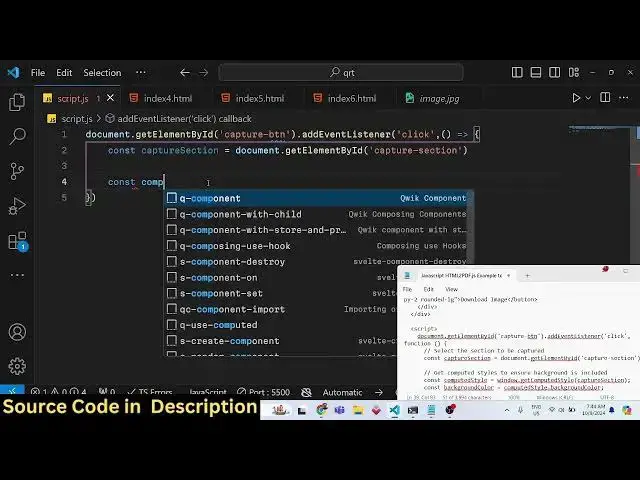
this and then here we need to write the
3:37
JavaScript code here so inside
3:42
script.js we will first of all get the
3:45
reference we will bind a onclick
3:47
listener to the capture button so when
3:50
you click that capture button this call
3:54
back function will
3:58
execute so here be getting
4:03
the
4:05
reference to whichever section that we
4:07
want to convert this into image after
4:10
getting that we will
4:12
simply
4:14
make window. get computed style and you
4:19
using this function to get the capture
4:22
section so here we are simply telling
4:25
the application to actually include the
4:28
CSS Styles as well
4:32
and here you'll be getting the
4:33
background color using this property
4:36
computed style it contains this property
4:38
which is background all the CSS
4:41
properties so we want the background
4:45
color and then you'll be H creating a
4:48
canvas
4:53
element so you can use it the create
4:56
element function in do to actually
4:58
create a Dynamic
5:02
element we'll be using the canvas
5:04
element and then we will draw it using
5:07
the 2D context to get the context we'll
5:09
be using this function get context we'll
5:12
be getting the 2D context after getting
5:15
the context we will be getting the
5:17
canvas width by using capture section do
5:23
offset
5:24
width similarly you'll be getting the
5:27
height as
5:28
well while offset
5:31
height then we need to set the
5:34
background color by using the fill style
5:37
property then we need to draw a
5:40
rectangle by using the fill rectangle
5:43
method and here it takes four arguments
5:45
first is x and y coordinate the rest two
5:48
arguments are the canvas width and
5:50
canvas
5:55
height and now we'll be using the
5:58
library which will be rasterize HTML
6:03
library for using this we use this
6:06
rasterize
6:07
HTML and it contains a function which is
6:10
draw HTML so here you'll be passing the
6:13
section cap section do inner HTML
6:16
everything which is there the HTML and
6:20
then we will draw this onto this canvas
6:23
that we created this
6:26
element and uh this returns a promise we
6:30
can handle this using dot then and then
6:32
it will actually return this variable
6:34
render
6:37
result I think this is
6:39
actually the canvas element so we can
6:42
convert this into base 64 code using
6:45
this function two data URL which is
6:46
present in every browser and here we
6:49
need to convert this into a PNG file so
6:51
we will writing this MIM type which is
6:53
image/png
6:56
and now we need to show this image in
7:00
live preview for showing it we do need
7:02
to add some HTML in
7:05
the for the image to be shown so right
7:08
after the
7:10
button we will have a simple dep
7:17
section so here we'll be showing the
7:20
actual image which is taken by roriz
7:22
HTML so we have this s tag screenshot
7:25
preview we have given an ID to it of
7:28
preview container and in this image we
7:30
have given an ID to this image
7:31
screenshot preview and a download button
7:34
which will actually download this image
7:36
file so now in the uh JavaScript we will
7:40
simply Target and show this
7:44
image and for showing it first of all we
7:47
do need to get the preview container we
7:50
have given an ID to
7:56
it screenshot
8:00
container and then we need to get access
8:03
to the image element as well so again we
8:05
have given the ID here
8:09
screenshot
8:12
preview so now we can simply add this
8:15
remove this class first of all of hidden
8:18
by default it will be hidden because we
8:20
have given this class if you see in the
8:23
HTML this hidden class so we are
8:25
removing it dynamically using JavaScript
8:27
using class list. remove
8:30
after this we'll
8:31
be in the image
8:33
tag we will be manipulating the source
8:36
which will be data URL and then you'll
8:39
be enable the
8:41
download So for enabling the download we
8:44
will
8:45
be download button and we'll be finding
8:50
a on click listener so when we click the
8:52
download function uh button we need to
8:56
download the
8:58
image so if you check right here if you
9:01
click the capture
9:04
button I think some error has taken
9:06
place Riz HTML is not defined okay I
9:09
made a spelling
9:11
mistake this needs to be
9:15
rized
9:17
HTML so just make sure the spelling is
9:19
this
9:26
one let me check cannot three properties
9:30
of null class list on line number
9:37
31 uh let me
9:44
check preview container preview
9:47
container screenshot container let me
9:50
check if we
9:52
have sorry this is this is uh preview
9:55
container not screenshot container this
9:58
is preview container
10:03
so now you can see if I click that it
10:06
has taken the screenshot and a download
10:07
image is showing now to make this
10:10
download button working we do need
10:13
to download the image for downloading it
10:16
we will be using a anchor element we
10:19
will be creating this anchor element
10:23
dynamically so link. HF
10:29
is equal to data URL link. download
10:35
is result.png
10:37
and then we'll be clicking this
10:40
dynamically so this completes the
10:43
application if I refresh it click the
10:45
capture screenshot button it will take
10:47
the screenshot and then we can download
10:50
this as a PNG
10:53
file so you will see the quality of the
10:55
image is uh good it has taken everything
11:00
that is mentioned inside this section so
11:02
in this way you can Target any section
11:04
in the web page and take a screenshot as
11:06
a PNG file using this library of roriz
11:09
HTML so I have shown you a complete
11:11
example if you need the source code the
11:13
link is given in the description you can
11:15
get the full source code and please hit
11:17
that like button subscribe the channel
11:19
as well and I will be seeing you in the
11:21
next video
#Online Goodies
#Clip Art & Animated GIFs
#Open Source
#Other