Up next in 10

Javascript HTML2Canvas.js Example to Take Screenshot of Webpage as PNG Image in Browser
Jan 9, 2025
Get the full source code of application here:
https://gist.github.com/gauti123456/67f596c201764c1118f92eceb0ffb7d5
Show More Show Less View Video Transcript
0:00
uh hello guys welcome to this video so
0:02
in this video we'll be looking at one
0:03
other open source Library which actually
0:06
takes the screenshot of the whole web
0:08
page and it can actually convert this
0:11
into a PNG or jpg image file so the name
0:14
of the library is html2 canvas Library
0:17
which is really famous if you just type
0:19
this on Google html2
0:22
canvas so the very first result which
0:25
comes which this is their official
0:27
documentation the website it takes the
0:29
HTML
0:30
and they you can even try this on online
0:33
as well try it
0:34
[Music]
0:35
out so it is just we have the capture
0:39
button so it will actually take the
0:40
screenshot of the web page and now you
0:43
can download this
0:45
image as a PNG so you can see that
0:48
everything that it contains the HT uh
0:51
website it has taken the screenshot of
0:54
that website and Export it as a image
0:57
file so exactly we'll be doing the same
0:59
process in this video as well we have
1:01
this section right here we will take the
1:03
screenshot of it if I click that button
1:06
you will actually
1:07
see now we can download this as a PNG
1:11
image
1:13
file so we will take an example of it
1:16
all the source code that I will use in
1:18
this video is given in the description
1:21
so now to get
1:23
started we will be using this library in
1:26
the
1:26
browser just make a simple index.html
1:29
file and you'll be giving a title to it
1:32
of JavaScript HTML to
1:38
Canvas
1:40
example and then we just need to paste
1:43
the CDN
1:48
link so you can grab it from their
1:51
official website and also we are using
1:53
tailin CSS for making the user interface
1:55
of this application so we also grabbed
1:58
the CDN for that also
2:01
so and then we will be giving a
2:05
background G gray color so these are all
2:07
tailin
2:11
classes then we'll make
2:13
the in the center position so MX Auto
2:17
padding a
2:20
container then we'll be having a simple
2:23
heading which will simply
2:25
say screenshot
2:28
app so essentially we are actually
2:31
converting this HTML and we are taking
2:34
the
2:35
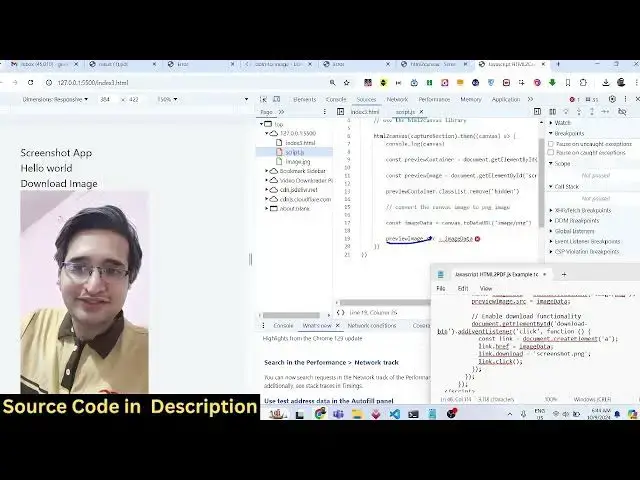
screenshot so we can actually have a div
2:38
tag you can give it an ID of capture
2:41
section so whatever that you put inside
2:44
this div it will it will be taken as a
2:46
screenshot so we can have a heading here
2:49
which will say hello world we can even
2:52
have a button as well which will say
2:54
download
2:57
image so we can even have a image as
2:59
well
3:00
so if you see we have this image present
3:03
you can give it a width and
3:07
height then if you want to take the
3:10
screenshot what you will
3:18
say so right at the bottom here you'll
3:22
have a button which will say that uh
3:25
capture
3:27
screenshot so you'll be giving an uh ID
3:30
to it of capture button so when we click
3:32
that
3:36
button so here after this we will
3:40
be writing the JavaScript
3:43
code so you'll be referencing it in a
3:46
separate file so
3:48
script.js so you'll be referencing the
3:50
button that we have given an ID capture
3:53
button so you'll be binding a on click
3:56
listener to it so when we click that
3:58
button we will be getting the reference
4:01
of that capture section that we given so
4:05
we need to take the screenshot of this
4:09
section so you can pass you are passing
4:11
the ID here which you have given if you
4:14
see capture section so this is actually
4:17
the div that we need to take the
4:21
screenshot and here we'll be using the
4:23
HTML to Canvas
4:25
Library so we simply call HTML to Canvas
4:29
and then we we pass the reference of the
4:31
section in this case it is located in
4:34
this variable capture section and then
4:36
it returns a promise and here in this we
4:40
have the canvas right
4:42
here
4:43
so we have this canvas
4:48
returned now we can export this canvas
4:50
as a image file so if you refresh now we
4:54
have this uh all this HTML and if I
4:57
click this button of capture screenshot
5:00
you will see in the inspect element this
5:03
canvas tag will be returned width will
5:05
be500 height
5:08
631 so now using this tag we can
5:13
actually now to show the live preview of
5:16
the image taken in the HTML just make
5:19
sure that you have something which is
5:23
div an ID of preview container
5:36
so here basically what we are doing
5:39
right here we are having a simple H3
5:45
tag screenshot
5:49
preview then we have a button of
5:52
download
5:55
image you can give it an ID to it of
5:58
download button and also so
6:00
here so we have given the ID here of
6:03
download button and a ID here preview
6:06
container so here we will be
6:10
targeting where we need to show this
6:13
image which has been taken so we will
6:18
Target that container preview
6:22
container we have given this uh ID here
6:26
of preview container after getting the
6:28
reference of that
6:30
element now we
6:32
can also get the reference of the image
6:35
tag in which we need to show the
6:37
screenshot
6:39
image and then here you'll be saying
6:42
preview container class list remove
6:45
hidden so by default it will be hidden
6:48
so if you see we also need to attach the
6:51
hidden
6:53
class so inside here class hidden so
6:58
here we have added this hidden class so
7:01
by default it will not be shown when we
7:03
load the page but after we click the
7:06
capture screenshot button then the
7:07
screenshot will show so we are
7:10
programmatically removing it using class
7:12
list. remove
7:15
hidden and then we the most important
7:17
step we need to convert the canvas image
7:20
to PNG image for doing this we will
7:24
declare a variable of image data and
7:27
then canvas contains a method which is
7:29
two data URL and here it'll be saying uh
7:34
we need to convert this into a image/png
7:36
image file and then preview image.
7:41
Source will be equal to image
7:44
data so it will act this function two
7:46
data URL it is present in every browser
7:50
and it actually converts the canvas to
7:52
base 64 code and it will have this
7:54
inside this variable and then we'll be
7:57
showing this base 64 in the image
8:03
tag so now if you see if you click that
8:06
capture screenshot
8:12
button so it is saying that cannot set
8:15
properties of null setting
8:18
Source preview image let me preview
8:22
screenshot preview let me check if we
8:25
have given an ID here okay sorry we do
8:29
need to have the image tag as
8:32
well we need to give it an ID here
8:36
of screenshot
8:39
preview just make sure that you have a
8:42
image tag and I have an ID here of
8:44
screenshot
8:46
preview so now if you click the capture
8:49
screenshot you will see it will actually
8:50
take the screenshot of this and
8:54
uh now we can actually bind uh a on
8:58
click listener to the download image as
9:00
well so when we do click the download
9:09
button this download button we click it
9:12
we need
9:14
to uh download the image file so you can
9:17
b a on click listener to
9:22
this so here we'll be creating a anchor
9:25
tag
9:30
link.
9:32
HF will be the image
9:37
data the file name let me choose
9:40
result.png
9:42
and link.
9:46
click so that's all if you click this
9:49
now it takes the screenshot download
9:54
image if you check we have given this ID
9:57
here of download button
10:07
okay sorry we do need to move this code
10:09
right in the function
10:12
itself just after this step we need to
10:14
write this in the function itself we are
10:18
taking the
10:19
screenshot
10:21
this binding of this on click listener
10:24
should be there in this function itself
10:26
so if you click this download image you
10:29
will see your it will be converted into
10:32
a PNG
10:33
file so now we can simply style this
10:36
using Tailwind CSS so that this
10:39
application can be looking good so we
10:41
can add the Tailwind classes
10:48
to so we can add this margin top
10:54
six you can align it in the center
10:57
position text Center
11:00
and then we can
11:01
have hh3 tag text Excel font semi bolt
11:08
margin bottom
11:13
four and here we can make give it an ID
11:17
to this image MX
11:21
Auto we can give it a border to this
11:23
image border
11:25
gray so you can just see we are applying
11:27
custom CSS using Tailwind
11:33
CSS and
11:36
also to this download button background
11:39
color let me change it to
11:44
Green ex2 py2
11:54
rounded so now if you see uh
11:59
all the source code will be present in
12:01
the
12:02
description let me just paste the HTML
12:06
which is required
12:09
here so uh so at last it will look
12:11
something like this so I just added
12:13
those Tailwind classes which is not part
12:15
of this tutorial you can make this
12:18
application without Tailwind CSS as well
12:21
just add your own custom CSS so now you
12:24
will see it will if you click this
12:27
button you will see the screenshot
12:28
preview
12:29
so the basic logic of this uh we are
12:31
using this Library HTML to Canvas which
12:34
actually takes the screenshot of the Dom
12:36
elements and convert this into a PNG
12:39
image file so in this
12:42
way you can do this process you can take
12:45
any screenshot of any web page and
12:47
actually export this into a PNG image
12:51
file so this was the short little demo
12:53
about HTML to Canvas Library
12:57
so thank you very much for watching ing
12:59
this video please hit that like button
13:01
subscribe the channel and I will be
13:03
seeing you in the next video
#Clip Art & Animated GIFs
#Skins, Themes & Wallpapers