Up next in 10

How to Deploy a Serverless Node.js & Express CRUD Backend API on Netlify Using Netlify CLI Tutorial
Mar 2, 2025
Get the full source code of application here:
https://github.com/gauti123456/nodeexpressnetlifyapp/
Watch My Visual Studio Code IDE Setup Video For Fonts,Themes & Extensions
https://youtu.be/Bon8Pm1gbX8
Hi Join the official discord server to resolve doubts here:
https://discord.gg/cRnjhk6nzW
Visit my Online Free Media Tool Website
https://freemediatools.com/
Buy Premium Scripts and Apps Here:
https://procodestore.com/
Show More Show Less View Video Transcript
0:00
uh hello guys welcome to this video so
0:02
in this video I will show you how to
0:05
deploy a serverless nodejs Express JS
0:08
backend API to netlify using netlify
0:11
command line interface so netlify is a
0:14
very popular platform if you don't know
0:17
just type netlify on Google this is
0:20
their website I've already created a
0:22
sign up for a account here just you can
0:25
if you're visiting for the very first
0:26
time this is a website netlify.com you
0:29
you can log in with your GitHub account
0:31
it does offer a free plan as well for
0:33
testing purposes so this is actually the
0:36
dashboard which looks like this and here
0:39
in this tutorial I will show you how to
0:41
deploy a backend API such as nodejs and
0:45
express so for this you should have uh
0:49
this netlify CLI installed so this is
0:51
actually the command
0:53
npmi - G for globally installing it
0:56
inside your computer and then netlify
0:58
Dash SL CLI so just execute this command
1:02
uh I have already installed it so you
1:05
will be able to access netlify using the
1:07
command line so I already have this so
1:12
if you just type netlify you will see
1:14
the command will be
1:16
successful and you can see that so we
1:19
have all these commands out there so now
1:22
to actually initialize a very basic
1:24
project let me just create a project
1:27
here node API
1:30
or node Express
1:33
API let me CD into this folder and open
1:36
it inside VSS code so you will now see
1:38
we are starting it from scratch nothing
1:41
is present in this folder so now we just
1:43
need to initialize a simple package.json
1:45
files so npm in it- y so after this we
1:49
just need to install some modules here
1:51
first of all for Express which is our
1:55
actual server web server and then the
1:58
second module which is here serverless
2:02
HTTP so we need both these modules so
2:05
simply install them by executing this
2:07
command so now after installation this
2:11
now we need to
2:13
initialize a file here which will be
2:16
specific for netlify so right in the
2:19
root folder just Define this file
2:20
netlify do TL file so this is actually
2:25
the file here netlify do
2:28
TL so in the description of this video I
2:31
have given my GitHub repo so if you have
2:34
confusion regarding any code you can
2:36
clone that GitHub repo so if you go to
2:38
my GitHub uh page right here I have
2:41
created this GitHub repo specifically
2:44
for this video so if you have any
2:46
confusion you can clone this GitHub repo
2:48
this is containing the project code so
2:51
you will see that so all these files are
2:53
present the link is given in the
2:55
description so for this we have this to
2:58
Define this netlify do TL file so what I
3:02
need to do simply copy all this code
3:04
from here and paste
3:07
it so here we are just defining this
3:10
path here where all your netlify code
3:13
will be present for this we need to
3:14
create a netlify
3:17
folder right in the root directory
3:19
netlify create this folder and inside
3:22
this folder we need to create another
3:24
folder which will
3:27
be functions
3:30
so this is a standard way if you want to
3:32
deploy a nodejs express application to
3:36
netlify you define these folders first
3:39
of all netify inside this functions
3:41
folder and right here we
3:44
will need to define a file which will be
3:49
you can call this anything I just
3:50
calling it API GS so this will be the
3:54
main file here you will write our
3:56
express code here so so just make sure
4:01
you don't use uh this required synex
4:04
because for deployment purposes uh this
4:07
required synex is not accepted instead
4:10
we need to use the latest version which
4:12
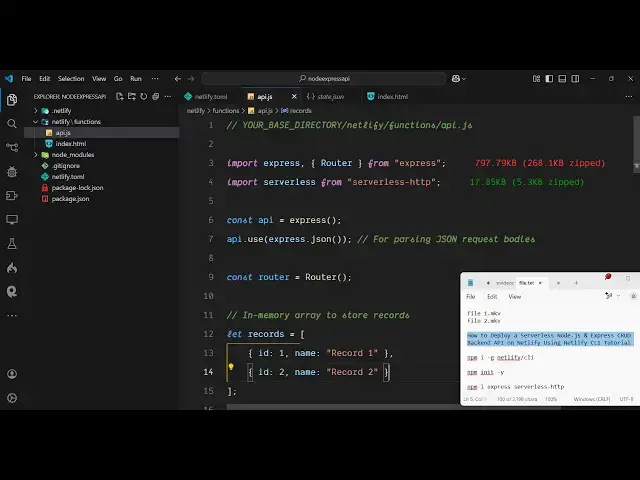
is the import statement import
4:14
Express and then we also need to import
4:18
the router which will be coming from
4:21
Express and then we need to import the
4:24
serverless which will be coming from
4:25
serverless HTTP and here we'll be
4:28
initializing a new Express app API and
4:32
we will be using
4:36
these and now for uh
4:40
actually for the router we will just
4:42
declare a simple router variable and be
4:44
using this router which we imported from
4:48
Express early
4:49
[Music]
4:51
on so after this here we can just simply
4:54
Define a simple get request so once
4:57
someone goes to the Home Route
5:00
we will simply load a simple
5:03
file so send file and here in this
5:08
directory I will just create a simple
5:10
index.html file so what we are telling
5:13
we have when someone goes to the
5:15
homepage we need to show this index.
5:17
HTML files so right here we don't need
5:19
to create in this folder we need to
5:21
specifically create in this folder
5:22
netlify functions and right here you
5:25
create your file which will be
5:27
index.html
5:30
so right here this can be any code here
5:33
let me just write a simple hello world
5:39
message let me just align it in the
5:41
center
5:43
position and just make it font weight to
5:47
be
5:50
bold so that's all uh this is uh now we
5:53
just need to start this application so
5:55
what we will do we will add the bottom
5:58
we can simply say api. use and we'll
6:03
basically make this route as/
6:06
API and then we will pass this router
6:09
and lastly we just need to say export
6:11
const Handler and just pass the
6:16
serverless serverless is coming from
6:18
this serverless do HTT HTTP so we are
6:21
simply passing this so this is the
6:24
actual configuration that we need to do
6:26
and now for deployment purpose we will
6:29
use the netlify CLI
6:33
so so if you are let me just log out
6:36
first of all and show to you from
6:38
scratch so there is a command here in
6:40
netlify to log out from your account so
6:42
this command will log out and now if you
6:46
just write this command netlify in it so
6:49
this command will actually ask you to
6:51
log in here so it will redirect the
6:53
browser to netlify.com so here you just
6:56
need to login with your get uh netlify
6:59
accounts so just click the authorize
7:02
button simply click authorize so now you
7:04
are logged in so here it will actually
7:07
tell you that do you want to create a
7:09
netlify site without a g
7:11
repository so I will select the first
7:14
option yes create and deploy site
7:16
manually or you can also connect it to
7:18
the GitHub first as well so I will
7:20
select the first option and here you
7:23
will
7:27
actually want to select your team
7:33
so just make sure that
7:40
uh let me just run this command once
7:43
again get sorry netlify in
7:54
it so now you will see uh your team will
7:57
come so my team is create here this is
8:00
your actual username of your netlify and
8:03
then netlify gives you a random name but
8:07
if you just left this empty a random
8:09
name will be assigned to it you can even
8:11
change it to a customized name as well
8:13
let me just left it empty enter so now
8:16
what it will do it will give you this uh
8:19
it will create this netlify file here
8:22
which will contain this file state. Json
8:24
which will contain the site ID for you
8:27
and after this you just need to simp it
8:29
is telling to deploy to this site please
8:32
run run this command netlify deploy so
8:35
now I just run this command here netlify
8:38
deploy and then you just need to add
8:40
this flag which is netlify deploy D-
8:44
prod which is for production so now just
8:47
enter this execute this command so what
8:50
it will do it will
8:55
actually uh deploy your application it
8:57
will take hardly just enter publish
9:00
directory it is asking so we need this
9:02
to deploy from the current directory so
9:04
just
9:05
enter and it is now deploying the site
9:08
here so just wait for the deployment to
9:11
complete so it takes almost 10 to 15
9:14
seconds so if you're doing it for the
9:15
very first
9:17
time so it is uploading all the files
9:20
and uh now you can see the deployment is
9:23
complete deploy is live so it gives you
9:26
this URL so simply copy this
9:30
URL and paste it you can see deployment
9:33
successfully you can see
9:36
your uh can see just click
9:41
it and open this
9:44
URL because this is our base URL so here
9:48
we provided SL API this is the so now
9:53
you see hello world is showing right
9:55
here because we at the last here we do
9:57
need to write / API because in the
9:59
routing if you see in the routing file I
10:03
Define this route to be using SL API so
10:06
every route that comes we need to add/
10:09
API for this this is our serverless
10:12
backend API which is deployed guys so
10:14
now you can put any sort of crud
10:16
operation let's
10:18
suppose you can go to go to the GitHub
10:20
repo so I have this sample code
10:23
available so I can just modify this
10:27
instead of
10:34
so just paste all this so This contains
10:37
all the four cred operations create read
10:40
update delete so we are simply using a
10:42
simple array variable so it declared a
10:45
simple records array array of object so
10:49
we have having these post request we
10:51
have the get
10:53
request to get all the
10:55
records so we simply getting a specific
10:59
record then we have the update we have
11:01
the delete functionality as well so now
11:04
for if I make any sort of changes you
11:06
just need to run this command once again
11:08
netlify deploy D- prod so if you make
11:12
any sort of changes just run this
11:14
command in the command line and it will
11:15
just modify your up uh
11:20
app so just enter it so anytime you make
11:24
changes just run this command once again
11:27
so it will again re deploy your site
11:30
with the changes that you have done so
11:33
it's very simple
11:37
so now you can see that so if you now if
11:40
I go to this route here you will see it
11:43
will return to me the array of Records
11:45
which are there in the Json so this is a
11:48
nice little serverless API that is
11:51
deployed now in netlify you can perform
11:53
all these four operations so if you want
11:55
to specifically get/ API SL one so
11:59
it will give the details of the first
12:01
record which is id1 name is equal to
12:04
record so you can see perfectly the API
12:07
has been deployed here so in this way I
12:10
showed you step by step so if you need
12:12
this GitHub repo the link is given in
12:14
the description you can directly clone
12:16
this and just modify it and just uh
12:20
deploy this to netlify using that
12:21
netlify CLI so thank you very much for
12:24
watching this video and also check out
12:27
my website as well free media tools
12:30
uh which contains thousands of tools
12:32
regarding audio video and image and I
12:34
will be seeing you in the next video