Up next in 10

Get the full source code of application here:
https://gist.github.com/gauti123456/66b69e504d0ced639acabb4db612131b
Show More Show Less View Video Transcript
0:00
uh hello guys welcome to this video so
0:02
in this video we will be looking at how
0:04
to create form
0:06
Fields inside PDF document and also
0:09
insert images as well using pillow
0:11
Library pillow Library as you all know
0:14
it's a python
0:16
Library if you just write p i l o
0:20
w and just write python as well the very
0:23
first link which appears this is the
0:25
module and it has its own official
0:28
website and it is is specifically used
0:30
for images but it can also be used with
0:33
PDF documents as well so I will show you
0:35
this example very good example so I've
0:38
just created this script so once I run
0:41
the script you will actually see the
0:44
form it will actually create a form
0:47
inside PDF and automatically fill it let
0:50
me just
0:51
uh execute the script app 3. ppy so you
0:55
will actually see the PDF has been saved
0:57
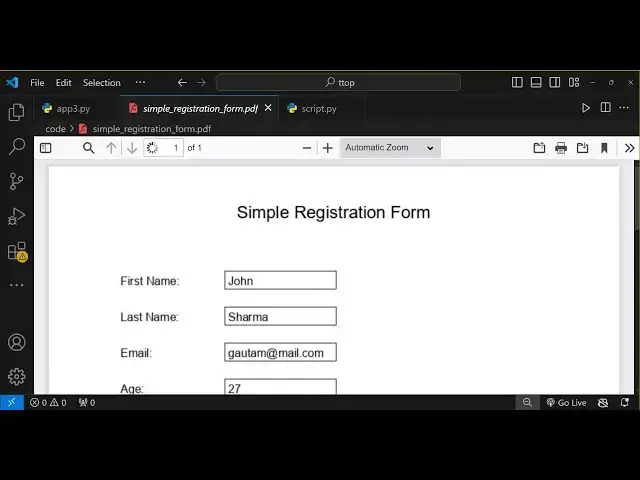
as simple registration form so we will
1:00
be having a student registration form
1:02
which will have these details pre-filled
1:05
first name last name email address age
1:08
and the profile picture you can just see
1:10
let me show you it in the browser as
1:12
well so if I open this PDF document so
1:15
it you can see that guys the actual data
1:17
student data has been pre-filled we have
1:20
this heading we have the first name last
1:22
name email address age and the profile
1:25
picture so in this way you can generate
1:27
unlimited number of copies with with the
1:30
your custom data you can change this
1:32
first name last name email address age
1:34
and also the profile picture so I just
1:36
show you step by step on how to get
1:38
started with pillow so now to install
1:41
this module first of all you do need to
1:44
execute this command
1:46
pi and you need to install it using pip
1:49
so pip install
1:51
P simply execute this command I've
1:54
already installed it so I will just
1:56
create a new script script.py
2:00
it already exist so I will simply delete
2:03
everything and start from scratch so in
2:05
this first of all what we need to do we
2:07
need to import the pillow package p p
2:11
which is in all capital letters and from
2:14
this package there is some classes we
2:16
need to import the image
2:19
class which will be used to insert
2:21
images in PDF document and then the
2:23
image draw function class image draw
2:26
which will be used to drawing uh
2:29
rectangles which will be form fields and
2:32
the image font so it is used to control
2:35
the font of the
2:37
textes so now after that we'll be
2:39
creating a custom function which will be
2:42
responsible for creating this PDF so
2:44
create simple form it will take either
2:47
two arguments the output PDF path and
2:49
the profile picture of the
2:51
student like this so inside this
2:54
function first of all we do need
2:57
to specify the dimensions of the PDF
3:00
document so you'll be taking a A4 size
3:03
so you simply say declare the page width
3:06
and the page height these two variables
3:10
and we'll simply be setting 794 comma
3:14
1123 so this is actually the width and
3:17
the height and now we need to Simply
3:19
create a blank
3:21
page with white background so you can
3:24
even control the background of the color
3:27
background of the page as well so Now to
3:30
create a new we will simply use the new
3:32
function which is there in this image
3:34
class so we will simply say RGB which is
3:38
red green blue and here specify the page
3:41
width we'll pass it and the page height
3:44
as the second
3:46
argument pageor
3:50
height and then in the third argument we
3:52
need to specify the color so I will
3:54
simply specify white so it will have the
3:57
white background so so now we need to
4:01
draw this page so now to draw this page
4:03
we'll use the draw class which is image
4:07
draw and it contains a function which is
4:09
draw and it will draw the
4:12
page so this below Library guys it's
4:15
slightly different when the output will
4:17
be generated it's slightly different
4:18
from the other libraries of PDF it
4:21
actually uses these image classes to
4:23
draw the pages rather than insert
4:26
directly so it will be slightly messy
4:29
the result but still it works so if I
4:32
just run this class if I just call
4:37
this specify the output PDF so let me
4:40
call this as
4:41
student result PDF and profile picture
4:46
is also available in the same
4:51
directory so it is profile jpg so we'll
4:55
call this function create simple form
4:59
function we pass these two
5:01
arguments output PDF and the profile
5:04
picture
5:05
path so if you just run the script now
5:08
in the left hand side you will see
5:11
python
5:16
script.py nothing has been generated you
5:18
see nothing is generated because we do
5:20
need to save this file as well so now
5:23
for saving it we have this function
5:26
which is save function you need to call
5:28
this function so this is actually the
5:30
save function we need to call it and we
5:32
need to specify the location that we got
5:34
which is output PDF path and uh the name
5:40
we will simply be saying
5:43
PDF so it will be a PDF document so
5:46
that's why we need to pass the PDF as a
5:48
second argument so if you now run this
5:51
you will actually see this student
5:53
result PDF has been created if you open
5:57
this you will see the white background
5:59
if I now change this to Red you will see
6:02
the background will
6:05
change so you can see red background you
6:07
say you can have any color so I will
6:09
stti to the white color which looks good
6:12
so after we do this we now need to add
6:17
the data so first of all we will add the
6:21
title so for specifying the title text
6:25
it will be simply be simple so it needs
6:28
to come before this save function right
6:31
after
6:34
this so the title you can change it so I
6:37
will simply say simple registration
6:40
form and then comes the uh coordinates
6:44
guys so these coordinates I pre-filled I
6:48
we just need to copy paste it so the
6:50
link is given in the description so I
6:51
just not waste the time in just writing
6:54
this let me just summarize you what is
6:56
happening so now in basic basically we
7:00
need to calculate the X position and the
7:02
Y position of placing the text in the
7:04
PDF document so we are using this
7:06
formula by using the page width and uh
7:10
we have the text size function which
7:12
will automatically detect the size of
7:14
the text and depending upon that we draw
7:17
the text on the screen on the Page by
7:20
using the text method this is the x
7:22
coordinate y coordinate the title text
7:25
and the color should be black the text
7:27
color you can also change it right right
7:29
here and then the actual text that you
7:32
want to render so after you do this
7:35
after you will
7:37
see you can see cannot access local
7:40
variable draw where it is not
7:45
associated uh let me see what is the
7:48
problem title
7:54
text okay okay sorry we missed this line
7:57
you need to specify after we did this
8:00
white we do need to create this class
8:03
which is draw we haven't done this so
8:05
image draw and it contains a draw
8:08
function and we need to draw this
8:12
page so after drawing this page we need
8:15
to specify the font as well for
8:18
specifying the font you can load any
8:20
font of your choice but we are loading
8:22
the simply the default font which is the
8:24
aial TT ttf it there in the memory so if
8:29
you have a custom Google phone that you
8:31
downloaded you can specify the path here
8:34
ttf file you can
8:35
specify so after you do this you will be
8:39
able to run the
8:42
file so it is saying that image draw has
8:44
no attribute
8:50
draw image
8:53
draw I think we imported this
9:00
let me just copy everything I think I
9:02
made some typ of
9:03
mistake so what I will do pH title
9:19
sorry so if I just run
9:23
this sorry here we need to just remove
9:26
this from this
9:35
so if you see now
9:42
uh I think some typo mistake has been
9:45
happening so what I will do I will
9:46
simply paste everything and uh just
9:50
remove this part we have done right till
9:54
now so this part I will delete
10:00
so we have done until this we have added
10:03
this heading so if I just run this
10:06
now you'll see the file is generated and
10:10
you will see this heading appearing
10:12
simple registration form so compared to
10:14
other libraries report lab fpdf and
10:18
others python libraries you will this
10:21
result may find you may find this
10:23
results little bit messy because it is
10:25
not directly writing the text it is
10:27
using the image class to render the text
10:31
it is slightly messy but it does the job
10:34
so after you do this we now need to add
10:36
this profile image in the as well as
10:38
well as the input Fields so now for
10:41
doing this we now need to have the data
10:45
here first of all so we will Define some
10:48
data in the form
10:52
label so we will create this array
10:59
so one by one we'll Define the fields
11:01
which is the first
11:03
name and the value will be and then
11:07
we specify the x coordinate and the y
11:10
coordinate 100 and 150 similarly we will
11:14
have three Moree fields which is for
11:15
last name email and age so let me copy
11:18
this just put a comma after each field
11:22
so we have these four Fields first name
11:24
last name email age you can have as many
11:26
fields as you want so after you did do
11:29
this we now need to insert this in the
11:31
PDF document for doing this we'll use
11:33
the for
11:34
Loop label value
11:37
position in form labels so in Python you
11:40
can run this for Loop and then for each
11:44
field will be each entry each text you
11:48
will be drawing the text using the text
11:51
method in that position whatever is the
11:54
label and the actual value so the fill
11:57
color will again be black
11:59
and the font whatever phone that we
12:02
selected and then again we now need to
12:06
draw the value of so if you just do do
12:10
this you will see the fields will be
12:13
added you can see these first name last
12:16
name email H now we need to add
12:21
those rectangle boxes which is
12:24
specifically for the form Fields so for
12:27
doing this again we'll be using the Tex
12:29
X method and this time we need to
12:32
specify the position x
12:34
coordinate
12:38
so let me just copy
12:42
this it takes x coordinate y coordinate
12:46
the actual value fill font
12:50
everything so if you
12:53
just run this you will see the values
12:56
will be inserted Gotham you will see see
13:00
now after that we need to actually add
13:01
this into a illusion that it's a form
13:04
field so we need to add these rectangles
13:06
around it for each field we need to add
13:09
these rectangles for adding those
13:11
rectangles now in the next step we do
13:14
need to add this line we need to add a
13:16
rectangle at that exact position so I've
13:20
just calculated all these formulas so
13:22
what I will do I will simply paste
13:25
it so this will calculate the x
13:27
coordinate and the y coordinate which is
13:29
needed so this will be all in black
13:32
color you can even customize that as
13:35
well change it the color if you just run
13:38
this
13:39
now so you will actually see it will
13:42
be a rectangle will be drawn right here
13:46
so if you have a larger text you can
13:48
increase it height as well in the
13:49
mathematical formula right here you can
13:51
adjust it so let me just mail.com so
13:56
just to fit it properly
13:59
just need to try this based upon the
14:01
length of the text now you can see it's
14:03
looking pretty good so after we do this
14:06
we need to add the profile picture as
14:08
well for doing the profile
14:13
picture we will come out of this uh in
14:16
the same for
14:18
loop I think we do need to come out of
14:21
the for
14:23
Loop so just come out of this for Loop
14:26
we done drawing the form FEI
14:29
now we'll be doing the profile picture
14:32
so we'll be adding this again we'll be
14:34
using the text method and this will be
14:36
the simple label which will be for
14:40
profile picture so now this profile
14:42
picture has been drawn now we'll be
14:44
having this uh profile jpg image that we
14:47
need to add this of the student so now
14:50
for adding this image we will actually
14:52
use first of all calculate the position
14:55
x coordinate and the y coordinate so I
14:59
already calculated these positions to
15:01
fit it directly in the page and then
15:04
we'll be simply be adding this
15:08
image so this is actually the
15:16
code so we basically first of all open
15:19
the image using the open function and
15:22
then we resize this image accordingly
15:24
whatever is the coordinates calculated
15:26
in the previous step x coordinate y
15:29
coordinate in the width and the height
15:30
and then we paste this image in the PDF
15:32
by using the paste method so pillow
15:35
Library provides all these methods so
15:39
after we do this you will see your image
15:41
added
15:42
successfully if you
15:48
see
15:57
think images let me open this you'll see
16:01
your image is successfully added this is
16:04
actually the output that you will get
16:06
guys after you run the script you will
16:09
get this form data automatically filled
16:12
in these input Fields you can left it
16:15
empty fill it later on but you can fill
16:18
it as well then you can show images as
16:20
well so this was a tutorial guys
16:23
obviously you can change values you just
16:25
need to change it in the script after
16:27
you get the script you can change the
16:28
values from gam to John if you run
16:33
this you will see the entry will change
16:36
in this way you can generate unlimited
16:38
number of Records in PDF documents so
16:43
this was the tutorial guys about pillow
16:45
Library how we can generate forms inside
16:47
P pillow p i l w which is a image
16:52
Library so thank you for watching this
16:55
video and do check out my website free
16:58
mediat tools.com which is a open source
17:00
website and it contains a lot of tools
17:03
related to audio image and video and I
17:06
will be seeing you in the next video
#Programming
#Education