Up next in 10

Build a Vue.js One Tap Auto Google OAuth2 User Login Using vue3-google-login Library in Browser
Jan 9, 2025
Buy the full source code of application here:
https://procodestore.com/index.php/product/build-a-vue-js-one-tap-auto-google-oauth2-user-login-using-vue3-google-login-library-in-browser/
Show More Show Less View Video Transcript
0:00
uh hello guys welcome to this video so
0:02
in this video we will actually talk
0:03
about how to implement One Tap Google
0:06
authentication in
0:07
VJs and uh let me show you the demo of
0:10
the application so if I just open the
0:12
application which is running on Local
0:14
Host 3000 you will see that this is
0:17
actually the one tap authentication and
0:19
it will do the authentication
0:20
automatically you need to click on
0:22
continue and it will verify the
0:24
information and then it will show you
0:25
the profile picture display name email
0:28
address and a log out button as well so
0:29
log functionality is also there it will
0:32
redirect me to the profile page if you
0:33
see right
0:35
here so Local Host 3,000 profile it will
0:39
redirect me let me just
0:48
so so we will
0:50
be looking to do this so you will see
0:53
that the application is running on Local
0:56
Host 3000 SL profile it will redirect me
0:59
to the profile page where you can
1:01
actually see the profile picture display
1:03
name email address and a log out button
1:05
as well so if I click the logout button
1:07
I will be redirected back to the
1:08
homepage once again it will
1:10
automatically detect and it will
1:13
automatically uh I did not have to
1:15
actually press the login button and it
1:17
automatically did the process for me so
1:19
this is one tap authentication of Google
1:21
which is provided if you go to the
1:23
homepage once again you can see you have
1:26
seen these authentication in the
1:28
websites like like this in
1:32
the so this is very cleaner way of doing
1:36
authentication because it is all the
1:39
bulk work is done by Google to actually
1:41
authenticate you and you can actually
1:44
display details so we are actually using
1:45
a module in vue.js vuejs 3 we are using
1:49
the latest version of vue.js and we are
1:51
using this module which is called as V3
1:54
Google login this is actually the
1:56
package we are using for this making
1:58
this Google Authentication we are also
2:00
using view router and this is the latest
2:02
version we are using at the time of
2:04
recording this video which is 3.0.4 and
2:06
it is compatible with all the versions
2:08
but uh you should use the latest
2:11
version so all the source code guys is
2:14
given in the description you can
2:15
directly purchase it from my website Pro
2:18
cod store.com with full documentation
2:19
and support So if you still want the
2:21
source code you can go to the
2:22
description link Pro code store and
2:24
purchase the source code uh you will be
2:26
getting this ZIP file after you purchase
2:28
it and you will be redirected to Google
2:30
Drive where you will actually get the
2:31
zip file which will actually contain all
2:33
this directory structure all the source
2:35
code files let me also show you with a
2:38
different account if I open the same
2:40
route here with a different Google
2:42
account so again it will sign in with
2:45
Google it will automatically sign in you
2:47
you can see it is signing you and now
2:50
again it will actually you don't need to
2:52
select your account you don't need to
2:54
Grant permissions this is a cleaner way
2:56
of doing it where we don't show the user
2:59
a consent screen we just log in in in
3:02
the background so this makes it very
3:04
much easy you'll see the profile picture
3:06
is shown let me show you another
3:10
account so this is the user interface is
3:14
quite simple you will see signing you in
3:16
and you will see that so in this way
3:18
guys we will start building this
3:20
application so what I will do I will
3:22
navigate into the projects directory
3:24
right here and I will simply make a new
3:27
project of UJS and I will be using the V
3:31
development engine v is actually a
3:34
similar to webpack it allows you to make
3:38
frontend applications such as reactjs
3:41
vuejs and it is very fast as compared to
3:44
the native commands to actually build
3:46
view react CH application so I will be
3:49
using V here to actually build the
3:52
simple project of V sorry VJs so there
3:57
is a simple Command right here which is
3:58
npx
4:02
create
4:04
V app followed by the name of the
4:07
project so let me give here view O2
4:10
Google and then dash dash template and
4:13
we are building it for views that's why
4:15
we need to provide view here so npx
4:18
create V tab followed by the name of the
4:20
project and dash dash template and it
4:22
will be using the view template this is
4:24
a command here simply execute this
4:26
command and it will actually create a
4:28
brand new folder in inside your
4:30
directory which will contain the vuejs
4:35
project so now it has created this
4:37
folder so we can navigate into this
4:39
folder and let me open it inside vs code
4:42
so it will look something like this this
4:44
is the vuejs 3 project we have a app.
4:47
view folder we just need to install the
4:50
nodejs modules by npmi so this will
4:52
install all the modules create a node
4:55
modules folder right inside your root
4:57
directory
5:02
so now we can start this server and uh
5:05
we can basically previously started so
5:07
we can just stop this server and start
5:11
this npm runev this is actual command to
5:13
actually start this vuejs server so you
5:17
just need to navigate to Local Host
5:20
3000 so it is just compiling the project
5:23
and uh now this is will be the Hello
5:27
vuejs app you can edit this file by
5:30
going to app. view and simply delete
5:33
everything from here and just write
5:35
hello
5:39
world just delete everything from here
5:42
so a temp a vuejs component comprises of
5:45
a template tag inside this you will
5:47
write your HTML then we have the
5:49
JavaScript as well and CSS as well for
5:53
you can see hello world is showing right
5:55
here so the very first thing we need to
5:57
do guys we need to install this module
5:58
which is uh
6:00
view3 Google login it's a specifically
6:03
made for vuejs application for
6:05
integrating the Google authentication so
6:07
npmi
6:09
view3 dasg go- login this is actually
6:13
the package we are using npmi view3
6:15
Google login simply install this package
6:18
you can read more about it by going to
6:20
the documentation view3 Google login if
6:22
you just type here on Google you will
6:24
see the very first link which comes
6:26
right here this is the npmjs page of
6:28
this module
6:30
so it is already having 12,000 weekly
6:34
downloads you will
6:36
see so documentation is given so we will
6:40
be implementing this so once it's
6:42
installed we can
6:44
start npm run Dev once again so now what
6:47
we need to do we need to navigate to the
6:49
main.js file where we need to register
6:51
this plugin which we installed
6:53
registered this Library so go to the
6:55
main.js file right here and uh right
6:59
here we need to import this module so we
7:01
will simply say here import
7:03
view3 Google login and we will be
7:06
importing it from the package we have
7:08
installed view3 Google login so inside
7:12
this package we have this method AV
7:14
variable
7:18
view3 Google login and now we just need
7:20
to register this so for registering it
7:23
it is very
7:25
easy what we will do we will just say
7:28
con stab create
7:36
pass the app
7:39
here and we just need to import create
7:41
app you'll see it is already imported
7:43
and then we need to Simply say app.use
7:46
we will use this middleware view3 Google
7:48
login that we imported and here we need
7:50
to provide the client ID it takes us
7:53
argument right here client ID we need to
7:55
pass it so we'll be creating it inside
7:57
Google developer console and
8:00
also right here we will simply app.
8:02
Mount and we will be mounting it to this
8:05
element which has an ID app that's all
8:08
this is all that we need to do right
8:10
here to actually register this so now to
8:12
get this client ID we just need to go to
8:17
Google developer Cloud
8:19
console and right here you just need to
8:23
create a brand new project it is totally
8:25
free go to API services and right here
8:28
you need to create
8:30
go to credentials and
8:34
uh click on create credentials o client
8:37
ID and here you just need
8:41
to give the application type which will
8:44
be web application and here inside
8:46
authorized JavaScript origin this will
8:49
actually hold your homepage URL so HTTP
8:53
Local Host we need to give this and the
8:57
second it will give you this information
9:00
let me just go to it and provide the so
9:03
this first URL will be this HTTP Local
9:05
Host this is required because you are
9:07
building your application on Local Host
9:10
and the second one will be the URL which
9:13
will include port number as well so this
9:15
is actually the full URL of the
9:17
application including the port number as
9:19
well which is HTTP Local Host 3000 and
9:22
now in the authorized redirect URI we
9:24
again need to use the same address right
9:26
here HTTP Local Host 3000 so again we
9:28
can
9:29
paste the same address right here so
9:31
HTTP Local Host
9:35
3000 so once you provide all this
9:37
information you just need to click on
9:39
the save button and now it will provide
9:42
you this uh client ID and the client
9:44
secret this will be different for you so
9:46
don't copy this my information so just
9:48
write here client ID just paste it
9:53
here so now we have successfully
9:56
configured the client
9:58
ID and and also you need to one more
10:01
thing we need to do right we just need
10:03
to create a router file as well right
10:08
here so just create inside the source
10:10
directory a folder for router which is
10:14
router and right here you will create a
10:16
index.js file so we just need to make
10:20
routes for our vuejs application so we
10:24
have
10:25
this create router and create web
10:29
history methods available from The View
10:33
router you just need to install view
10:35
router as well so I forgot to tell you
10:37
so
10:38
npmi view
10:40
router so if you want to integrate
10:43
routing inside view application you need
10:45
to install this module this is build
10:48
this is a part of the library
10:51
so you just need to install it
10:59
so it will comeing from The View router
11:02
you will see
11:04
that and here we need to define the
11:06
routes different
11:09
routes so it will actually contain an
11:12
object which will contain three
11:14
properties first is a path and then the
11:16
name of the component which will be
11:17
login and here we will be loading these
11:19
these two components right here first is
11:22
the login and the second one will be the
11:24
profile so here just create a inside
11:26
your components folder delete this hello
11:29
world component and instead of create
11:32
login. View and uh profile.
11:36
view
11:40
so just have a
11:51
template this will be the profile
11:53
component and now we just need to
11:55
include these components so we simply
11:57
say login
12:04
so now to include these components we
12:07
will simply say you need to
12:13
import do. component SL login and also
12:18
we need to import
12:25
uh like this so now we can simply use
12:28
these component in the component
12:30
property
12:31
login and the second route will be so
12:35
here if you go to the homepage it will
12:37
show you this login component and here
12:40
we making a second route for the
12:41
application so if you go to/ profile
12:45
then we need
12:47
to
12:51
uh show the profile component so here
12:54
we'll say the component property will be
12:56
profile
13:00
so now we just need to create this
13:02
router so
13:04
router will instantiate create router
13:07
and right here we will pass the history
13:10
to be create web history and we'll pass
13:15
the number of routes that we created as
13:17
the second property so this is actually
13:18
the router we just need to export
13:21
default the router so that we can use
13:22
this inside the main JS file export
13:25
default router so now we can include
13:28
this router in inside the main JS file
13:30
we can register it similarly that we did
13:33
for registering the library so again we
13:36
will be simply be passing it right here
13:39
as a middleware app.
13:42
use router so this will be automatically
13:45
imported import router do from
13:50
router so router is available in the
13:53
router folder so that's why you need to
13:56
go to the router folder and then index
13:59
so just make this
14:00
change so now you will see nothing will
14:03
be no error will if you go to Local Host
14:10
3,000 so nothing will be showing here
14:12
instead hello world is showing so why it
14:15
is showing you we haven't uh we need to
14:18
Simply go to app. view still it is
14:20
hardcoded Hello World here so we need to
14:22
change this
14:24
value it is very simple uh we just need
14:27
to hear
14:30
just bring the router tag which is
14:32
router
14:37
view so we can simply
14:46
say so we will have a root tab div ID
14:51
app so inside this we will be embedding
14:52
the router
15:00
so that's all that we need to do guys if
15:01
you refresh now you will actually see
15:03
the login component if you go to the
15:05
homepage if you go to the/ profile route
15:08
you will see the profile route so in
15:11
this way you can actually do the routing
15:13
inside view3 instead you can bring the
15:16
view router register it and inside your
15:19
router file you can register as many
15:21
routes as you possible you can have
15:23
individual components stored inside the
15:25
components folder right here now we just
15:28
need to simp simply do
15:30
the as we registered our client ID in
15:33
the m in main JS file you will see we
15:37
have registered this view Google 3 login
15:39
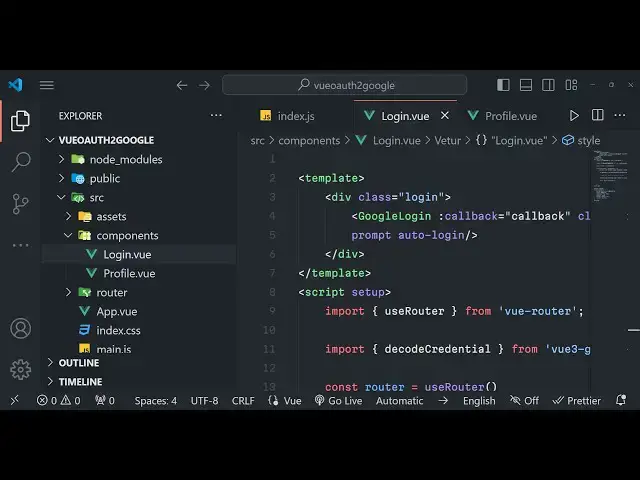
now we just need to go to the login
15:41
component right here and simply write
15:44
some HTML so right here instead of login
15:47
we will simply have
15:49
a class of
15:53
login and here we'll be having this tag
15:56
which is Google login this is actually
15:58
it will be import it
16:01
from we just need to import this uh
16:05
Google login and it will have this uh
16:09
call back
16:12
function here we need to assign a
16:14
callback function so we'll be defining
16:17
this callback function in the JavaScript
16:19
we'll be assigning some classes here
16:21
which is BG blue 500 hover BG blue so
16:26
these are all Tailwind classes guys we
16:28
can actually include
16:32
a uh CDN so I will show you how to do
16:35
this so these are all Tailwind classes
16:37
phone BL py2 PX 4 and it will be rounded
16:44
and one more option we need to give here
16:46
prompt and uh Auto login so these are
16:51
part of these uh
16:52
Library so this will be a special button
16:55
which will be shown in the homepage and
16:58
uh now we just just need to Define this
17:00
in the
17:02
JavaScript so right here we will say
17:06
setup we need to import this uh first of
17:11
all we need to import the use router
17:14
from view
17:16
router and we just need to make uh the
17:19
router use
17:20
router and now we just need to make this
17:23
function which is call back so this
17:25
function that we defined right here in
17:27
this
17:29
so this function will automatically get
17:31
this response right here whenever the
17:33
Google login is completed so inside this
17:36
response we will be having uh the user
17:39
information this response will be coming
17:41
from
17:42
Google login response so we can simply
17:45
show in the console as well so after
17:48
this if you just refresh your browser if
17:51
you go to the homepage you will see a
17:53
sign in with Google button and it is
17:55
signing you in and uh if you just check
17:58
check the console right here you will
18:00
actually
18:02
see an object will be received by us so
18:05
this will actually contain the
18:07
credential this credential is called as
18:09
JWT token uh this is Json web token so
18:12
we need to decode this credentials to
18:14
actually get the user profile
18:16
information such as the display name
18:17
email address and the profile picture
18:20
now to decode this JWT token we will
18:23
actually use a method which is available
18:25
inside this package which is a decode
18:28
credential so now
18:30
to you can import this
18:33
method import decode credential from
18:37
view3 Google login and now you'll use
18:39
this method to actually decode this
18:41
credential we'll say let profile is
18:44
equal
18:46
to decode credential and here we'll be
18:50
passing the credential which is present
18:52
inside response. credential and we will
18:55
be storing this information inside the
18:57
local storage
19:00
save user profile in local storage you
19:03
can also store it in a database as well
19:05
if you are in production level
19:07
application but for the sake of this
19:08
tutorial we are storing it in local
19:10
storage so there is a method set item
19:13
and we can simply say user json. stringy
19:16
file we will convert the Json object to
19:18
a Json string and
19:21
profile and then we will say router push
19:24
we will push to the redirect the user to
19:27
the profile page so
19:29
so this is very
19:33
simple and we can actually write the CSS
19:36
Styles as well so this tutorial is not
19:39
about CSS so I will simply copy paste
19:41
this code so all the source code you can
19:42
purchase it guys so if you just to
19:46
Now navigate to the homepage you will
19:48
see it's signing it with it is showing
19:51
you this continue with it will now
19:54
navigate to your profile page you will
19:55
see now you will be landing on the
19:57
profile page once you are authenticated
19:59
so now we can display this information
20:01
in the profile page we can simply go to
20:04
profile page right here and instead of
20:07
this H1 tag we can have
20:09
a div profile and right here we will
20:14
have a conditional statement V if so if
20:16
the user exist then only we need to just
20:20
show the information so first of all we
20:21
will be showing
20:23
the user. picture so you just put a
20:26
colon right here
20:30
so then we will have
20:34
the user display name user.name and then
20:40
similarly we have to display the email
20:44
address user. email so if you just
20:46
refresh now you will actually
20:48
see just navigate to homepage and once
20:53
you are authenticated save the
20:54
information in local storage and oh
20:57
sorry we do need to to actually get this
21:00
user object using script tag so
21:04
basically in vuejs application we the
21:07
component comprises of upon HT HTML CSS
21:10
and JavaScript so once we do need to get
21:13
this user object
21:15
because now to get this user object we
21:18
will
21:20
use on
21:24
mounted it will be coming from the base
21:26
View library and it also so we will be
21:29
using the use router also from view
21:34
router so right here we will be having a
21:38
simple export
21:43
default we will have the setup method
21:46
right
21:50
here we will have the
21:54
user
21:55
ref null
21:59
and then we will basically say router is
22:01
equal to use
22:03
router by default the user will be null
22:06
and now we need to get this uh user
22:10
info we will Define a function so inside
22:13
this function what we will do we will
22:16
actually get the user information from
22:18
the local storage so now to get this
22:20
information local storage have the
22:21
method called as get item and here we'll
22:24
be passing user which is a key name so
22:27
now if the user information is found
22:29
then in that case we will insign user.
22:32
value is equal to Json and we converting
22:35
the Json string to a Json object by
22:37
using json. pass and passing stored user
22:40
like
22:42
this so now in the else block we can
22:45
simply router. push to the homepage if
22:49
the user information is not found
22:52
so we will be executing this function as
22:56
soon as your component is mounted so
22:58
this is very simple you can do it using
23:02
uh a life cycle method which is
23:04
available for every view component which
23:06
is on mounted so whenever this component
23:09
is mounted you need to execute this
23:11
function so if you just uh reload the
23:14
application you will actually
23:18
see so once you are
23:24
authenticated okay we do need to return
23:27
this as well this user property that's
23:31
why it is not working at last after you
23:34
define all these methods there is
23:35
actually a written property which you
23:38
need to say
23:39
written the user object so now you will
23:43
see the information will be displayed
23:45
right here the profile picture display
23:47
name and the email address and also guys
23:50
we also have will be a log out button
23:53
which will be responsible for logging
23:55
the user out from the application so
23:58
button but log
24:00
out and we will be binding a onclick
24:03
listener to it which will execute a log
24:05
out function we need to Define this log
24:07
out function so right here we can Define
24:13
it log
24:17
out so inside this log out function guys
24:20
it's very
24:22
simple we just need to navigate to the
24:25
homepage and clear the information from
24:28
the local
24:29
storage local storage. remove item and
24:33
we will remove the item user and
24:35
redirect the user back to do router push
24:39
homepage and also we need to return this
24:42
method as well log out so that it can be
24:44
accessible in the template so we can
24:46
access this method so if you just uh we
24:50
have a log out button and if you click
24:52
log out you will be redirected back to
24:53
the homepage and again if you go to the
24:55
homepage it will automatically detect
24:57
please log you in continue you will see
25:00
that it will now show the user profile
25:03
information so in this way guys you can
25:05
actually make a simple user
25:07
authentication system in vuejs one tap
25:10
authentication it's automatic we don't
25:12
need to show any consent screen this is
25:15
one tap automatic authentication system
25:17
in vew CHS using view3 Google login
25:20
Library please hit that like button
25:22
subscribe the channel as well and if you
25:24
want to purchase the full source code
25:26
the link is given in the description you
25:28
can go to procode store.com and you can
25:30
actually purchase it from Google Drive
25:33
after payment you will be redirected to
25:34
Google Drive where you will actually
25:35
find the source code with full
25:37
documentation and I will be seeing you
25:39
guys in the next video
#Programming
#Software
#Web Services