live_tv
Livestream Starting Soon
00
Hours
:
00
Minutes
:
00
Seconds
Up next in 10

Build a Vue.js Dropbox Chooser API Example to Upload Files to Dropbox Using vue-dropbox-chooser
Jan 17, 2025
Get the full source code of application here:
https://codingshiksha.com/vue/build-a-vue-js-dropbox-chooser-api-example-to-upload-files-to-dropbox-using-vue-dropbox-chooser/
Hi Join the official discord server to resolve doubts here:
https://discord.gg/cRnjhk6nzW
Visit my Online Free Media Tool Website
https://freemediatools.com/
Buy Premium Scripts and Apps Here:
https://procodestore.com/
Show More Show Less View Video Transcript
0:00
uh hello guys welcome to this video so
0:02
in this video I will show you how to
0:05
integrate the Dropbox file Chooser API
0:08
inside your vuejs uh application so
0:12
directly you can upload multiple files
0:14
to your Dropbox Dropbox if you don't
0:16
know it's similar to Google Drive uh
0:19
it's a great alternative to Google Drive
0:21
so it's a file management soft website
0:24
where you can upload your files to cloud
0:26
so I already have a DropBox account here
0:28
you will see currently I am having no
0:30
files right here it is empty right here
0:33
the dashboard and we have this
0:35
application setup inside vuejs 3 and as
0:38
soon as I click this button I am able to
0:42
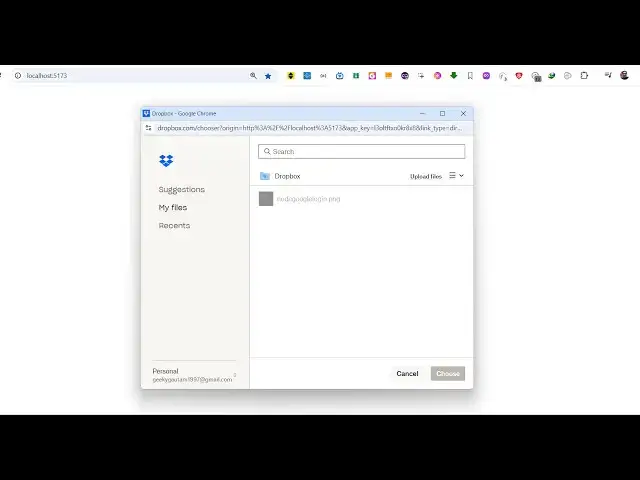
directly upload files so there is this
0:44
file picker opens and currently the
0:46
folder is empty and then as soon as I
0:49
click the upload files the file picker
0:52
will open now I can select multiple
0:54
files right here uh as soon as I select
0:57
these files so the uploading process
1:00
will start one by one the images will
1:02
start getting
1:03
uploaded and once all the images get
1:06
uploaded you will get this nice little
1:08
notification that upload
1:10
complete and in this way you can close
1:13
this file picker window and just refresh
1:15
your dashboard you will see all these
1:17
five images is successfully uploaded so
1:22
this is actually the package here which
1:24
allows you to integrate this Dropbox
1:27
file Chooser inside your VJs
1:31
application and now to get started uh I
1:35
have given all the source code which I
1:37
have used in this video is in the
1:39
description of the video you can go to
1:41
my blog post and right here just search
1:45
for this module view Dropbox Chooser
1:49
this is actually
1:51
the package that I'm talking
1:54
about so you just need to install this
1:57
by executing this command I have already
1:59
installed it it's a fairly new package
2:02
so only nine downloads are there so now
2:05
to get started first of all just edit
2:07
your app. view file and start writing
2:11
the code so first of all you'll be
2:13
writing the template the HTML code which
2:15
is required and now in the script
2:17
section we will simply import this
2:20
package using the import statement so
2:23
right here we simply use the import
2:26
statement import view Dropbox
2:31
picker and it will be coming from this
2:33
view Dropbox Chooser package so we
2:36
simply import this package by writing
2:38
this line so this will simply import
2:40
your package so after that you just need
2:43
to register this module so we simply say
2:46
export default and then we need to
2:50
register it inside the components and
2:52
view
2:54
Dropbox
2:56
Chooser view Dropbox picker so whatever
3:00
the module name that you have given so
3:02
we simply registering
3:04
it so this needs to be the same and then
3:08
whatever
3:09
data we need to or state variables that
3:12
we need to declare it for this we do
3:16
need the Dropbox API key so this API key
3:19
is totally free to create you need to
3:22
have a valid Dropbox account for
3:24
this I will show you how to get the API
3:28
key and the second variable will be be
3:30
the files that you select So currently
3:33
we have an empty array so as soon as you
3:35
select files to upload this will be
3:37
required so now go to your drop
3:41
Dropbox simply type on Google Dropbox
3:44
developer console and here you
3:51
need you just need to go to app console
3:54
so once you go to app console you will
3:56
be able to create apps right here I've
3:58
already created some apps app s so if
4:00
you want to create a new app click on
4:02
this create app button so as soon as you
4:05
click the button right here you will be
4:07
able to create a new app so here you
4:10
need to choose an API so I will choose
4:12
the scoped access API and after that it
4:16
is asking that choose the type of access
4:19
you need so two types of access is there
4:22
app folder and full Dropbox so we will
4:25
choose the full Dropbox we need the full
4:28
access to the AP
4:30
and then here you need to give the name
4:32
to your app so we simply say drop sample
4:36
upload app so you can give any name and
4:40
then simply click the create app button
4:42
so it will now create this application
4:44
for you inside the dashboard so this
4:47
name is already taken so I will just
4:48
customize this name and then click on
4:52
create app so then the app will be
4:54
created and now you need this app key
4:58
which is your AP key so just copy
5:02
this and we just need to paste it right
5:06
here and one more thing that we need to
5:08
do so my application is running if you
5:11
see on Local Host 5173 this is my
5:14
homepage URL so whatever is your url you
5:17
need to paste it right
5:21
here inside your
5:24
uh so first of all the embed domain so
5:28
I'm developing this application on Local
5:30
Host so I just need to paste this domain
5:33
name so I just need to click the add
5:35
button so this domain will be added
5:38
Local Host and then the full URL inside
5:41
the redirect URI so O2 after the
5:45
authentication you need to redirect the
5:47
user to this URL HTTP Local Host
5:51
5173 just so just add this URL so once
5:54
you added both these URLs
5:57
and now the setup process is complete
6:00
configuration is complete now you can
6:03
directly use this uh component inside
6:06
your template and we will just give it a
6:10
div tag and just give it an ID here app
6:13
and you'll be simply be having a H1 tag
6:17
Dropbox file picker example and after
6:21
this we'll be using this
6:22
directive view Dropbox picker and then
6:26
it actually takes some attributes that
6:28
we can directly pass here first of all
6:30
the API key so this is actually the
6:34
variable we have already declared this
6:37
Dropbox API
6:38
key link
6:40
type this is
6:42
actually we need to direct then multi-
6:46
select is a Boolean parameter this
6:49
simply says that if you do want the user
6:51
to select multiple files so I will say
6:53
yes true and then you can even control
6:57
which extensions the user will upload
7:00
inside this array you can provide I only
7:03
want the user to upload MP4
7:08
PDF and then the PNG files then
7:13
the JPG files so in this way you can
7:16
control which extensions the user want
7:19
to upload inside the file picker and
7:22
then the user can also select the entire
7:25
folder as well you can put this to true
7:28
as well so user can also upload entire
7:31
folder to Dropbox and then you can even
7:34
put the size limit as well so you can
7:37
put a restriction on how much the user
7:40
can upload in terms of megabytes so we
7:43
have put this restriction size limit
7:45
it's approximately 100 megabytes
7:49
restriction and then as soon as the user
7:52
picks the
7:53
files this call back function will
7:56
execute on picked and when they cancel
7:59
it then also this call back function
8:02
will execute on cancell if they cancel
8:05
the operations so both these callback
8:07
functions we just need to Define it so
8:10
we can give it a label to this button so
8:13
we can simply say open Dropbox
8:19
picker so right in the typescript code
8:22
now we can inside your methods we can
8:25
Define
8:33
the first of all the on
8:39
cancel and
8:41
then whatever files that you pick from
8:45
the
8:49
Dropbox we can just console Lo the files
8:53
so if you just refresh now uh you will
8:56
see this
8:58
uh enable open Dropbox speaker as soon
9:01
as you click it this window will open
9:04
and it is saying that cannot enable both
9:06
folder select and direct lens so what
9:09
you need to do
9:13
here one property needs to be false so I
9:16
will just change this folder select to
9:22
false again refresh and now it will
9:26
first of all do the authentication part
9:28
and then all your images will show right
9:32
here you will see five images are
9:34
present right here then there is an
9:36
upload Button as well you can upload
9:38
more images so as I select these three
9:42
images to be uploaded so one by one the
9:44
images will get uploaded with this nice
9:46
little progress bar so once the images
9:49
get uploaded you will get this nice
9:51
little uh
9:53
notification and let's suppose I want to
9:55
select these four Images click choose
9:59
uh as soon as you click the choose
10:01
button the window will close
10:03
automatically and you will get this
10:06
response here array each object
10:09
containing the choosed image that you
10:11
have the extension icon link size title
10:16
and using this information Json you can
10:19
display the information as well so
10:20
whatever the user has picked up so this
10:23
is actually a very handy extension
10:26
inside Vue if you want to directly allow
10:28
user to upload files to Dropbox it's a
10:32
Dropbox file Chooser API in
10:34
vuejs so thank you very much guys for
10:37
watching this video and uh do check out
10:40
my website as well uh free mediat
10:42
tools.com uh which contains thousands of
10:45
tools regarding audio video and MH and I
10:49
will be seeing you guys in the next
10:50
video
#Cloud Storage