live_tv
Livestream Starting Soon
00
Hours
:
00
Minutes
:
00
Seconds
Up next in 10

Build a Vue.js 3 Google Drive OAuth2 Component to Upload Files to Drive With Progressbar in TS
Jan 17, 2025
Get the full source code of application here:
https://codingshiksha.com/vue/build-a-vue-js-3-google-drive-oauth2-component-to-upload-files-to-drive-with-progressbar-in-ts/
Hi Join the official discord server to resolve doubts here:
https://discord.gg/cRnjhk6nzW
Visit my Online Free Media Tool Website
https://freemediatools.com/
Buy Premium Scripts and Apps Here:
https://procodestore.com/
Show More Show Less View Video Transcript
0:00
uh Hello friends welcome to this video
0:02
so in this video I will show you a
0:04
component inside vuejs 3 which allows
0:07
you to upload files directly inside the
0:09
browser to Google Drive you can upload
0:12
multiple files with progress bar so this
0:14
is actually the demo here we have a sign
0:17
in with Google button first of all you
0:19
will do the authentication part using
0:20
the O2 protocol and as soon as you click
0:23
the button you will be redirected to
0:25
your Google account you select your
0:27
Google account and then you grant the
0:29
permission click on
0:31
continue and as I click the continue
0:34
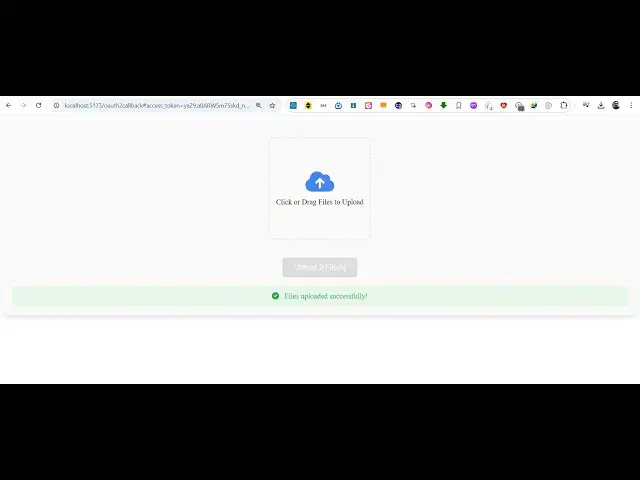
button so now you will see this drag and
0:36
drop interface where you can easily drag
0:38
and drag multiple files or you can click
0:41
it and now you will be able to select
0:44
whichever image files that you want to
0:47
select so let's
0:50
suppose I want to select these three
0:54
files these four files I need to upload
0:57
so one by one these files will be rented
0:59
out with the name of the file and the
1:00
size of the file as well you can see
1:04
that so all the four files have been
1:06
selected and we actually got this button
1:08
here upload so as soon as I click the
1:11
button you can see it is uploading your
1:13
files please wait and after some time it
1:16
will get this notification that your
1:17
files have been successfully
1:19
uploaded
1:21
so depending upon your internet
1:23
connection it will take time and then it
1:25
will show you this notification that
1:27
files uploaded successfully and then you
1:30
can cross check it inside going to your
1:32
Google
1:32
Drive just
1:38
refresh you can see all these four
1:40
Images are been successfully uploaded
1:43
you can see the time here 633 which is
1:47
this 633 so all these four images that
1:51
we can see all the four Images have been
1:54
successfully uploaded so there is this
1:57
component right here if you go to
1:58
npmjs.com
2:01
uh and search for this uh module which
2:04
is Google Drive view so this is actually
2:08
the name of the Google Drive uploader
2:11
component I given the full blog post in
2:14
the description of the video you can go
2:16
to the description to get the full
2:17
source code so the command is simple
2:20
I've already installed it it's having
2:22
it's a fairly new package only three
2:24
downloads are there you can see you can
2:26
perform all these
2:27
operations multiple file Lo validation
2:30
customizable UI it first of all
2:34
authentication and then it will upload
2:36
your files so now to get started inside
2:39
your uh view3 project you need to go to
2:42
your app. viw
2:44
file and simply I will now show you the
2:49
code here which is responsible so just
2:51
make a simple template here you'll be
2:54
writing the HTML code and then inside
2:58
your typescript we will simply import
3:01
the package here so using the import
3:04
statement we simply say so we will
3:06
simply change the language here to
3:09
typescript and then we use the import
3:12
statement and we import this module
3:14
Google Drive which will be coming from
3:17
Google Drive view so we simply import
3:20
this package and secondly we also need
3:22
to import the CSS file of this package
3:25
which is stored inside style. CSS so we
3:28
import the package and also the CSS file
3:31
as well so now we come to the HTML part
3:34
here here we embed this component so we
3:37
simply say Google
3:41
Drive and it actually takes some
3:43
parameters first of all it takes the
3:45
client ID which you will get from your
3:47
Google Cloud console I will let you know
3:49
how to get this and then the redirect
3:52
URI so after you make the authentication
3:55
which URI you want to be redirected to
3:58
so my application is running on HTTP
4:01
Local Host and then the port number is
4:03
5173 which is the default port number on
4:06
V 3 application runs and I will say o
4:10
or2 call back so I'm just calling this
4:14
like this you can call this anything
4:16
just mention the same URL inside the
4:19
Google Cloud console and now let me go
4:22
to Google Cloud console just create a
4:25
simple account here and go to create
4:28
create credential s and here go to O
4:33
client
4:34
ID and simply select from the drop down
4:37
which is FB application and here in the
4:39
authorized JavaScript origin simply add
4:43
your Local Host
4:45
URL and also the full URL containing the
4:48
address on which your application is
4:50
running so my application is
4:53
running this is a full URL so you also
4:56
need to mention HTTP Local Host and HTTP
4:59
local was plus plus the port number and
5:02
then in the authorized redirect URI you
5:04
need to mention the same URL that you
5:09
provided so just copy
5:19
this and paste it right here so as soon
5:22
as you paste it you will see that click
5:25
on this button create so then it will
5:27
give you your client ID which you need
5:29
this so simply copy
5:35
this and just paste it here so as soon
5:39
as you paste it you will see uh if you
5:41
go to your
5:44
browser go to the address Local Host
5:48
5173 and you will see this button sign
5:50
in with Google and as soon as you click
5:52
the account you need to Grant the
5:54
permission here click on
5:58
continue and now you you will see this
6:00
button here so here you can select it
6:03
can be anything it can be video files
6:05
image files PDF files so you will see at
6:08
this moment of time I can only select
6:10
one file so if you want to enable
6:12
multiple file support you can just add a
6:15
attribute right here so there are
6:19
attributes you can select here so if you
6:22
want to accept multiple files so you can
6:25
configure this allowed formats
6:29
so if you only want to accept image
6:32
files you can explicitly tell here I
6:34
only want to upload the PNG file and
6:39
then I only want the JPG
6:42
file and the PDF file so here you can
6:45
mention this using this attribute and
6:47
then inside this array you can provide
6:49
the MIM type of different
6:51
files and then the max file size
6:55
attribute you can even provide this so
6:58
maximum size that you want to
7:04
accept so here I'm expecting 5 megabytes
7:08
so this means that we can upload now
7:11
multiple files so if you refresh now
7:15
select you can see now we can select
7:17
multiple files you will
7:19
see and upload and then it
7:23
will after some time the notification
7:26
will come and your files will get
7:27
uploaded so in this easy way guys you
7:29
can integrate the Google Drive uploader
7:32
component inside vuejs 3 using this
7:35
package step by step I showed you this
7:38
tutorial so if you need the full source
7:39
code the link is given in the
7:41
description of this full project and
7:44
thank you very much for watching this
7:45
video and also visit my website free
7:49
mediat tools.com uh which contains
7:53
thousands of tools regarding audio video
7:55
and image and I will be seeing you guys
7:58
in the next video
#Other
#Cloud Storage