Up next in 10

Build a React.js Project to Upload Media Files to Cloudinary Using Fetch API & Bootstrap
Jan 9, 2025
Get the full source code of application here:
https://gist.github.com/gauti123456/2cd04fb0e080de41d94b4b62af2dd8a6
Show More Show Less View Video Transcript
0:00
uh hello guys welcome to this video so
0:03
in this video I will show you the react
0:05
CHS application where you will upload a
0:09
image file to Cloud Nary Cloud Nary is
0:12
actually a service where you upload your
0:14
image files or any files for matter so
0:17
it is useful
0:19
for so it's a image Shing website
0:22
cloud.com so I already created One
0:25
account right here so we have this media
0:27
folder I have already some images
0:29
present
0:30
I will now show you in this video how
0:32
you can directly upload files inside
0:35
your reacts application by making a
0:37
simple rest API call we have this
0:39
interface as if I choose any image file
0:43
let's suppose this PNG file and we have
0:45
this upload button so it will show you
0:48
this nice little progress bar and once
0:50
the image uploads you will see the image
0:53
is uploaded and you will see this
0:55
hyperlink if I click this you will see
0:58
the image is successfully uploaded it to
1:00
Cloud Nary it gives you this address of
1:02
this image and also if I refresh this
1:06
dashboard in the media folder you will
1:08
see the image will get
1:10
added so you can see the image is
1:13
automatically uploaded so this is the
1:16
application we will be building right
1:18
here and uh for doing this we are using
1:22
bootstrap for building the user
1:24
interface so just make sure that you
1:26
install these two plugins
1:28
or libraries react bootstrap and
1:32
bootstrap so I've already installed
1:34
these two so all the source code is
1:37
given in the description so now let's
1:39
get
1:40
started I will start it from
1:44
scratch so just make a simple functional
1:48
component and now at the very top we
1:51
will
1:52
import all the components from react
1:54
bootstrap and the base bootstrap CSS
1:57
file which is a CDM I already imported
2:00
all these pre-made components which is
2:02
coming from react bootstrap and now to
2:04
actually build out this application we
2:06
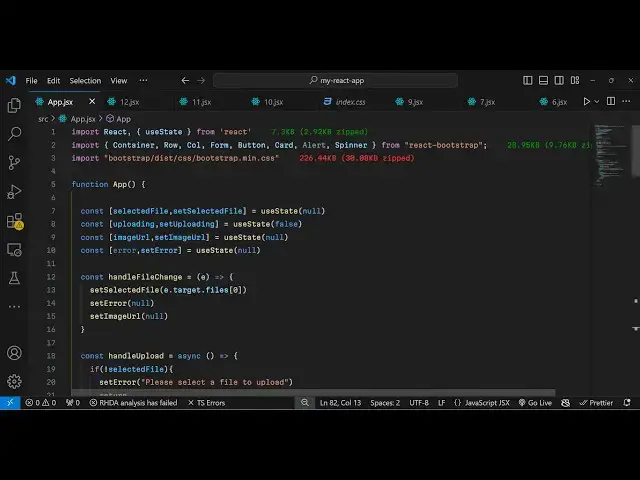
need some State variables first state
2:10
variable will be to keep track of which
2:13
file is selected by the user so selected
2:15
file set selected file and you'll be
2:18
using the UST State hook which is
2:20
provided in react CH the initial value I
2:23
will give it as null then we have to
2:26
have a variable for
2:28
actually cheting whether the user is
2:31
uploading or not so for this we have
2:33
this Boolean parameter uploading set
2:35
uploading initial value will be false
2:37
whenever you load the application for
2:39
the very first time and then we need to
2:41
have a variable for the uploaded image
2:44
so I will show you the uploaded image
2:46
once the image is uploaded so again this
2:50
will be
2:51
null lastly we have the error for
2:56
actually if any sort of error take place
2:57
it will show this so initial value will
3:00
be null so we have declared these four
3:03
variables for keeping track of the file
3:05
then we have a buan parameter for
3:08
showing whether the uploading is going
3:11
or not not then the output image URL and
3:13
the error these four variables are there
3:16
now coming back to the jsx we have a
3:19
simple form right here we'll be using
3:21
the container component of bootstrap and
3:24
we will wrap everything right here
3:26
inside this we giving a class name
3:30
and inside the row we will actually have
3:34
the class
3:36
name which will be justify making this
3:40
all in the center position so justify
3:42
content
3:44
Center and we will be having the call
3:48
column medium will be
3:52
six so right here we'll have an H2 tag
3:56
which will simply have a class last name
4:00
text Center we'll be aligning the text
4:02
in the center position and simply say
4:04
image
4:06
upload to Cloud
4:11
n and after this we will actually have a
4:15
simple form where we will allow the user
4:19
to Simply upload the file that they want
4:21
to upload inside form
4:25
group and I will just give it a control
4:28
ID which is a form
4:31
file giving a class name to
4:38
it margin bottom three and inside this
4:42
we will actually allow the
4:45
user we will have a form label and it
4:49
will simply say to the user that select
4:52
an
4:54
image and then we'll be having a
4:57
simple control Where We Are all the user
5:00
this will be of type
5:02
file and we'll Bing an onchange event
5:05
handler so whenever you select any file
5:07
this custom function that we will Define
5:10
handle file change will execute so now I
5:14
just need to Define this handle file
5:16
change function so e parameter will
5:19
automatically be passed in right here so
5:22
if you refresh your application what you
5:24
will see you will see this choose file
5:26
button appearing so now we just need to
5:32
actually allow the user to Simply select
5:34
the file and just after this input field
5:37
we will we will have a button to submit
5:40
the form so we'll have this bootstrap
5:43
component button and color of the button
5:46
will be primary which is blue color and
5:49
it will find an onclick listener to the
5:51
button so whenever you click the button
5:54
we will execute this
5:55
handle upload
6:03
so the button will be disabled it will
6:06
be dependent upon this uploading Boolean
6:09
parameter by default this value is false
6:12
so the button will not be disabled it
6:14
will be shown if you refresh it is
6:17
saying that you should Define this
6:19
function handle upload so I will just
6:27
apply so inside this function you allow
6:29
the user to upload the file so just
6:34
make just write a simple text on this
6:37
button which will be let's
6:40
suppose
6:42
upload so you will see upload is there
6:45
so once I click this button I need to
6:47
upload the file so we now need to first
6:50
of all get the file inside handle change
6:52
so whenever user selects a file we need
6:55
to show uh set the selected file use
6:58
this hook function
7:00
to e. target. files and select the first
7:05
file so we are setting the file which is
7:07
selected by the user and it'll be
7:09
setting the error to be
7:11
null and then we'll set the images URL
7:14
to also be
7:16
null we're using these functions right
7:19
here to set the values right here you
7:21
will
7:21
see and once you get the file it's now
7:24
easy Once you click the button to upload
7:26
the file so just make sure that you make
7:29
this function
7:31
async handle upload so right here first
7:34
of all we have this if condition that if
7:36
the file is not present in that case
7:38
it'll set a error that please
7:42
select a file to upload and then you'll
7:44
be returning we not execute the
7:47
code and after this we will make a
7:51
simple rest call to Cloud
7:54
Nary so make a new form data object
7:59
and inside this form data object we will
8:02
append the actual file that needs to be
8:05
uploaded which is stored in this
8:06
variable selected file and one more
8:09
thing we also need to append two more
8:11
variables this variable will be for
8:15
upload
8:17
preset and whatever is your Cloud n
8:20
preset I will show you how to get this
8:22
information and also your Cloud
8:26
name we need to Define a variable here
8:29
Cloud name and these two information
8:32
which will be coming from your own cloud
8:34
Nary dashboard so just create a cloud
8:36
Nary account I've already created one so
8:40
just go to
8:41
your this option program media so here
8:46
you will find out your own cloud name so
8:50
my cloud name is coding Sika so I will
8:53
just copy this name and paste
8:56
it you need to pass this information in
9:00
the rest API
9:01
call and then uh you need to go to
9:04
settings option and inside your settings
9:06
you will find your upload preset this
9:09
means that in which folder you need
9:12
to here you will find this option upload
9:15
presets just click this I've already
9:17
created two presets so I will just
9:20
upload in this preset so just copy
9:24
this and
9:27
paste if you want to create cre a new
9:29
preset you there is a button out there
9:32
you can click the button just give it a
9:34
preset name and then click on save so it
9:38
is just a location where you need to
9:40
save your files so once you get this two
9:42
information now we can simply make the
9:45
rest API call in the try catch
9:54
block so right here first of all we will
9:57
need to show the progress part so I will
9:59
set uploading to be
10:01
true and then we'll make a simple rest
10:04
call so we'll Define a variable response
10:08
you'll make a fetch
10:09
call to this endpoint https api.
10:14
cloud.com SLV one
10:19
underscore
10:20
1 and this is your Cloud name you need
10:23
again need to replace your own cloud
10:25
name right here so we have defined This
10:27
Cloud name so we are mentioning it right
10:29
here
10:30
and slash image slash upload this is the
10:35
end point and here you need to make a
10:36
simple post request and pass your form
10:40
data
10:43
object in the body so we are passing our
10:46
form data object which we have we have
10:50
actually passing it in this post request
10:53
so once you make this post request we
10:55
need to convert your data into Json so
11:00
converting our response to Json and now
11:03
we'll be comparing that if the file is
11:07
uploaded we can even console log the
11:10
data so there is a property right here
11:12
it will come when the file is uploaded
11:14
which is secure URL so it will actually
11:18
be the image URL which is uploaded so we
11:21
need to set this image
11:23
URL which is data. secure URL and set
11:27
again reset the form and then
11:29
reset it to
11:31
null and if the file is not uploaded in
11:34
the else block you can actually show
11:37
this error to the
11:39
user that fail to upload the image
11:43
please try
11:47
again that's
11:51
all so this is all the JavaScript code
11:55
is complete so once you
11:57
actually see if if I choose any
12:01
file let's suppose this file and if I
12:04
also open the console click on the
12:07
upload option you will not see the
12:09
progress bar but if you see the file is
12:11
uploaded and we get this object inside
12:14
this object we get actually your asset
12:16
ID created at original file name
12:20
placeholder so you also get your secure
12:24
URL so this is the actual URL once the
12:27
image uploads it will give you this
12:29
unique URL so now we need to show this
12:32
image once the image gets uploaded so
12:35
right here in the
12:37
jsx we also will change the button text
12:41
depending
12:43
upon whether so inside this you will
12:46
programmatically show if the value of
12:49
uploading is true in that case we need
12:51
to show the progress bar so this is a
12:54
loading spinner that we are showing it
12:56
using bootstrap there is a spinner
12:58
component
12:59
so if the value is false then we are
13:01
showing
13:03
upload and after this form we also need
13:06
to show the uploaded image so if the
13:08
image URL is defined in that case only
13:13
we need to show
13:15
the in a card like structure we will
13:18
show this image we'll give it a class
13:20
name of margin top
13:23
4 and then it has card image component
13:29
and inside variant I will use the top
13:32
variant and Source I will equal to the
13:36
image URL
13:40
variable and we
13:42
can inside
13:45
your card body we can actually show the
13:49
actual image the description on the URL
13:52
of the image so
14:02
so here we are
14:04
simply showing this
14:07
image you can see this is actually the
14:09
link we are having this anchor tag so
14:12
whenever you click this link you will be
14:13
redirected to the image URL so that's
14:16
all this completes the application if
14:18
you now choose the image file click on
14:20
you will see this spinner appearing and
14:22
once the image is uploaded you will see
14:25
view uploaded image and you can actually
14:28
see the file is upload it will give you
14:30
this
14:31
link so in this way you can actually
14:34
make
14:38
this uh application in react CHS to
14:42
actually allow file upload to cloudinary
14:46
so using bootstrap so thank you very
14:48
much for watching this video and do
14:50
check out my website as well freem
14:51
mediat tools.com which contains
14:53
thousands of free tools regarding audio
14:56
video and image and I will be seeing you
14:59
in the next video
#Online Media
#Software
#Web Services
#Cloud Storage