live_tv
Livestream Starting Soon
00
Hours
:
00
Minutes
:
00
Seconds
Up next in 10

Build a React.js Image Cropper Editor With Live Preview Using Cropper.js Library in Browser
Jan 9, 2025
Get the full source code of application here:
https://gist.github.com/gauti123456/5e1ff0df1ecddc7b0915c755f0971ba9
Show More Show Less View Video Transcript
0:00
uh hello guys welcome to this video so
0:02
in this video I will show you how to
0:03
build out a image Cropper editor where
0:07
the user will select a image file inside
0:09
react CH application so I'm running this
0:11
application on Local Host you will see
0:13
that we have a choose file button so
0:16
where we allow the user to Simply select
0:18
the image and you will see this cropping
0:20
controls out there where you can easily
0:23
crop whatever portion that you want to
0:25
crop the image so once you select the
0:27
portion that you want to crop there is a
0:30
button out there so click the button and
0:33
you will see the image will be cropped
0:36
and now you will be able to save your
0:37
image file at whichever location and you
0:41
will see the image is successfully
0:43
cropped so basically we will be using
0:46
this
0:47
package uh the package name is react
0:52
dcer and if you go to npmjs.com just
0:56
search for this package it is commonly
0:58
know known as crer Js so if you just
1:01
search for this
1:03
package so this is actually the
1:06
component and it is known as Cropper JS
1:10
so this is actually the command to
1:12
install this I've already installed it
1:14
it has got almost 196,000 weekly
1:17
downloads so now to get started it is
1:20
also called as crer JS it has its own
1:22
official website as well this is a
1:24
GitHub
1:25
repo and you can check out the demo as
1:28
well this is Library called as jav
1:30
Cropper JS it's a JavaScript library but
1:33
you can even use it in reactjs as well
1:35
using this package react Cropper so I
1:38
will show you the complete example here
1:41
so once you need to do just make a
1:43
simple functional component and uh we
1:46
need to include the package first of all
1:49
so for including the package we use the
1:51
import statement so we simply import and
1:54
we have the crer component coming from
1:56
this
1:59
react Cropper package so we have this
2:02
package here react crer and we do also
2:05
need to import the CSS file as well of
2:09
this component so we are simply
2:12
including the CSS file as well so the
2:15
full so we imported the component and
2:18
the CSS file so now for our application
2:22
we do need to declare some State
2:23
variables so we need a
2:26
reference for this we'll be using the
2:28
use reference hook of react CH initial
2:31
value will be null so it is kind of a
2:34
just reference we will give to the image
2:36
which we want to crop the second
2:38
variable will be for keeping track of
2:41
which image the user will select so for
2:43
this we will have a variable we will use
2:46
the UST State hook in react CH initial
2:49
value will be nothing and then we need
2:52
to also have the variable for keeping
2:54
track of the cropped
2:56
image like
2:58
this the output image that will be shown
3:00
to the user once the image is cropped
3:02
for this also we are using the UST State
3:05
hook so that's all these three variables
3:08
we have
3:09
declared so now coming to the
3:11
jsx we will simply inside this
3:17
div we will align everything in the
3:19
center position so we'll give it a style
3:22
here and we'll give it a padding of 20
3:24
pixel and inside this we will have an H2
3:27
heading which will say react
3:31
CER example and after this we will
3:35
actually allow the user to
3:37
select the image file that they want to
3:40
crop and for this we will have the input
3:43
type file and we'll only be accepting
3:45
image files so we'll simply say
3:48
image and we'll also be binding an
3:50
onchange event handler so when the image
3:53
is selected this function will be
3:55
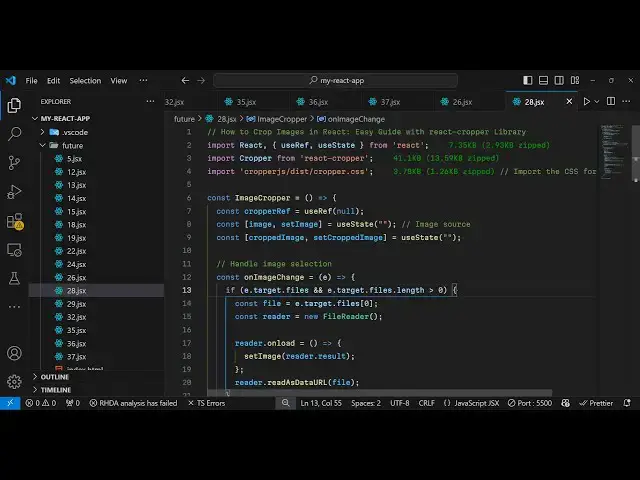
executed on image change I will Define
3:58
this function and one more thing I will
4:01
just give it a style
4:03
attribute I will give some margin from
4:06
the bottom position 20 pixel so we just
4:09
need to Define this function on image
4:11
change so right here I can Define this
4:14
on image change so e parameter will
4:16
automatically get
4:20
passed so once the image is selected uh
4:24
we do need to
4:27
actually get the image file which the
4:29
user select like this you can have this
4:32
if condition if the e. target. files do
4:36
length is greater than zero then only we
4:38
need to
4:39
execute here we need to keep track of
4:42
the file we can easily get this using e.
4:44
target. files so once we got the file we
4:47
can read this by using the file reader
4:50
API so we can simply say file reader so
4:55
you're using the file reader API to
4:57
actually read the image file and we will
4:59
read it as a we have a function
5:02
available read as data URL so this will
5:05
read the file as base 64 code and it
5:08
actually contains this onload call back
5:11
function which will execute once the
5:13
file is successfully loaded and here we
5:16
will set this image in the state using
5:19
this function and here we'll pass the
5:22
whatever is the result so reader do
5:25
result so if you refresh your
5:27
application uh just go to it you will
5:29
see this choose file button so once we
5:32
select the image file we also need to
5:34
display the file as well so now to
5:37
display the image just after this input
5:39
field we will compare if the image is
5:42
available then in that case we need to
5:44
display the image crer component and we
5:47
will be displaying this
5:48
component and it actually takes the
5:51
source property so whatever image that
5:53
you want to crop and we will just style
5:56
it just give it a height of 400 and a
5:59
WID of
6:01
100% just some CSS styling to the crer
6:04
component and also we'll be changing the
6:06
aspect ratio and just we providing 16 by
6:12
9 and uh it also takes the guides option
6:17
as well if you want the guides you can
6:19
put it to true and we can attach our
6:21
reference that we declared early on
6:23
which is crer
6:27
ref and there is also this View mode as
6:30
well which will restrict the cropping to
6:32
the image boundary only so these are all
6:35
the options it takes we are attaching
6:37
this croper reference that we declared
6:39
early on if you
6:40
see
6:42
so if you refresh now uh you will see if
6:45
you select any image you will see the
6:47
Cropper GS will take over and now you
6:50
can able to crop whatever portion that
6:53
you want to crop inside your image with
6:55
these helpful
6:58
controls so now we do need a button to
7:01
actually save the cropped image so just
7:03
after this we will have a simple button
7:06
so inside this we will have a button
7:12
here so this button will simply say crop
7:17
image so you'll just give it a style
7:20
here margin from the top which will be
7:23
20 pixel and to this button we will bind
7:26
and on
7:28
click this function crop image and we
7:31
will give it a style here which will be
7:33
margin from the right position which
7:37
will be 10 pixel so we just need to
7:39
declare this function now so once we
7:41
click the
7:42
button so we just need to Define this
7:45
function which will be useful for
7:47
cropping the image so once you crop it
7:50
using the controls once you click the
7:52
button this function will get executed
7:54
so inside this function we need to get
7:57
the reference of the Cropper
8:00
component so we have given this
8:01
reference so we can get this reference
8:03
using this dot
8:07
Cropper so we are just targeting this
8:10
image because we have given this
8:11
reference that's why we are able to get
8:13
this using
8:15
this so that's why we declared this
8:17
variable CER us ref and then once we got
8:21
the Cropper element we can simply get
8:25
the cropped
8:27
canvas by using a function which is
8:29
available inside this Library which is
8:32
get
8:33
cropped canvas so once you get the
8:37
cropped canvas we can set this set
8:40
cropped canvas set cropped image to
8:42
whatever is the cropped canvas and we'll
8:45
be converting this to base 64 code to
8:47
two data URL this contains this function
8:50
here and uh that's all now we just need
8:54
to display this cropped image so just
8:56
after this uh button uh we will simp
9:00
simply
9:02
uh display the cropped image so once the
9:05
cropped image is available then in that
9:08
case we just need to display
9:10
it so you have this H H3 tag which will
9:14
say cropped image and inside the image
9:17
tag we will display this in the source
9:20
parameter we will display the cropped
9:24
image and give it a style here
9:30
Max width of around
9:33
100% And I will just give it the margin
9:37
from the top 10 pixel so this completes
9:40
the application now so if you try to
9:42
test it out select your image and do the
9:46
cropping here whatever portion that you
9:48
want to crop and then click this
9:51
button and now you can see the image has
9:54
been successfully cropped and then you
9:56
can simply save this image and in this
9:59
way you can make build out a very simple
10:01
image Cropper application with full live
10:05
preview full editor using this Cropper
10:07
JS package inside reactjs so thank you
10:10
very much guys for watching this video
10:13
all the source code is given in the
10:14
description and also visit my website as
10:18
well free mediat tools.com which
10:20
contains thousands of tools regarding
10:22
audio video n MH and I will be seeing
10:25
you in the next video
#Software
#Other