Up next in 10

Build a Python3 Streamlit Image Editor to Add Text Watermark as Overlay Using Pillow in Browser
Jan 9, 2025
Get the full source code of application here:
https://gist.github.com/gauti123456/10237e0b22a093f8ff3334abffe2f680
Show More Show Less View Video Transcript
0:00
uh hello guys welcome to this video so
0:02
in this video we will look at how to
0:05
build a image Watermark
0:08
editor inside browser using python uh
0:11
using the pillow
0:13
library and we will be using streamlit
0:16
open source framework of python to build
0:18
out web application faster so you can
0:21
see on your screen this is actually the
0:23
demo of this application what we will be
0:25
building in this video so we will have
0:28
this button right here drag and drop
0:31
here you will select your input image on
0:34
top of which you want to add the
0:36
watermark so you can select either jpg
0:39
PNG any file let me select my image so
0:43
it will show you the live preview of
0:45
this image and you will see all these
0:47
controls the watermark text phont size
0:51
you can rotate X position y position you
0:54
can change the color of the watermark
0:57
default color is white and then we have
0:59
this button right here here apply
1:01
Watermark so if you just click on this
1:03
button you will actually see the water
1:06
Mar will be applied here your watermark
1:09
and if I want to make some adjustments
1:12
let's suppose I change the watermark to
1:15
free media
1:17
tools and I Chang the phone
1:20
size and Let me refresh you will
1:23
actually see it will automatically apply
1:26
this let me also change the color of the
1:28
watermark to red color
1:30
and adjust a rotation angle let me
1:34
provide this around about
1:38
45° apply again and you will actually
1:40
see the water mark is rotated at
1:44
45° and the color is red so in this way
1:48
you can adjust the X position y position
1:50
everything you can control regarding the
1:52
water mark like this so once you make
1:56
the adjustments if you are happy you can
1:59
use these sliders you actually adjust
2:03
the position of the watermark and then
2:05
from this Color Picker you can pick your
2:08
favorite color of the watermark and
2:10
click on apply
2:12
Watermark so you can increase the size
2:14
of this
2:16
Watermark by adjusting the slider so
2:19
once you are happy uh you can click this
2:22
button which is appearing which is
2:24
download Watermark image so once you
2:26
click the download button image output
2:28
image will be downloaded
2:30
and you can see your watermark is
2:32
successfully added on top of the image
2:34
as an overlay so in this easy way you
2:37
can add watermark on top of the images
2:40
using this Watermark editor so we will
2:43
try to build this from scratch using
2:45
Python and for building this we are
2:48
using couple of libraries first Library
2:51
we are using a
2:52
streamlit streamlit is a faster way to
2:56
build data apps inside python so this is
3:01
their official
3:02
website so the biggest advantage of
3:06
streamlit is that is it is open source
3:09
it is completely free to use and the
3:12
second Library we are using is p
3:15
i which is pillow which is essentially
3:18
it's a image package so which allows you
3:22
to add watermark on top of the images so
3:24
it's image processing Library so command
3:26
is very simple pip install pillow so
3:30
just go to your command line and install
3:32
these two packages by the PIP command p
3:35
i l w and streamed
3:38
it so install these two packages so once
3:41
you install this just create a new file
3:45
inside your root directory let me delete
3:48
everything and start from scratch so all
3:51
the source code which I will use in this
3:53
video is given in the description so if
3:54
you need the full source code you can go
3:56
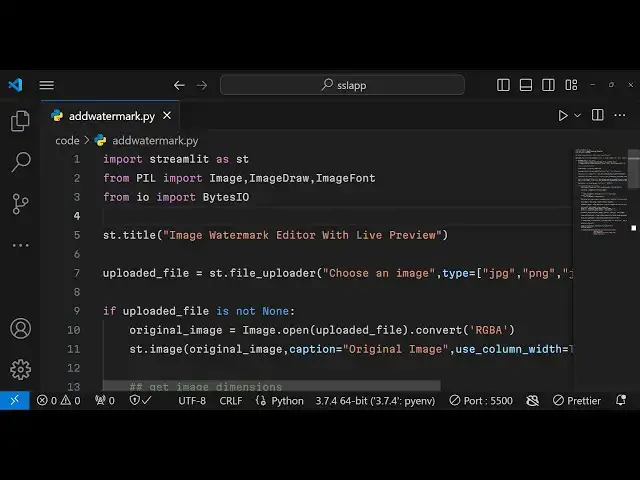
to the description so now to get started
4:00
the very first thing we need to do we
4:02
need to import this streamlit
4:05
package streamlit as
4:09
St and then we need to import the pillow
4:12
Library so p in capital letters and then
4:15
from this we need to import the image
4:17
class the image uh draw
4:21
class and thirdly we need to import the
4:24
image font class so these are all these
4:26
classes available inside below package
4:29
and then from from the buil-in input
4:30
output package we need to import the
4:32
class byes input
4:35
output so this is used to actually save
4:37
the image so now we need to specify the
4:40
title of the app so we can specify using
4:42
the title method and we can simply pass
4:44
a title image Watermark editor with live
4:50
preview so this will essentially add a
4:53
title to your application instantly so
4:56
if I want to run this application so we
4:58
can run this command streamly run
5:00
followed by the name of the Python file
5:02
that you want to run so in this my it is
5:06
ADD Watermark
5:07
dopy so automatically this will start
5:10
your application at Local Host 8501 you
5:13
can see the port number and uh the title
5:16
has been
5:17
added so this is the advantage of using
5:21
streamlit with one line of code your
5:25
have essentially made this web
5:27
application so it basically faster the
5:30
process of building a web app inside
5:33
python so now secondly what we need to
5:36
do we need to a drag and drop interface
5:38
where the user can upload a file so for
5:41
that also we have this method file
5:43
uploader so essentially here we'll
5:46
choose a label choose an image and the
5:48
secondly the type parameters so type
5:52
essentially what images you will accept
5:54
jpg
5:56
PNG and jpg
6:00
so if you refresh now you will see this
6:03
drag and drop interface will get added
6:05
and uh here if you click it you will be
6:07
able to select your input file so it is
6:10
that easy with one line of code so you
6:13
have essentially added the ability
6:15
inside your application to accept files
6:18
from the user and after this we will
6:20
have this if condition and we will check
6:23
basically if the user has uploaded some
6:27
file so in that condition this evalues
6:30
to true and
6:32
uh if the user has uploaded a file in
6:35
that case we need to first of all read
6:38
the file we need to open the file so in
6:40
that scenario we'll use this image
6:43
Constructor from this pillow Library it
6:45
contains a open method so essentially
6:48
we'll open this image we'll pass the
6:50
uploaded
6:52
file and then we'll use the convert
6:54
method to convert this into rgba red
6:57
green blue Alpha
7:00
and then we need to show this image on
7:03
the browser so we will show
7:06
this providing a caption as
7:09
well which is original
7:12
image so we'll essentially show the
7:15
image to the user what image the user
7:17
has selected the third property is the
7:19
use column width to be
7:23
true and then we need to get the image
7:27
Dimension so now to get the image
7:30
Dimension we will declare two variables
7:33
width and height and original image do
7:36
size so it will return the width and
7:40
height and now we need to have a input
7:44
field so essentially if you refresh it
7:47
you will actually
7:49
see if you select any file uh let's
7:52
suppose if I select my file here you
7:54
will see the image will get
7:57
displayed so now this image is
7:59
successfully displayed and now below
8:01
this image we need to have some input
8:03
Fields so the first input field will be
8:06
for adding The Watermark and streamlit
8:09
does provide you the methods to actually
8:12
create uh text Fields
8:14
automatically so this contains this
8:16
method text input so this will create a
8:19
text input field and here you can
8:21
provide a default value so automatically
8:25
this value will be automatically there
8:27
in this input field
8:29
and your watermark so if you refresh
8:36
here so if you select a image
8:41
file so
8:43
this text field will be automatically
8:46
added and the value will be inserted
8:48
automatically the default value this is
8:50
actually the label Watermark text and
8:53
there is a input
8:54
field similarly we need to add some more
8:57
input fields and uh we need to add some
9:00
sliders as well one such slider will be
9:04
controlling the phone size of the
9:07
watermark like this here we can provide
9:11
the minimum value to be 10 and then the
9:13
maximum value to be can provide 50 here
9:18
and the value default value will be
9:21
30 so this you can change depending upon
9:25
which values you want to accept let me
9:27
change the max value to 100
9:30
this will add the slider automatically
9:33
so we have the slider
9:37
method and after this we need to have
9:39
the rotation angle as well for that also
9:42
we have the slider so here the user will
9:46
provide if they want to rotate the
9:48
watermark in this case also the minimum
9:51
value will be zero and maximum value
9:54
will be
9:56
360 and the default value will be
10:01
zero and then we will have two input
10:04
fields for providing the position of the
10:07
water mark So x coordinate again we have
10:11
a slider which will control the X
10:13
position of the watermark minimum value
10:16
will be zero maximum value will be the
10:20
width of the image
10:29
so the current value
10:31
uh we can
10:33
actually divide the width by two so we
10:38
need to type cast this so width divided
10:41
by
10:42
two similarly we will create another
10:45
slider this time for the height so this
10:49
will be the Y
10:51
position so this will be height divided
10:54
by
10:57
2 and this max value will be
11:01
height and this will be position
11:06
y so now we have these two input fields
11:09
for controlling the position and then we
11:11
need to have a Color Picker where the
11:13
user can control the color of the
11:17
watermark so we have this Color Picker
11:19
method available for us so it will add
11:21
this Color
11:23
Picker so here we can provide a label
11:26
which is text color and then the default
11:28
value and let me set it to white color
11:32
so this is white color you will see
11:38
that so after adding all these controls
11:41
let me just refresh it and just show to
11:43
you if it is working or not so let me
11:45
pick any image uh after this you will
11:48
see all these controls have been
11:50
successfully added these
11:52
sliders for controlling phone size
11:55
rotation X position y position and this
11:57
is your Color Picker add
12:00
now we need to add a button for applying
12:03
this
12:04
Watermark so we will have this button so
12:08
you'll have this if condition if this
12:11
button which has a text of apply
12:18
Watermark is clicked by the user if the
12:20
user clicks this button this condition
12:23
will evaluate to true and in that case
12:26
we need to apply that Watermark so for
12:29
that doing this we would use the pillow
12:31
Library image Constructor and it
12:33
contains a new method we will create a
12:36
new image with all the changes the user
12:40
specify and we will specify the width
12:43
and the height of this image and then
12:48
the color so for the color we can
12:51
provide this value
12:53
255 this is essentially the white color
12:56
opacity zero
13:03
and then we will use the image draw
13:05
function and it contains a draw method
13:07
and we will draw this
13:10
image draw this text whatever is the
13:13
text we will draw this on top of the
13:17
image and we also need to load the font
13:21
here we can use the image font class
13:24
here and it contains a function right
13:26
here true type so here if if you are
13:29
using a custom font then you can provide
13:31
a ttf file path but we are using the
13:33
local font which is available which is
13:36
arial.ttf
13:37
and then you'll specify the phont size
13:40
which is selected by the
13:44
user accept input output error so we are
13:48
just writing this code in
13:50
the the try catch block so if any sort
13:53
of error take place you can show this
13:57
error so if this font is not available
14:00
then we will simply load the default
14:03
font so in most cases this font will be
14:06
available in your computer which is
14:08
arial.ttf
14:10
so after we apply the font we now need
14:14
to draw this water mark on top of the
14:16
image for drawing this we have
14:20
uh the text method and we will provide
14:23
first of all the position X and position
14:25
Y which is selected by user and the
14:28
second argument will be the actual
14:30
Watermark text and then the font is
14:32
equal to the font selected and the fill
14:35
color will be the actual text color
14:37
which is selected by the
14:42
user so essentially what we are doing
14:45
right here we are having this object it
14:47
contains a text method this need to be
14:51
shifted just shift this code in the if
14:54
block just make sure that you write all
14:56
this code in the if
14:58
block so we are drawing The Watermark
15:00
using the position that we got from the
15:02
user position X position Y the second
15:05
argument is the actual Watermark text
15:07
then we are loading the
15:09
font and the next argument is the color
15:12
of the text so we are providing all
15:14
these things as arguments to this
15:18
function and then after we do this we
15:21
need to show this image onto the screen
15:24
as well so for doing
15:27
this we will create
15:34
we will rotate this
15:36
uh by the angle that is given so
15:40
rotation and
15:42
expand we will provide the value of
15:47
one then you will create a new Watermark
15:51
image by the new function once again
15:55
rgba
15:59
and the original
16:08
image and the third argument will be the
16:12
color of the image so 255 255 255 0
16:29
so after this we need to calculate the
16:31
position to paste the rotated text image
16:35
so for doing this on the
16:37
canvas we need to declare some variables
16:41
here so after this we need to write this
16:44
code uh which is need to calculate the
16:47
width of the text and the WID height of
16:49
the
16:50
text and then we are calculating the x
16:53
coordinate and the y coordinate using
16:55
the simple math formula
16:59
and the next step is basically to paste
17:02
the text on top of the image using the
17:05
paste function which is
17:07
available inside pillow Library we are
17:10
taking the image of the text and just
17:13
pasting
17:15
it using the coordinates
17:18
given this is slightly complicated but
17:20
you are getting the gist of it because
17:22
we actually first of all calculate the
17:24
coordinates and then we are using this
17:26
function paste function to add the text
17:29
on top of the image with all the options
17:32
that you
17:34
select and then lastly we need to merge
17:38
The Watermark and the image together for
17:41
merging it we will create a new variable
17:43
image with
17:48
Watermark and again in site pillow
17:50
Library we have this function image.
17:53
ala
17:56
composite this function and we will take
17:58
the original image and the watermark
18:00
image and merge both these images into a
18:03
single image so now we will get this
18:05
output image
18:08
so then we need to convert this output
18:11
image into a RGB
18:15
image so you can simply say
18:19
RGB and now we need to show a download
18:22
button so that user can download this
18:24
image so we need to display this
18:26
Watermark image so now display this we
18:29
use this image
18:31
function we pass this caption here image
18:35
with Watermark so if you just uh refresh
18:39
the application and then in select your
18:42
input image and click on this button
18:47
apply with Watermark you will actually
18:50
see the watermark will be applied and if
18:52
you make any sort of changes that you
18:54
change the color of the
18:55
watermark if you change the slide
19:00
this and provide a rotation angle as
19:03
well change the watermark let's suppose
19:05
free media
19:08
tools again click the button apply
19:10
Watermark and you will actually see the
19:12
watermark has been applied so
19:14
essentially we are missing a download
19:16
button so at uh just below this image we
19:20
need a simple download button so the
19:22
user can download this image as well
19:24
inside your machine so for downloading
19:26
it we will use need to convert this
19:29
image into a buffer so for that we can
19:32
use bytes input
19:33
output and image with Watermark it does
19:36
provide you a save function which will
19:39
actually save this image using the
19:41
buffer so the second argument is the
19:43
actual format so either you can provide
19:46
jpg or PNG I am providing
19:49
PNG and then we need to move to
19:52
the starting so seek zero and now we
19:56
need to show a download button so
19:58
streamlit does provide you a download
20:01
button function which takes four
20:03
arguments first is a label of the button
20:07
the secondly the actual image that you
20:09
want to download which is a buffer third
20:12
is the file name and the fourth is the
20:13
MIM type so in this case we provided the
20:17
label download Watermark image the data
20:19
is buffered file name you can provide
20:22
any file name and the MIM type which is
20:24
image/png so this completes the
20:27
application and and uh if you
20:30
refresh the browser select the input
20:33
image
20:36
file apply Watermark you will see this
20:39
what download button appearing so if I
20:42
make changes right
20:48
here change the color here click on
20:51
apply
20:52
Watermark so you can see Watermark is
20:55
applied click on download and you will
20:57
actually see the image is downloaded and
21:00
those changes have been taken place The
21:02
Watermark has been added so in this easy
21:04
way you can build out this complete
21:07
image editor which you can apply
21:09
watermark on top of images with all
21:11
these
21:12
controls so we have built a complete
21:15
application inside python using
21:17
streamlit using the pillow Library so if
21:20
you like this video then please hit that
21:22
like button subscribe the channel as
21:23
well and do check out my website as well
21:27
freem mediat tools.com which is
21:28
essentially a open source website which
21:31
contains thousands of free tools
21:33
regarding audio image and video and I
21:36
will be seeing you in the next video
#Multimedia Software
#Skins, Themes & Wallpapers
#Photo & Image Sharing
#Scripting Languages