live_tv
Livestream Starting Soon
00
Hours
:
00
Minutes
:
00
Seconds
Up next in 10

Build a FFMPEG WASM Photoshop & Canva Image & Video Editor Clone in Browser Using HTML5 & Javascript
Jan 9, 2025
Buy the full source code of application here:
https://procodestore.com/index.php/product/build-a-ffmpeg-wasm-photoshop-canva-image-video-editor-clone-in-browser-using-html5-javascript/
Hi Join the official discord server to resolve doubts here:
https://discord.gg/cRnjhk6nzW
Visit my Online Free Media Tool Website
https://freemediatools.com/
Buy Premium Scripts and Apps Here:
https://procodestore.com/
Show More Show Less View Video Transcript
0:00
uh hello guys welcome to this video so
0:02
in this video I just want to show you a
0:04
brand new uh Photoshop canva clone video
0:08
and image editor clone that I developed
0:10
in browser using HTML and JavaScript
0:12
plain HTML and JavaScript when we have
0:14
used fmpg web assembly library in the
0:16
browser to build this awesome ultimate
0:19
Advanced uh image and video editor
0:22
software in the browser which works uh
0:24
right in the browser no server site code
0:26
is involved if you upload your files it
0:28
is 100% secure it works in the browser
0:31
itself you will see all these
0:32
functionalities are there you will be
0:34
able to convert from one format to
0:36
another all the formats are supported
0:38
and you will be able to control the size
0:40
of the image compress the size you can
0:43
add Watermark trim the crop the image
0:46
you can even transform the image resize
0:50
the image rotate the image add the image
0:52
Watermark text Watermark this is actual
0:55
application guys so first of all let me
0:57
show you the demo right here so first of
0:59
all as you will your image file guys so
1:01
as you select the image it will
1:03
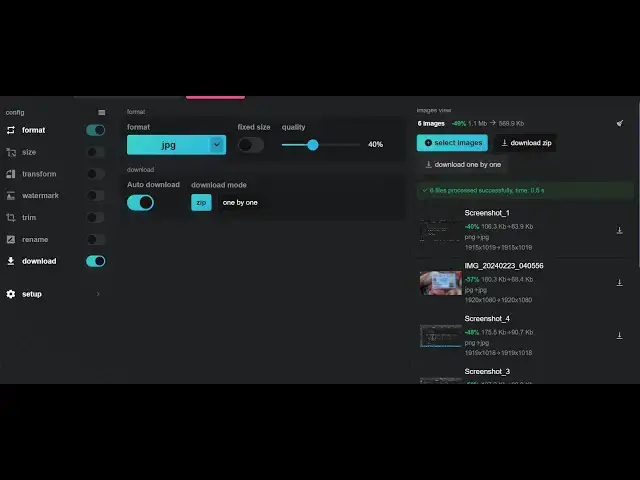
basically download it so first of all uh
1:06
in the
1:07
download directory right here if you
1:10
have Auto download on then automatically
1:13
your file will be downloaded you can
1:14
basically this is the download mode you
1:16
can put zip file it will basically
1:19
download the output images in a zip file
1:21
or one by one if you don't want to Auto
1:24
download you can simply turn off this
1:26
option and these are various settings
1:28
out there if you want to toggle out of
1:30
all these settings let me show you one
1:31
by one by default when you launch the
1:33
application it works in the browser if
1:35
you see it is working in the browser no
1:37
server side code is involved you can
1:39
directly upload this application to a
1:41
ordinary hosting and you can basically
1:44
earn a lot of money by placing
1:45
advertisements as well so the link is
1:47
given guys you can directly purchase the
1:49
full source code of this application you
1:51
will get the zip file after you purchase
1:53
it from Google Drive you just need to
1:55
extract the content which will contain
1:56
the HTML CSS and JavaScript code so let
1:58
me show you the demo of application so
2:01
by default this will be selected and now
2:03
you just need to select which format you
2:05
want a image to convert let's suppose I
2:07
want all my images to convert to webp
2:10
format I will simply select this and now
2:12
if I select my
2:14
image like this if I select this and
2:18
basically in the download I will
2:22
simply turn on this option so the as I
2:26
select the image it will automatically
2:28
download after the processing is done so
2:31
now uh as I select my image let's
2:34
suppose I want to convert this image to
2:36
webp format so it will work and
2:38
automatically your image will be
2:40
converted to webp format you will see
2:42
that so in this way so the next thing is
2:47
so next thing guys is that you will
2:50
basically see
2:52
here uh we can basically convert to any
2:56
other format jpg as well all these
2:58
formats are available GI file static GI
3:00
file PNG webp animation GIF animation
3:03
you can even convert this to Icon as
3:05
well various sizes 128 by 128 256 by 256
3:09
so if you're developing an application
3:11
if you need an icon you can simply it
3:14
will simply convert this into a icon
3:17
file whatever image file that you select
3:19
and now it has been converted to a 256x
3:22
256 icon
3:25
so you can even select you can see that
3:28
this file has been reduced from 301
3:31
kiloby to 45 kilobyte so image
3:33
compression is also going on guys it's a
3:35
very tremendous application it also do
3:38
you it also compresses your images as
3:41
well alongside with converting and uh it
3:44
is very good application and
3:47
uh you can basically do
3:51
it take your image it will basically
3:54
show you a progress bar after it is done
3:56
it will simply download your file
3:59
automatically once it is done it will
4:01
simply download you will see that so now
4:03
I will show you uh some other dependent
4:06
uh size as well you can even control the
4:08
size as well you can mention manually as
4:10
well if you want to
4:12
mention or you can select premade sizes
4:15
500 width 500 height you can even
4:19
provide scaling as well and uh if you
4:23
want to resize your image to 500 by 500
4:27
so it will resize your image to 500 00
4:30
by 500 so now this image is exactly 500
4:33
in width and 500 in height so next thing
4:36
you can even control the quality by
4:38
using the slider if you want to decrease
4:40
the quality of the image if you want to
4:43
save some
4:45
size
4:49
uh so you will see this image quality
4:53
will be slightly degraded you will see
4:55
that we have successfully degraded the
4:58
size from 2011 kilobyte to 12.5 kilobyte
5:03
you can control all these options guys
5:05
like this you can even have a fixed size
5:07
as well let's suppose you want a fix F
5:10
100 kilobyte as only you can toggle this
5:13
option so all these Advanced it's
5:15
Advanced image editor guys similar to
5:18
canva that you see and Photoshop all
5:21
these functionalities are available
5:23
right in the browser it says single page
5:25
application it works in the browser no
5:27
server site code is involved and and uh
5:30
now let me show you the third one which
5:32
is
5:33
transform so if you want to rotate your
5:35
image by any angle let's suppose if I
5:37
want to rotate my image to 90° so now if
5:41
I select my image this image it will
5:45
basically rotate my image and now you
5:48
can see it will see it it is rotated my
5:51
image by 90° if you want to horizontally
5:54
flip your image as well you can also do
5:56
that as well
6:02
so it will horizontally flip your image
6:05
you will now see the image is
6:06
horizontally flipped so you can see that
6:09
so all these options are there and uh
6:12
rotation flipping next option is for
6:16
adding Watermark so let's suppose if you
6:18
want to add Watermark guys it is very
6:19
easy adding text Watermark this is a
6:23
window will open right here if you see
6:24
that
6:26
basically if I want to add my own
6:28
channel name coding section so
6:30
automatically it will show you in the
6:32
left hand side it will show you you can
6:35
control everything right here phone size
6:37
as well if you want to repeat this you
6:40
can select the repeat option open repeat
6:42
and now you will see that you can even
6:44
control that like this you can see that
6:47
you can control everything right here
6:50
this looks great so you have seen images
6:53
using Watermark something like this you
6:56
can control this left position all that
7:07
Stu you can see that so now I can simply
7:09
save so now Watermark is saved right
7:13
here so once I basically apply this to
7:16
let suppose
7:20
uh now if I select my image
7:29
so if I open this image now you will see
7:32
that guys all these watermarks will be
7:34
added right here coding sixa coding sixa
7:36
that you see right here let me just
7:39
delete this one that I see right
7:43
here so two water marks are there so I
7:46
only need one Watermark so I will simply
7:48
delete the first one so you will now see
7:52
all these watermarks will be added right
7:54
here if you see that we added this water
7:56
mark you can control the orientation
7:59
every Thing by I showed you
8:01
basically if you want to add also the
8:04
image Watermark same goes with it as
8:06
well you can control all these
8:08
functionalities repeat you just need to
8:10
choose a watermark image that will be
8:14
used so once you will basically
8:23
see so image is larger so I need to
8:26
select a small image for this so so what
8:30
I will say uh YouTube
8:43
logo 256 by 256
9:00
so this logo I will take guys for adding
9:02
water
9:04
mark so simply click add choose your
9:10
uh simply file here so now go to repeat
9:14
and basically you can basically place
9:16
anywhere it will place it and all the
9:18
locations if you want the in in the
9:20
center position left hand side all that
9:23
stuff if you want here all that you can
9:26
even scale it if you want to decrease
9:29
the size
9:30
everything you can control guys with
9:31
this editor it's a tremendous editor if
9:34
you have this editor you can do all the
9:36
things you can even if after purchasing
9:40
this you will get full commercial rights
9:42
of reselling or using this as uh putting
9:46
advertisements and earning money so the
9:48
link is given you can directly purchase
9:50
it from my website you will get a zip
9:52
file which will get which will contain
9:54
all the source code and the actual
9:56
application you can see the application
9:58
tremendous
10:01
Su you will see
10:05
that you can see that so how
10:10
it I think this looks great we don't
10:13
need the repeat one
10:17
so you can toggle this off so I just
10:20
want this uh Watermark to appear in
10:24
the so I can
10:27
simply in the center sorry in the the
10:29
center that's all click on save so now
10:32
if you upload your image now any image
10:35
that you upload you can even do this for
10:37
multiple images guys so just select
10:39
multiple images not one single so now
10:41
guys I will I I'm just talking that if
10:43
you want to toggle this download option
10:46
if you want to have multiple images
10:48
downloaded you can basically select
10:50
multiple images right here so if I
10:52
basically now want to select multiple
10:54
images I can select here this multiple
10:57
images so I CED all these images so it
11:00
will show the progress bar it will now
11:02
download a zip file and now it will open
11:05
a zip file and all these screenshots
11:08
will
11:09
be uh Watermark will be added so you
11:11
will see that all the images have
11:13
Watermark right at the center position
11:15
so you can see bulk Watermark you can do
11:17
with this application awesome image
11:19
editor that I developed for you guys in
11:22
HTML CSS and Java script the link is
11:24
given in the description and also in the
11:26
next section I will show you it also
11:28
contain a video recorder built in inside
11:31
this video editor canva and Photoshop
11:34
editor it is also having a video editor
11:37
builtin which allows you to record your
11:40
videos directly in the browser and
11:42
saving at web M file you will see in the
11:45
next section and this is for the
11:47
watermark guys I showed you all these
11:49
things you will see that now we come to
11:52
the trim option if you want to trim the
11:54
trim the crop the portion you can even
11:57
do that as well
11:59
you can select the top portion left
12:02
portion this is for trimming or cropping
12:04
the video you can do that you can rename
12:06
your file as well original name number
12:09
as well so these are all the
12:11
settings and now let me show you very
12:15
fun little setting guys if you want to
12:17
have a simple sound you can basically go
12:20
to it you can even control the number of
12:22
CPUs that it will be used using I have
12:25
maximum CPUs available which is CPU CES
12:28
which is eight it is automatically
12:30
selected you can also control that also
12:33
if you want a sound notification then
12:35
you can simply toggle this option on so
12:38
now you will get a sound notification
12:40
when your processing is
12:43
done job's done you can see that job
12:46
done a person has spoken these words so
12:49
that you get a notification that your
12:51
job is done so you can now open your
12:52
result awesome application guys so the
12:56
link is given guys you can directly
12:57
purchase it you will get a
13:00
simple uh you will get a HTML
13:05
code like this this will be the HTML
13:08
sorry this will be the code that you
13:10
will get this will be the directory
13:12
structure you will get guys if you are
13:14
interested the link is given so you can
13:18
directly go to the description and
13:20
purchase this awesome little source code
13:22
so thank you guys for watching this and
13:25
uh in the next section in this video I
13:27
will now in the next section I will show
13:29
you that video recorder as well
13:31
so uh and as a as a bonus software guys
13:34
I also develop a video editor guys for
13:36
you where you can even record your
13:38
screen as well simply click this option
13:40
or you can even drag and drop your
13:42
existing video as well take screenshots
13:44
and save it as a PNG or webp format if
13:47
you want to record your screen simply
13:49
select entire screen let me select click
13:52
on share if you want to also include
13:54
audio system audio so whatever that I'm
13:57
speaking right here system audio you can
13:58
even include the system audio as well so
14:01
toggle this option click on share so now
14:03
it will start recording whatever I'm uh
14:08
so you will basically see it will start
14:11
recording click finish my video will be
14:13
generated if you see in the video player
14:16
and uh I can
14:19
simply this is
14:26
the you can basically will see that so
14:28
it's it's a very awesome little
14:30
application guys if you see that video
14:32
recorder is also
14:34
there and
14:39
uh you can basically take the screenshot
14:43
as
14:44
well in the
14:51
video so if you're interested guys the
14:53
link is given in the
14:55
description you can directly purchase it
14:58
just this is the actual software very
15:00
good software Photoshop canva clone
15:03
software thank you very much for
15:05
watching this video
#Flash-Based Entertainment
#Multimedia Software
#Clip Art & Animated GIFs
#Photo & Image Sharing
#Video Sharing