live_tv
Livestream Starting Soon
00
Hours
:
00
Minutes
:
00
Seconds
Up next in 10

Build a FFMPEG GIF Animated Video & Image Editor in Browser Using gifsicle Library in Javascript
Jan 9, 2025
Buy the full source code of the application here:
https://procodestore.com/index.php/product/build-a-ffmpeg-gif-animated-video-image-editor-in-browser-using-gifsicle-library-in-javascript/
Hi Join the official discord server to resolve doubts here:
https://discord.gg/cRnjhk6nzW
Visit my Online Free Media Tool Website
https://freemediatools.com/
Buy Premium Scripts and Apps Here:
https://procodestore.com/
Show More Show Less View Video Transcript
0:00
uh hello guys welcome to this video so
0:02
in this video guys I will show you a
0:05
animated gif editor that I developed
0:08
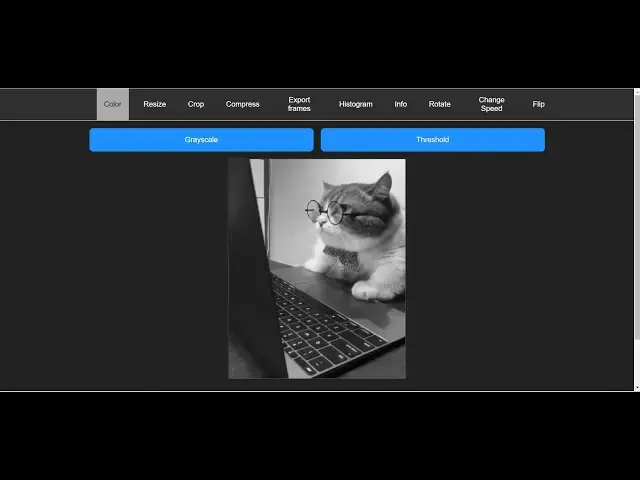
with live preview so this editor will
0:11
allow you to edit your gif animated
0:13
files uh which are a short video files
0:17
which are there so this is the actual
0:19
interface and we basically developed
0:21
this using fmpg and a library third
0:24
party library that I will show you this
0:26
is the actual application that you can
0:27
see on on your screen so so here you
0:30
need to select your any give file this
0:33
is actual file so let me select this
0:35
file so you will see as you select the
0:37
file it will it is a entirely client
0:41
side application no no files are
0:43
uploaded to the server so basically as
0:45
you select the file it is just STS in
0:47
the browser itself and now as you select
0:50
the file here you can basically perform
0:52
all these operations you can basically
0:54
change the color of this GIF animation
0:56
let's suppose if you want to change it
0:58
to black and white now you can see that
1:00
that colored GIF animation has been
1:02
changed to gray scale and now you can
1:04
basically download your result as an
1:07
attachment so now if you open this
1:08
animation you will basically now see
1:10
this has been changed to a gray scale
1:12
black and white GIF animation and let's
1:15
suppose if you want to convert this into
1:17
Tes then also it's very easy Guys these
1:21
are the operations that you can perform
1:23
and then if you want to resize this GIF
1:25
animation 128 width 128 height so here
1:29
you need to provide provide the
1:30
dimensions for the width and the height
1:32
of the animation click on resize and now
1:34
you will basically see your GIF
1:36
animation will be successfully resized
1:39
and you can download it you can see that
1:41
so it's a very good tool that I
1:42
developed guys in the browser itself you
1:45
don't need third party software to
1:46
actually edit your GIF files it's a
1:48
fully fledged GIF uh editor which allows
1:51
you to perform all these operations on a
1:53
simple gif file you can even crop a
1:56
particular section let's suppose we have
1:58
this GIF animation we need to crop a
2:00
particular section in the GIF animation
2:02
we can basically use this mouse here and
2:05
we can drag and drop whichever section
2:07
that we want to crop here and we can
2:09
basically let's suppose I only want to
2:11
crop this portion of the animation so I
2:14
can simply select it just select the
2:16
portion and then click on crop so as you
2:19
click crop section guys you will see the
2:21
rest of the portion has been
2:22
successfully cropped you are s simply
2:24
seeing the face of the cat and rest of
2:27
the portion has been successfully
2:29
cropped and uh this will significantly
2:31
reduce the size of the GIF animation and
2:34
also it will only show the part that you
2:36
want in the GIF animation and basically
2:38
you can crop the section whatever
2:41
section that you want by using this
2:43
mouse here simply click crop and once
2:46
again your section will be cropped here
2:48
so in this way guys you can see how easy
2:51
it is you can basically resize change
2:54
the color and you can snap it to the
2:56
center aspect ratio you can change it to
2:59
landscape
3:00
and then crop so
3:03
various custom you portrate 9 by 16 if
3:07
you uploading it to Instagram then
3:09
basically it will do it in the portrait
3:17
mode you can see that so as you select
3:24
it so it will change it
3:28
to
3:30
portrait mode here like
3:33
this just select
3:38
here so now you can see that
3:41
so you can provide here custom so
3:43
whatever whatever you select right here
3:46
it will be cropped right here you can
3:48
see that and now I basically come to the
3:51
compress if you want to compress a large
3:53
size GIF animation if you have you can
3:56
basically use the compression here and
3:59
basic basically inside this application
4:01
here we can have low compression medium
4:03
compression high compression if you
4:05
select high compression you just need to
4:08
provide the amount here so it comes I
4:11
think you can select the value from 0 to
4:13
100 let's suppose if I say 50 click on
4:16
compress it will take some time and it
4:18
will actually compress the size of the
4:20
GIF animation and then it will show you
4:22
the GIF animation and then you can
4:24
download it so it will take some time
4:27
and after that you can see that so it
4:29
basically you can see reduced this
4:32
animation 6.14 megabytes to
4:35
4.01 megabytes so it basically reduce
4:39
the size of this GIF
4:40
animation and then you can basically
4:43
download you can see the size is now
4:45
become four megabytes so in this case
4:47
guys if you do do want to reduce the
4:49
size of the GIF animation you can do
4:51
this as well and then the very important
4:54
part guys if you want to extract the
4:56
images from a gif animation export the
4:58
frames you can basically select this
5:00
portion exports frames and now what will
5:03
it will do it will automatically capture
5:06
all the frames in the GIF animation it
5:08
will convert the video into series of
5:11
images that you see in the GIF animation
5:14
so particular image you can open this
5:15
right here so one it's basically
5:18
comprise the GIF animation from these
5:20
series of images and we are basically
5:22
animating these images to form a gif
5:24
animation so we are actually take it
5:27
take the snapshot of each frame and
5:29
converted that to frames so in this way
5:32
guys this also supports this also which
5:35
actually converts your GIF animation
5:37
into a series of frames and then we have
5:41
histogram and if you just increase just
5:45
it will exactly tell you which colors
5:47
are dominating here in histogram if you
5:49
want to calculate in the GIF animation
5:52
which colors are dominating here so you
5:54
will it will tell you the dominant
5:56
colors which are there in the GIF
5:58
animation this is this is also a very
6:00
handy tool if you want to use and then
6:03
in info here if you want to have
6:05
additional information it will tell you
6:07
exact images in the GIF animation which
6:09
is 94 images logical screen conclusion
6:12
all that stuff uh is basically printed
6:15
out uh which is the information related
6:18
to GIF animation so all these things are
6:20
printed out then we can even rotate the
6:23
GIF animation 90° 180° 270° so if I want
6:27
to rotate this animation you will see
6:29
that I can rotate this GIF animation so
6:31
all the operations guys that you want to
6:33
perform you can perform it right in the
6:36
browser you don't need any third party
6:38
software then if I want to say 180° so
6:41
you will see that it will rotate 180°
6:43
270° now you can see that it will rotate
6:46
2
6:47
70° this is the rotation part and if you
6:50
do want to control the speed of this you
6:53
can even control the speed as well so
6:54
let's suppose you just need to provide
6:56
the speed in uh numbers so if you
6:59
increase the speed let's suppose if I
7:00
provide 15 so it will slow down the
7:03
animation and you will see the animation
7:05
will be slightly slower very slow
7:08
because we have provided large value
7:09
here which is 15 if I provide here less
7:12
value which is one the animation will
7:14
run faster you will see that very
7:17
fast if I change change
7:20
speed the animation will be far very
7:24
fast and this is the actual thing guys
7:26
if you want this source code guys
7:30
of this animation of this uh project the
7:33
link is given in the description of the
7:35
video you can directly purchase the full
7:37
source code of this project after that
7:39
you will actually get a zip file which
7:42
will actually contain this HTML CSS and
7:44
JavaScript code and you will be able to
7:46
download the file from Google Drive
7:48
after the payment is done and you will
7:51
be able to extract the from the zip file
7:55
and this is actual directory structure
7:56
is there we are actually using the FM PG
8:00
basically library in the browser and
8:02
also we are using GIF CLE Library these
8:05
two libraries that we are using guys
8:07
both these libraries are open source
8:09
fmpg if you don't know it's basically we
8:12
can even flip the animation as well
8:14
horizontal flip vertical flip like
8:19
this if you don't know about fmpg guys
8:22
it's a video and audio processing
8:24
Library it has its own website it's
8:27
completely crossplatform available for
8:29
both the uh Windows Mac and op but we
8:32
are using it as a CDN so you don't need
8:35
fmpg installed inside your system so we
8:38
are directly using it in the browser so
8:40
you don't need to install fmpg to work
8:43
it so I just showing you the for
8:45
reference and the SEC second package is
8:47
again a third party Library JavaScript
8:50
library open source uh JavaScript and
8:53
nodejs package 510 weekly downloads
8:58
th000 it's a very popular package and
9:01
this allows you to actually animate your
9:04
GIF edit it perform all these operations
9:07
which is
9:08
rotating scaling it or trimming it
9:12
cropping the GIF changing speed rotating
9:15
the GIF all these operations that I'm
9:17
showing you we are performing it using
9:19
this Library alongside with fmpg this is
9:23
the actual package npmi so we are
9:25
actually using the CDN which we are
9:28
directly using in the browser so this is
9:31
actual application guys now let me walk
9:33
you through how I coded this application
9:35
the interface how it looks and uh as I
9:39
already told you guys this is entirely
9:41
coded in HTML CSS and JavaScript and no
9:44
server site code is involved in this so
9:47
if you are purchasing it you can
9:49
directly host it inside your website you
9:51
will get full commercial rights to
9:53
actually use this application and earn
9:55
Revenue because users will enjoy this
9:57
application they they don't need third
10:00
party software and your website will
10:03
rank if you basically purchase this
10:05
source code and you will be able to get
10:07
a lot of things this is a very cool
10:09
little project where you will allow the
10:11
user to actually uh perform all these
10:14
operations cool little operations change
10:17
the color of the GIF animation resize it
10:19
to a particular size so all these cool
10:22
little operations you can perform it and
10:24
you will be able to learn a lot of
10:26
things so first of all guys let me show
10:28
you how I I did this uh little bit let
10:32
me explain you the code as well very
10:34
little bit because it's a massive
10:36
application so I can't write or I can't
10:39
explain everything but I will try my
10:41
best to actually explain you the
10:43
overview so basically guys as I show you
10:48
these are the actual navigation buttons
10:50
that you see right
10:52
here if I just uh delete these buttons
10:56
so you will basically see all the
10:58
buttons will go away which are basically
11:00
appearing on the top here so one such
11:03
button let me show you so we are
11:04
actually using the custom CSS so we have
11:07
styled all these classes in the CSS so
11:10
we are providing button navigation
11:12
button and the attribute data app this
11:17
is actually a for the color so here we
11:20
can simply say color so if you just add
11:22
this now this button is disabled by
11:25
default you need you do need to select
11:28
your GI GI file before you do this
11:31
anything so same goes with other but
11:34
button SK which is
11:37
for the resize crop
11:42
compress these are different buttons
11:44
here this one is for
11:48
resize and this data app will change to
11:52
resize and this one is for crop and here
11:56
we will basically give it an ID here
11:58
which is crop
12:02
button this is
12:07
crop you can see that so three buttons
12:10
are added so the fourth one basically is
12:12
for compressing the GIF
12:24
animation so next one is if you want to
12:27
export the gift to the images so like
12:32
this and this is
12:36
frames next one if you want to show a
12:40
histogram of the GIF
12:48
animation so these are all the buttons
12:50
guys which are there so what I will do I
12:52
will copy this paste it all this so you
12:55
don't need to waste time I just
12:58
explained you basically these are the
13:00
actual buttons which are there in the
13:02
HTML which actually controls all this
13:07
functionality so if you see now all
13:10
these buttons are there after this guys
13:12
we are basically uh having let me
13:16
explain you uh for the as you select my
13:20
if I basically select my gif file as
13:23
this is uh selected successfully now
13:27
these buttons are activated so if if I
13:29
just click this color button right here
13:32
this menu will appear these two buttons
13:34
will be there so how they are appearing
13:36
right here if you see basically this is
13:38
the code responsible for this so
13:43
here if you see now if I select my GIF
13:50
animation and click on this nothing will
13:52
nothing is there right here because we
13:54
deleted the code for this so right here
13:56
what we are doing it we are showing a
13:58
menu here to the user whenever they
14:00
click on this button after they select
14:03
our GI file so inside this what we are
14:06
actually showing to the user is uh a
14:10
simple UI you this UI will contain two
14:14
buttons first button is responsible for
14:17
converting allowing the user to convert
14:19
the GIF animation for grayscale
14:22
grayscale simply means black and white
14:24
so we are giving a default button right
14:27
here button
14:30
default
14:32
button so after this the second button
14:36
in this will
14:38
be the
14:41
threshold again SP same classes we are
14:44
giving default button so these all
14:46
classes we have styled it inside a CSS
14:50
so if you just now
14:52
see so these two buttons will appear as
14:55
we select you will see that so it is
14:58
appearing on the the same different
15:00
times so we just need to add this
15:04
uh
15:09
uh appcore
15:17
color appcore color class is equal to
15:22
app oh sorry this needs to be underscore
15:25
not
15:27
hyphen
15:30
so now you can see this is the actual
15:32
interface which is appearing so now I
15:34
will be showing you the actual code guys
15:36
which will transform my image to a black
15:38
and white GIF
15:41
animation so as I basically click this
15:43
button we will actually make a
15:46
JavaScript code for this it is saying
15:50
that
15:52
this resultant
15:57
UI okay we do also need to have a image
16:01
tag right here guys where we will
16:03
actually show the live preview to the
16:05
user whenever the result is there so
16:08
right here we will have a class of image
16:12
uncore wrapper in inside this pag we
16:15
will actually show the output to the
16:17
user so this will be
16:22
result underscore
16:25
GIF this is actual class we need to give
16:27
here to the image which is result under
16:32
uh underscore give and it will also give
16:36
it an ID here which is result uncore
16:38
color so here we will actually show the
16:40
result to the user and now I will
16:43
actually show you the actual JavaScript
16:45
code that I written for this which is
16:47
included in the script section which is
16:49
the color. JS so for all the operations
16:52
that you see guys changing the speed it
16:55
has its own Javascript file for changing
16:57
the color it has its own file
16:59
compressing cropping flipping exporting
17:03
gift to frames all these files have
17:06
their own Javascript file so I just
17:08
basically uh encapsulated the
17:10
application into different modules so I
17:14
haven't written entire code in a single
17:16
file so it's good practice to split the
17:19
code into multiple files so we are now
17:21
be using this uh showing you step by
17:23
step how I did this for changing the GIF
17:26
animation color to Black and White
17:29
so first of all guys we need to import
17:31
our file which is the library that I
17:34
showed you at the starting which is gift
17:36
skill run this package from this file GI
17:43
so we basically imported the library
17:45
that we will be using for this and then
17:48
we will get the references of all the
17:51
HTML elements result error then the
17:54
download
17:55
button so once the processing is done we
17:59
will actually click this button to
18:00
actually download the uh gif file after
18:04
that we will actually
18:06
get uh
18:13
the the actual time which took to
18:16
actually we will print the number of
18:18
seconds it took to for the processing by
18:20
using this element and then done area
18:23
you will also show a done message to the
18:26
user that your processing has been done
18:29
so it's good for user interaction and
18:30
for the application and now we will
18:33
actually submit
18:36
our response we will add a event list
18:39
first of all to this gray scale button
18:42
so once the user clicks this button we
18:45
will add this event listener inside this
18:47
call back function the very first thing
18:49
we do we call a function which is handle
18:51
click and we pass as an argument which
18:54
is gray so now we just need to Define
18:56
this function and uh
19:01
you basically Define a function here
19:03
which is handle click and this will
19:05
actually take a color color map either
19:08
it can be uh gray or it can be this
19:13
color if uh you press the second button
19:16
which is in this case is threshold so
19:18
it's BW so in both cases we are calling
19:22
the same function which is handle click
19:24
and now it I will
19:26
basically process my give animation so
19:30
inside this we will say document. get
19:33
element by ID which is uh
19:37
preview
19:39
image and then we will actually get the
19:42
file name by using preview image. data
19:47
set so after this guys we will actually
19:51
do our processing result time these two
19:54
things will be coming from this
19:57
operation await because we can use it in
19:59
a Asing function and await we will do
20:02
this call this function give skill run
20:05
and it basically pass some options here
20:07
first is the blob URL it will will pre
20:10
preview image
20:12
source and
20:16
then put a comma and then the file name
20:19
actual file name you can directly pass
20:22
it as you can see we are passing it just
20:26
make sure it is file name
20:30
the third parameter guys is the actual
20:32
command and you can see that this is
20:35
actual command that we are using-- use
20:38
Das color map and Then followed by the
20:41
actual color map that the user passed
20:44
and the actual output file name like
20:46
this this file name that you passed is
20:50
having its output so after you do this
20:52
guys what we need to do we now need to
20:55
add the image to the result you can say
20:59
result URL and then you can create an
21:02
object URL create object URL which is
21:05
results
21:08
0o and after this we can simply say
21:11
result give Source result
21:15
URL and then also download button you
21:18
can say
21:23
href result
21:27
URL
21:29
and for downloading the GIF animation we
21:31
are doing this process for there is a
21:34
download
21:37
button download with the actual file
21:41
name and we can also print out the
21:44
number of seconds it took by time value
21:46
inner text you will display the number
21:48
of time in seconds and also the done
21:51
message so we can basically print out
21:54
this display with to be
21:57
Flex so this is the actual code here
22:00
guys if you refresh your application and
22:03
try
22:05
to select uh the GI file click on Gray
22:11
scale so now it will do it will actually
22:14
change this to Black and
22:27
White
22:31
uh just
22:39
wait uh just wait I think I made some
22:42
mistake here this is actual problem guys
22:45
with live coding mistakes can happen
22:48
sometimes so just bear me let
22:53
me mistakes can happen guys so that's
22:56
it's part of the job and I think we are
23:00
missing the color
23:02
map as an argument color map we are
23:05
passing
23:06
it paste it
23:09
here I miss I think I made a mistake in
23:12
the import process so now if I refresh
23:15
it select my file change the color now
23:20
you can see that it is working so I
23:22
think I just made a mistake earlier on
23:24
if you see in the import process I made
23:27
a mistake here
23:31
we we also need to put JS right here at
23:34
the very top while importing it we do
23:36
need to put here
23:39
JS so just put JS and then your
23:42
application will work just select color
23:45
gray
23:50
scale some other error file name is not
23:54
defined okay file name sorry capital n
24:00
guys I'm telling you mistakes will
24:02
happen file name encoding if you don't
24:05
make mistakes then you are not doing the
24:08
right thing in order to be successful
24:10
you do need to make mistakes and uh then
24:13
work on those mistakes if you want to be
24:15
better on coding so you will see the GIF
24:17
animation is changed from colored
24:19
animation to colored one to black and
24:21
white so it is gray scale so same goes
24:25
with the threshold if you press
24:27
threshold we are passing different
24:28
argument so this is called as threshold
24:30
now I will need to show a button guys
24:33
also right here at the very bottom to
24:34
actually download my uh thing so if you
24:38
want to show the download button as well
24:41
so right here if you
24:45
see we are Al also just showing this
24:48
download button that you see right here
24:50
but that download button is not showing
24:52
up so what we are doing something wrong
24:55
here if you see right here for the
24:58
colored
25:01
one we also need to have a download
25:05
button for this I think yeah just after
25:09
this image tag in the diff section we do
25:12
need to have a ID here which is done
25:14
area color this will actually show you
25:18
the message if the processing is
25:20
successful also show you how much time
25:23
it took for the processing to take place
25:26
and then we will have an anchor tag for
25:28
download button
25:34
color and we will basically give it a
25:36
class here of Def BTN
25:41
default BTN and it will basically open
25:46
it in a different window which is Target
25:50
blank and here we will
25:55
simply uh
25:59
we will simply have say
26:02
download
26:06
result and then in the paragraph We Will
26:08
basically show how much seconds it took
26:12
basically done in Span tag and then give
26:15
it an ID which is time color timecore
26:18
color and
26:21
uh this will be this value will be in
26:25
millisecond so just make sure that you
26:27
write MS
26:31
so 1,000 millisecond is equal to 1
26:33
second so that value is in
26:36
milliseconds so if you see now there
26:39
will be this message printed out done in
26:41
this much of millisecond which is a less
26:43
than 1 second the processing is very
26:46
faster using this libraries it's this
26:49
application is very fast click on that
26:51
and now your result will be downloaded
26:53
as well so this is one operation guys
26:56
similarly we have repeated this for
26:57
every operation the command is s
26:59
slightly different rest of the process
27:02
Remains the Same if you check out the
27:03
rest of the files for cropping it you
27:06
will see all the code Remains the Same
27:08
we are importing this package and then
27:10
we are actually changing the command
27:13
here we are taking this blog URL file
27:15
name command is slightly different for
27:17
each operation cropping it rotating it
27:19
the commands are different but the
27:21
structure of the application remains
27:23
constant so if you like this video guys
27:25
please hit the like button subscribe the
27:27
channel and if if you need the source
27:29
code the link is given in the
27:30
description you can directly purchase
27:31
the full source code and you will get
27:33
your zip file and uh thank you very much
27:37
for watching this video and I will be
27:39
seeing you in the next video
#Online Media
#Online Video
#Multimedia Software
#Online Goodies
#Clip Art & Animated GIFs
#Animated Films