Up next in 10

Angular angular-ng-autocomplete Library Example to Build Material Autocomplete Form Field in Browser
Jan 21, 2025
Get the full source code of application here:
https://codingshiksha.com/angular/angular-angular-ng-autocomplete-library-example-to-build-material-autocomplete-form-field-in-browser/
Hi Join the official discord server to resolve doubts here:
https://discord.gg/cRnjhk6nzW
Visit my Online Free Media Tool Website
https://freemediatools.com/
Buy Premium Scripts and Apps Here:
https://procodestore.com/
Show More Show Less View Video Transcript
0:00
uh hello guys welcome to this video so
0:02
in this video I will show you how to
0:04
integrate this autoc complete field
0:06
inside angular material like so as you
0:09
type here you can have a series of
0:11
options right in the drop- down and as
0:14
soon as you type you will see these
0:15
series of options appearing so I will
0:17
show you how to integrate this inside
0:19
angular using a package so as soon as
0:21
you select any choice this will be
0:23
displayed so whatever that you selected
0:26
from the drop downs so it's a
0:28
autocomplete field and uh it's material
0:30
design if you see in inside angular so
0:33
there is a specific dependency that you
0:35
can have so we have the series of
0:37
options right here that we configured if
0:38
you see in the typescript code and as
0:41
soon as you select a choice this will be
0:42
triggered so there is a package here if
0:45
you go to npmjs.com uh just search for
0:48
this package which is angular NG
0:51
autocomplete so just search for this the
0:54
very first package which comes this is
0:57
actually
1:03
so if you see now uh this is actually
1:06
the package the command is very simple
1:08
I've already installed it uh it's almost
1:10
having 24,000 weekly downloads so I have
1:13
written a complete step by-step blog
1:15
post explaining all the source code you
1:17
can go to the description link to get
1:18
all the source code so now I will show
1:21
you I will simply delete everything and
1:23
start from scratch
1:30
so you can see that guys I'm deleting
1:32
everything and starting it from scratch
1:34
so this is a simple angular project and
1:37
first of all you need to go to your app.
1:39
module. TS file to actually register
1:41
this module and for registering this
1:44
module we simply use the import
1:45
statement so we simply say import auto
1:51
complete lib module and it will be
1:55
coming from this package which is
1:57
angular NG Auto
2:01
complete so we actually import this
2:04
using this line and then inside your
2:06
Imports array we simply add this so auto
2:11
complete live module so we simply add
2:13
this we configure this so this is your
2:14
configuration code so now you can close
2:16
this file you come to your app.
2:19
component.ts file so here we need to
2:23
specify a series of
2:25
options in the auto complete so we will
2:28
have an array here so will just take an
2:31
declare a countryes array so this will
2:34
this array will contain a series of
2:36
object each object will contain two
2:38
properties first is the ID which is a
2:41
numeric value and then the name of the
2:45
country so in this easy way you can have
2:48
all your choices configured
2:51
preconfigured this can even be coming
2:53
from a database as well but here for
2:56
this example we are just declaring a
2:58
statically declaring a countryes array
3:01
and here you can have all your
3:04
options so this can be any data and let
3:07
me paste it all the countries which will
3:10
appear in the autocomplete dropdowns
3:17
so so we have declared this countryes
3:20
array and each country is having two
3:22
properties ID and the name so after this
3:26
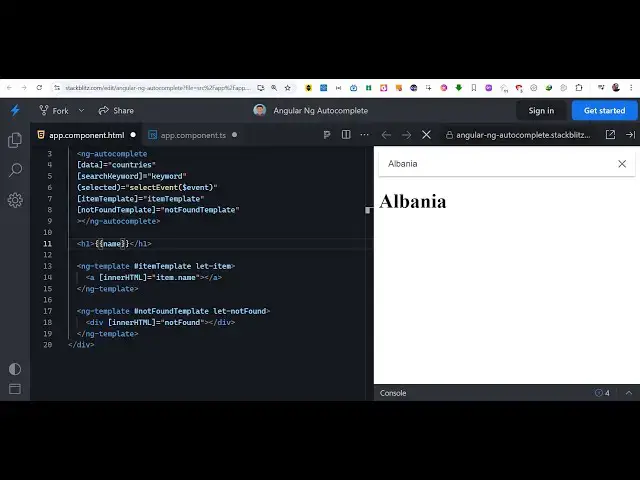
we come to your app. component. HTML
3:28
file and here we will configure the
3:31
autocomplete component so right here in
3:33
the div
3:35
element we'll give it a class of NG
3:39
autoc
3:42
complete and we'll render this component
3:44
which is NG autocomplete this is
3:47
actually the name of the component and
3:49
it actually takes some properties so the
3:51
very first property is take is the data
3:54
so which data you are looping through so
3:56
we are using the country's data so we
3:58
are directly providing is this property
4:02
and then whatever is your search
4:07
keyword so whatever that you
4:10
search we have also declared this if you
4:13
see we have a variable here keyword
4:15
which is the name right here so you're
4:17
directly attaching it in this component
4:19
search
4:22
keyword and then here you need to
4:24
specify two items here the item template
4:28
so whatever it item that you select we
4:31
need to put here so you can call this
4:34
anything I'm calling it item template
4:37
and if the item is not found that you're
4:40
searching through so there is a not
4:41
found template as well so here you can
4:44
even configure that as well so you can
4:47
give it a simple message that your item
4:49
is not found so we have these two
4:51
templates now we need to configure it
4:53
this is item template and not found
4:55
template so if you just go downwards
5:01
so right here we will configure you will
5:03
see this input field appearing material
5:06
autocomplete field but the suggestions
5:09
are not coming for now the suggestions
5:11
to come we need to configure these two
5:13
templates you can configure this using
5:15
the NG template
5:21
tab so the first template will be there
5:24
for the suggestions so we will simply
5:27
Target this whatever
5:31
item template that we have given so we
5:33
are directly attaching it by the hash
5:35
symbol so item template and we will look
5:37
through each item that is there in the
5:40
countries array so we will simply have a
5:42
anchor tag and inside your inner
5:46
HTML we will simply render the name of
5:49
the
5:52
item so now what happens if you write
5:55
this you will see all these suggestions
5:56
coming so as soon as I write here you
5:58
will see all these suggestions
6:00
so now if I write something which is not
6:03
available so for this we will configure
6:05
this template which is another
6:09
template and this time this will be for
6:12
the 404 message that your item is
6:14
doesn't there in this so we can simply
6:18
say not found
6:25
template and we can directly have a div
6:28
tag
6:36
we can attach this not found there will
6:39
be this message here if you write this
6:40
you will see not found so so if the item
6:44
doesn't is there not there so as soon as
6:47
you select the item we now to need to
6:48
display that particular item in the
6:50
browser for doing that we can declare a
6:52
variable in the typescript code so that
6:54
we can directly assign which country the
6:58
user has select Ed so for this we can
7:00
declare a variable here of typ
7:05
string so like this so we do have a com
7:08
parameter right here in this
7:11
component we can directly attach it in
7:14
the app. component. HTML file so this is
7:17
actually a call back function so
7:19
whichever country that you select from
7:20
the dropdown you can directly attach a
7:22
custom function select event I will call
7:25
this and this event will be
7:27
automatically be passed right here so
7:29
we're directly attaching this call back
7:31
function so whenever you select a
7:32
country from the dropdown this function
7:34
will execute select event now we come to
7:37
the typescript code and we Define this
7:40
function for defining this function we
7:44
right here we can Define this select
7:48
event and we pass the item which is
7:51
selected and then you can console log
7:54
this
7:55
item so if you check in the console as
7:57
soon as I write here you will see that
8:00
if I select this object will be returned
8:02
to us which contains these two
8:04
properties ID and the name so now we
8:07
need to Simply attach the name variable
8:10
that we have this. name is equal to
8:13
item. name so we directly doing this and
8:16
now come to we need to display this so
8:19
we can directly
8:20
go and render this variable in the
8:24
double quotes double call bracket name
8:28
so if you see now if you select anything
8:32
you will see the country will be
8:34
displayed the selected
8:42
country so in this way guys you can
8:44
integrate the autoc complete material
8:46
design input field inside the the
8:48
angular application using this package
8:50
all the source code is given in the
8:52
description of this video and thank you
8:54
very much for watching this video please
8:56
hit that like but And subscribe to
8:57
channel as well and also check out my
9:00
website as well free mediat tools.com uh
9:03
which contains uh thousands of tools
9:05
regarding audio video and image and I
9:08
will be seeing you guys in the next
9:09
video