Up next in 10

React.js Hooks Project to Embed Material Calendar on Website Using react-beautiful-calendar in JS
Dec 22, 2025
Buy the full source code of application here:
https://procodestore.com/index.php/product/react-js-hooks-project-to-embed-material-calendar-on-website-using-react-beautiful-calendar-in-js/
Show More Show Less View Video Transcript
0:07
Uh hello friends. Today in this tutorial
0:08
I'll be showing you that how to embed a
0:10
very colorful beautiful calendar on the
0:12
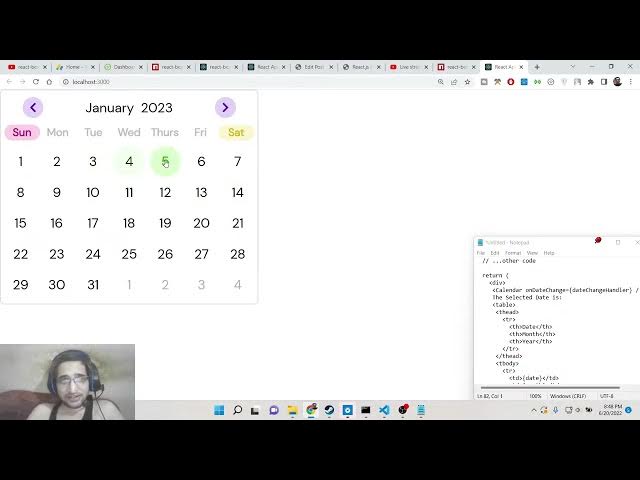
ReactJS project here. So something like
0:15
this. So this is a live demo of the
0:17
project that we will be building in this
0:18
live stream. So you can see that it's a
0:20
material feel like structure uh calendar
0:24
here. So it has got a Google material
0:26
design structure to it and it is also is
0:29
colorful as well. So you can see that
0:31
you can select any sort of date from
0:33
this calendar inside the ReactJS
0:35
application. So we are using a very
0:37
simple dependency which is React
0:39
beautiful calendar to embed this
0:41
calendar inside the website and
0:43
whichever date you select here let's
0:45
suppose I select this date you will be
0:47
seeing that the date is printed out on
0:49
the screen which is 11th July 2008. If
0:53
you change this date, you will see that
0:54
it will get updated instantly. So for
0:57
updation purposes, we are using the
0:59
concept of react hooks. Hooks you have
1:03
know if you know something about
1:05
ReactJS. We will be using the ustate
1:08
hook specifically in this video for uh
1:10
updating purpose and we will be
1:13
embedding this beautiful calendar that
1:15
you can see on your screen. So let's
1:17
start building this application from
1:19
scratch guys. So if you are new to this
1:21
channel, please hit the like button,
1:22
subscribe the channel as well for more
1:24
videos like this. So you will see that
1:26
you can change the year as well. Let's
1:28
suppose you want to change the year
1:29
2007. And you can just see here how you
1:32
can do this.
1:36
This is the previous years. You can see
1:39
that how easy it is to navigate through
1:43
the years panel. This is the month
1:45
panel. You can see you can select
1:47
specific month here like this and the
1:50
date you can just see here you can
1:51
select the date. So this is the calendar
1:54
that we will be embedding inside our
1:56
ReactJS project guys. So all the source
1:58
code regarding this project will be
2:00
there inside video description. I have
2:02
written a complete detailed blog post on
2:04
my website codings.com. So here I have
2:07
given full source code of this tutorial.
2:09
So make sure that you go to this blog
2:11
post and copy all the source code to
2:13
follow along with the video. So if you
2:17
just search for this project guys uh if
2:19
you just search for this dependency what
2:21
is the dependency I'm talking about just
2:23
go to npmgs and here you need to write
2:26
this package which is react beautiful
2:30
calendar. So if you just write this
2:32
library, this is a library that we are
2:35
using here which is a it's a component
2:37
library for uh embedding this calendar
2:40
here. You will see that
2:43
it has got a great documentation as
2:46
well. So make sure that you read it. So
2:48
let's start building this pro project
2:50
from scratch guys. So inside your
2:52
ReactJS project. So make sure that you
2:54
install this by simply going to the
2:57
command line and uh just install react
3:01
beautiful calendar. So with the latest
3:03
version of uh ReactJS you need to write
3:06
this d-force as well just for the
3:09
compatibility issues so that uh it
3:11
doesn't face any sort of problem in
3:13
installing purposes. So just make sure
3:15
that you add this d-force inside your
3:18
command. So after this guys what we need
3:21
to do is that we need to simply import
3:24
our react library at the very top. So we
3:28
need to import the react library from
3:31
the react and then we will start our
3:35
functional component which is simply
3:37
here we will have a simple div which
3:41
will say hello world and then we will
3:43
export this component export default
3:45
app. So this is just a boilerplate
3:48
ReactJS code. So if you want to now
3:50
start this application you can just type
3:53
npm start. So this will start this
3:55
application at port number uh 3000. So
3:59
just wait it is starting this
4:00
application. You will see that now it is
4:03
started that and hello world is printed
4:05
out. So now instead of hello world we
4:07
need to put the calendar. So right here
4:10
we need to import this library. So
4:12
import calendar
4:14
from react beautiful calendar. This is a
4:17
library you can see in the drop-down.
4:19
Simply select this.
4:22
So after this guys we will embed this.
4:25
So it is very simple. If you see here uh
4:30
inside our div
4:33
we will have this calendar.
4:36
Just close this. So now basically you
4:39
will see that without with just this
4:42
line of code here this we are embedded
4:44
this whole calendar here you will see
4:46
that this is a fully functional calendar
4:49
you can select any dates of your choice
4:51
and it's a very colorful calendar as
4:53
well it has got a feel of Google
4:55
material design feel to it you can
4:57
navigate the years panel months panel as
5:01
well you can select any specific date as
5:03
well so after this what you need to do
5:05
is that you need to provide some options
5:08
here. So whenever you select any sort of
5:10
date, so you need to print out the date
5:12
as well. So here for that we are just
5:15
embedding this uh function which we will
5:17
write this function custom function
5:19
which is this call back date change
5:22
handler. So whenever you select let's
5:25
suppose you select this date. So we need
5:27
to define this function. So which will
5:29
display the actual date which is
5:31
selected by the user. So right here if
5:34
you see here
5:36
we need to uh write this function. So
5:40
const date change handler and inside
5:43
this guys this will have a array and
5:46
it's it will contain the actual date
5:48
actual month and actual year which is
5:50
selected by the user. So basically it
5:53
will hold all these three things so that
5:55
you can uh display it on the screen. So
5:58
basically this will be a arrow function.
6:00
And now basically if you just console
6:02
log the date, console log the month
6:06
and console log the year you will get
6:08
all these three things which is selected
6:10
by the user in the browser console. So
6:13
if I select any particular date go to
6:15
the console you will see that the date
6:17
is two month is June which is six and
6:20
the year is 2022. So if I change this to
6:23
2007
6:25
and now select a date you will see that.
6:28
So now we need to display it inside a
6:31
table guys. So what we can do is that uh
6:34
we can make use of hooks which is very
6:37
much useful. So we can use uh use state.
6:40
So we can import this right here and we
6:44
can declare three variables here for the
6:46
date and this is actual function which
6:49
will set the date for us. Set date U
6:52
state the default value will be nothing.
6:54
Similarly, we will do this for the month
6:57
as well. Set month
6:59
U state to nothing.
7:02
And for the year as well, set year and
7:06
the default value will be nothing. So
7:09
right here guys, we need to set this
7:11
using uh set date function. We will pass
7:14
the date and for the year as well. For
7:18
the month we will do it slightly
7:20
different because the month is not
7:22
written in numeric terms. You need to uh
7:25
pass the actual month uh name which is
7:29
January, February, March, April by June.
7:32
So something like that for for this we
7:35
need to compare it in the if condition
7:37
here. So if the month is equal to triple
7:41
equal to 1 in that case we know that the
7:44
month is
7:46
January. So we can say January like
7:49
this. Similarly we can repeat it for 11
7:53
more times.
7:56
4 5 6 7 8 9 10 11.
8:03
So if I select the second month this
8:05
will be February.
8:09
This is the third month. March.
8:14
April.
8:19
This is May.
8:25
This is June.
8:30
This is July.
8:34
August.
8:38
uh September.
8:43
This is October
8:48
and uh
8:53
this is for
8:57
November
9:00
and lastly for December. So 12 12 months
9:03
are there in one year. So now we have
9:06
configured it. So you can see that.
9:10
So now we need to display these things
9:12
on the screen here which is very simple.
9:15
So we will have a simple table table
9:18
tag. Inside this we will have table
9:20
head.
9:24
So we will have these three things which
9:26
is firstly the date
9:31
column. Then we will have the month
9:34
column.
9:38
Lastly, we will have the year column and
9:41
then we will inside table body we will
9:44
display this. So
9:50
firstly we will display the date
9:55
and then we will display the month
10:01
and then we will display the year.
10:04
That's it. So this is now the
10:06
application is complete guys. Now we can
10:08
check it inside the browser. So
10:09
basically if you select any sort of date
10:11
you will see 2 June 2022
10:14
10th June. If I se change the month to
10:17
my you can see 25 my if I change the
10:20
year to 2007 29th May 2007. So this is a
10:24
fully functional calendar guys. It is
10:26
ready now. You can embed it inside your
10:27
ReactJS application with the help of
10:29
this colorful material design calendar.
10:31
So it's a very good dependency. It is
10:33
very underrated dependency. Not many
10:36
developers are using it. So especially
10:38
it's a very new dependency. Make sure
10:40
that you use it inside your application.
10:42
It's a very very good dependency. And uh
10:45
if you like this video then please hit
10:46
the like button guys. Please subscribe
10:48
the channel as well. And I will be
10:50
seeing you in the next video. Until
10:52
then, thank you very